What are the IVDR risk management requirements?
This article reviews unique IVDR risk management requirements for CE Marking of in vitro diagnostic (IVD) devices in Europe.
Last week I posted a blog about “How to create an IVDR checklist.” The article was very popular because we included a form for downloading a free IVDR checklist. That form included the opportunity for people to ask a question about the IVDR. One of the subscribers, a gentleman from New Zealand, entered a very simple comment: “risk management requirements.” My first thought was that the risk management file is the required technical documentation for the IVDR. Then I quickly remembered that in 2012, EN ISO 14971:2012 was released with three new annexes for the three directives: ZA (for the MDD), ZB (for the AIMD), and ZC (for the IVDD). In Annex ZC there were seven deviations, and even though ISO 14971 was updated in 2019, the international standard continues to deviate from the European regulations in significant ways. Therefore, this blog provides an overview of the IVDR risk management requirements.

If you are already compliant with ISO 14971:2019, do you meet the IVDR risk management requirements?
The biggest difference between the ISO 14971:2019 standard and the IVDR risk management requirements is that the standard only requires a benefit-risk analysis to be performed if risks are unacceptable. In contrast, the IVDR requires that a benefit/risk analysis be performed for all risks and the overall residual risk. Therefore, you must include a benefit/risk analysis in your technical file submission regardless of risk acceptability. The harmonized version of the standard (i.e. EN ISO 14971:2019/A:11:2021) was released in December of 2021. If you already purchased ISO 14971:2019, you only need to purchase the amendment which consists of Annex ZA (comparison between the standard and Annex I of MDR) and ZB (comparison between the standard and Annex I of the IVDR).
In the amendment, it states that manufacturers must have a risk management policy that is compliant with Annex I of the EU regulation. There are notes at the beginning of each harmonization annex that indicates that the risk management process needs to be compliant with the IVDR, which means risks have to be ‘reduced as far as possible’, ‘reduced to a level as low as reasonably practicable’, ‘reduced to the lowest possible level’, ‘reduced as far as possible and appropriate’, ‘removed or reduced as far as possible’, ‘eliminated or reduced as far as possible’, ‘prevented’ or ‘minimized’, according to the wording of the corresponding section in Annex I of the IVDR. The comparison table has a column with remarks/notes. In most cases, the deficiency identified states, “Device-specific execution of the process is not covered.” There are also two remarks/notes that state “Device-specific and usability-specific execution of the process is not covered.”
Where are the IVDR risk management requirements?

IVDR risk management requirements are found in Annex II, Section 5 of the IVDR. However, there are 228 references to the word risk throughout the IVDR. The following risk-related requirements in IVDR are particularly important:
- Article 10, Sections 2 & 8(e) – risk management procedure requirement
- Annex I, Section 3 – reiteration of risk management procedure requirement, but specific steps in the risk management process are identified (e.g. a risk management plan, hazard identification, estimation of risks, evaluation of risks, etc.)
- Annex I, Section 4 – Priority of risk control measures
- Annex I, Section 5 – Elimination or reduction of use-related risks
- Annex III, Section 1(b) – Reassessment of the benefit-risk analysis and risk management using post-market surveillance data
How should you document your risk management file for the IVDR?
In your risk management file of course. There is no format requirement for risk management files, but there are requirements for the content and there is a GHTF guidance document for risk management, and ISO/TR 24971:2020 is a new guidance document on the application of ISO 14971 to medical devices. Neither of these guidance documents is specific to IVDR risk management requirements. Annex H of ISO/TR 24971:2020, however, provides guidance specific to IVD devices.
What do the IVDR risk management requirements include for risk analysis?
In our March 23, 2022 blog posting, I described four types of risk analysis:
- Design risk analysis
- Process risk analysis
- Software hazard analysis
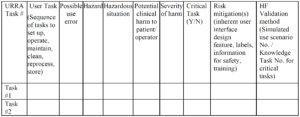
- User-related risk analysis (URRA)
Of these four types of risk analysis, only the software hazard analysis is sometimes not applicable. For an FDA 510(k) submission, you would need to provide software hazard analysis and URRA in the actual submission. The other two types of risk analysis would only be included in your design history file (DHF), and the FDA would review the design and process risk analysis during a routine inspection when the DHF is sampled as part of the design control process.
In contrast, the IVDR requires that a complete risk management file be submitted as part of the technical file (see Annex II, Section 5):
“Benefit-risk analysis and risk management
The documentation shall contain information on:
-
- the benefit-risk analysis referred to in Sections 1 and 8 of Annex I, and
-
- the solution adopted and the results of the risk management referred to in Section 3 of Annex I.”
The above documentation typically consists of design risk analysis and does not typically include process risk analysis, software hazard analysis, or use-related risk analysis. These other three risk analysis documents are IVDR risk management requirements, but they are referenced by the technical file in other sections. The most obvious IVDR risk management requirements are referenced in Annex I, Sections 1-9. These are referred to as the General Safety and Performance Requirements (GSPRs), and this requirement is typically met by including a GSPR checklist in the technical file to meet the requirement of Annex II, Section 4.
The process risk analysis is typically included with manufacturing information to meet the requirement of Annex II, Section 3.2. This documentation may include, any and all of the following elements:
- a process failure mode and effects analysis (pFMEA)
- a risk control plan including all processes from receiving inspection to final inspection and product release
- a process validation plan that is risk-based and linked to the risk control plan
The best practice for estimation of process risks is to link the probability of occurrence and probability of detection to the quantitative data gathered during process validation. In addition, you may establish a risk management policy that prescribes specific types of process risk controls (e.g. automated inspection) for the highest risk processes where manufacturing process errors are not acceptable residual risks. For example, an inspection of printed circuit board assemblies (PCBAs) typically requires automated optical inspection (AOI) methods, because visual inspection is not sufficient by itself and not all PCBAs allow sufficient ICT coverage, and functional testing is limited.
The software hazard analysis, if applicable, is typically performed in accordance with IEC/TR 80002-1:2009, Guidance on the application of ISO 14971 to medical device software. In the software hazard analysis, it is unnecessary to estimate the probability of occurrence of harm. Instead, it is only necessary to identify hazards and estimate harm. Examples of these hazards include loss of communication, mix-up of data, loss of data, etc. Software failures are systemic in nature and the probability of occurrence cannot be determined using traditional statistical methods. Therefore, we recommend that you assume that the failure will occur and estimate software risks based on the severity of the hazard resulting from the failure. For these reasons, it is recommended that software hazard analysis documentation is maintained as a separate document from your design risk analysis. The software hazard analysis documentation should be referenced in your risk management report, but the software hazard analysis should be included as part of your software verification and validation. The IVDR requires that you include a summary of software verification and validation in Annex II, Section 6.4 rather than the complete hazard analysis document.
A use-related risk analysis should be part of your useability engineering file for IVD devices as required by EN 62366-1:2015. Use-related risks are mentioned in Annex I, Section 5:
“In eliminating or reducing risks related to use error, the manufacturer shall:
-
- reduce as far as possible the risks related to ergonomic features of the device and the environment in which the device is intended to be used (design for patient safety), and
-
- Give consideration to the technical knowledge, experience, education, training and use environment, where applicable, and the medical and physical conditions of intended users (design for lay, and professional, disabled or other users).”
The above requirement includes not only the ability to read and interpret test results of IVD devices but also the ability of laypersons to properly self-select if an IVD is intended to be sold as an over-the-counter product. Usability also is mentioned in Article 78, Section 3(f):
“for the identification of options to improve the usability, performance and safety of the device;”
Therefore, there should be specific elements of your post-market surveillance plan that are designed to gather feedback on the usability of your IVD device.
When should risk management activities be performed for IVD devices?
The IVDR does not specifically define when in the design and development process the various risk management activities shall be performed. However, the required risk management activities are specified in the IVDR within Annex I. ISO 14971:2019, however, is more descriptive of the risk management activities and the risk management process. Therefore, your risk management plan should align with the process defined in ISO 14971:2019, Clause 4.1.
Unfortunately, most companies do not include risk management as an integral part of the design and development process. Instead, risk management documentation is created retroactively as part of the documentation preparation for technical file submission. For this reason, most medical device executives fail to see the benefit associated with the risk management process. Even biomedical engineers struggle to appreciate the necessity of following the process outlined in the risk management standard in order to prevent device malfunctions and use errors.
The following is a list of the required risk management activities in the order that they should be occurring. Each activity also references the applicable clause of ISO 14971:2019. We have also grouped the activities into the five phases of design and development:
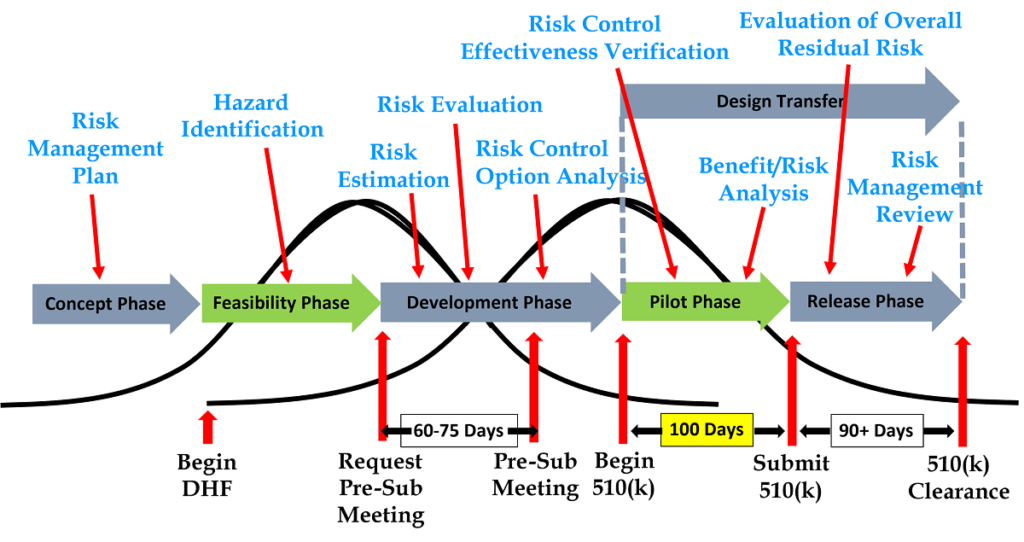
Design Planning
-
- Risk management planning (Clause 4.4)
Design Inputs
-
- Identification of hazards and hazardous situations (Clause 5.4)
Design & Development
-
- Risk estimation (Clause 5.5)
- Risk evaluation (Clause 6)
- Risk control option analysis (Clause 7.1)
- Implementation of risk control measures (Clause 7.2)
- Residual risk evaluation (Clause 7.3)
Design Verification and Validation
-
- Benefit/risk analysis (Clause 7.4)
- Risk control effectiveness verification (Clause 7.6)
Design Release
-
- Evaluation of overall residual risk (Clause 8)
- Risk management review (Clause 9)
If your company is preparing a 510(k), the company may be able to submit the 510(k) immediately after completion of risk control effectiveness verification. You may also be able to postpone the benefit/risk analysis until you submit your IVD technical file for CE Marking approval. The benefit/risk analysis is not required by ISO 14971 unless the risks are unacceptable, and the FDA does not require a benefit/risk analysis except for novel devices seeking market authorization through a De Novo Classification Request or a Pre-Market Approval (PMA). The FDA also does not require the submission of the complete risk management file.
IVDR risk management requirements are quite different than the US FDA requirements for risk management. An IVD technical file must include a risk management summary report that summarizes all activities that were performed according to the risk management plan. A benefit/risk analysis is required for each risk and the overall risk. The Notified Body auditor is also expected to sample the complete risk management file during quality system audits. Finally, the IVDR includes a requirement for a post-market surveillance plan that includes the collection of production and post-production data as feedback on the risk management process and a post-market clinical performance follow-up (PMPF) plan.
What production and post-production information should you be collecting for IVD devices?
Medical device manufacturers struggle to see the benefits of requiring a post-market surveillance system, and smaller companies, in particular, complain that the cost of the new European post-market surveillance requirements is excessive and prohibits innovation. However, the primary role of post-market surveillance is to ensure rapid initiation of containment and corrective actions for devices that malfunction and/or present unacceptable risks to the intended users and intended patient population. The purpose of generating the post-market surveillance data is defined in the IVDR within Article 78, Section 3.
The minimum requirements for post-market surveillance are defined in Annex III, Section 1(a):
- Information concerning serious incidents, including information from PSURs, and field safety corrective actions;
- records referring to non-serious incidents and data on any undesirable side-effects;
- information from trend reporting;
- relevant specialist or technical literature, databases and/or registers;
- information, including feedback and complaints, provided by users, distributors, and importers; and
- publicly-available information about similar medical devices.
The IVDR is not prescriptive regarding what production data shall be collected for post-market surveillance, but the reason for this is that there are many different types of manufacturing processes with different process risks. In addition, the IVDR includes software as a medical device where there is no manufacturing process at all. Therefore, the best approach for determining what production data to collect is the review your process risk analysis (e.g. pFMEA). The process risk analysis for each manufacturing process should allow you to identify the manufacturing process steps that have the greatest residual risks (e.g. risk priority number or RPN) and potentially the highest severity of the effect. The risks should be identified as a priority for post-market surveillance. You should also include process parameter monitoring data for any validated processes (e.g. sterilization time, temperature, and pressure). Finally, you should also monitor rejects at incoming inspection, in-process inspection, and final inspection operations.
Other IVD Risk Management Resources
The following resources may be helpful for creating and maintaining your IVD risk management file:
- EN ISO 14971:2019 + A11:2021
- ISO/TR 24971:2020
- GHTF/SG3/N15R8
- Regulation (EU) 2017/746 (i.e. IVDR)
- IEC/TR 80002-1:2009
- EN 62366-1:2015 + A1:2020
Note: Whenever possible, hyperlinks to the Estonian Centre for Standardization and Accreditation (EVS) are provided for procedures, because we find that this source is frequently the least expensive, and digital versions are available on-demand as a multi-user license.
What are the IVDR risk management requirements? Read More »