Audit Report Writing Quiz
29. Audit Report Writing Quiz
This is a pop quiz for the Audit Report Writing lesson.
Audit Report Writing Quiz Read More »
This is a pop quiz for the Audit Report Writing lesson.
Audit Report Writing Quiz Read More »
Can internal auditing be used as a tool specifically designed for conducting a labeling complaint investigation?
A complaint investigation is required when a customer “alleges deficiencies related to the identity, quality, durability, reliability, safety, effectiveness, or performance of a device after it is released for distribution (21 CFR 820.3b).” In the case of a “labeling complaint,” the customer is alleging that there is a deficiency with the label content, the physical label material itself, or both. In the fictional Halloween story I read about the “Label Monster,” there were five different deficiencies identified in a single unit. The customer refused to accept the entire lot and returned it to the contract manufacturer. “Natalie,” the internal auditor and consultant, was responsible for helping the quality manager (i.e., “Lorelei”) and the operations manager (i.e., “Valerie”) identify the root cause for each of the five label deficiencies. The investigation process involved: 1) interviewing personnel; 2) observing the process, equipment, and environment; and 3) inspecting the returned product.

Routine internal audits are scheduled as part of your annual internal audit schedule. You are the audit program manager, and usually you review your draft annual internal audit schedule with the other members of top management during management review meetings. Since a labeling complaint is not something you can plan or schedule, you would have to amend your internal audit schedule to add a special, “for cause” internal audit of the labeling process to perform a labeling complaint investigation as part of an internal audit. Internal audit scheduling also involves assignment of the lead auditor and team members (if applicable). In the case of labeling at the Red Rum Company, the quality manager was also the audit program manager and responsible for review and approval of the label change control process, inspection of labels prior to use, and final release of each lot. Therefore, an independent lead auditor from outside the company is needed (e.g., a Medical Device Academy auditor).
In addition to differences in the planning of the internal audit, a labeling complaint investigation also reduces the effectiveness of certain parts of the process approach to auditing. Specifically, “Natalie” said, “Reviewing procedures seems like a waste of time.” She was right. Whether the labeling procedure is adequate or not, it is important to evaluate how the process was performed–regardless of what the procedure instructs personnel to do or how well people are trained. Changing procedures and improving training could be a potential corrective action, but correcting procedures and training will not correct the deficiencies observed. We also assumed that the work order content matched the customer purchase order requirements–otherwise the label content would have matched the work order content (i.e., lot numbers should match). Therefore, internal audits performed as part of a complaint investigation should focus on the following elements of the process approach to auditing:
Why didn’t a pFMEA and process validation prevent the labeling errors in our story from happening?
In response to our live-streaming video that was published on Halloween, we received a comment with two questions (copied below).

The story I read was fictional, but in the scenario I was imagining, I envisioned a manufacturing facility that was running extremely well on the two first shift production lines, but nonconformities occurred when production started on second shift for a new product. I envisioned a team consisting of the quality manager (i.e., “Lorelei), operations manager (i.e., “Valerie”), and a possibly a manufacturing engineer and/or quality engineer working together to proactively review the new production line for any potential problems. They started with their pFMEA for the slower first-shift production lines, and modified that pFMEA for the new production line. Unfortunately, the cycle time of the second-shift production line outpaced the capacity of a single labeling machine. Therefore, the team would have three options for addressing this challenge:
All three of the above options are viable, but I imagine most teams would choose the third option. Unfortunately, if your process risk analysis for labeling process controls is designed for an on-demand labeling process, you could easily underestimate the potential complexities of batch building. Even if you evaluate the proposed process controls by conducting a pilot run, production would need to exceed the cycle time of the printers to expose the potential hazardous situation.
The second question that was asked in the YouTube comment would not be relevant, because most of the labeling change control process and the labeling process itself are manual (i.e., no process validation is required, because product is 100% verified). You would still validate that the printer correctly prints the label template in your labeling software, but process validation would not be performed for the manual creation of a label template, manual review of the new label, or manual printing and application of batch-printed labels. Usually, labeling process controls for batch printing of labels focus on initial verification of the label content, verifying the number of labels printed, and reconciling the number of labels printed with the number of labels used. Verification of label content was performed, but only for one label printer–not two printers. There were no problems associated with the number of labels printed or the reconciliation of labels printed with the number used.
In last week’s live-streaming video, we mentioned that an IS/IS NOT analysis would be used as one of the techniques for the labeling complaint investigation. This refers to the process of comparing the areas where a problem is found and where a problem is not found. Problems were not found on product made during the first-shift production, but problems were found on product made during the second-shift production. Additionally, finding problems with half of the product labeling is also critical to identifying the root cause of a failure. Therefore, this tool is extremely valuable when performing a complaint investigation.
A Fish Bone Diagram is another popular root cause analysis tool, because it is a six-part systematic method for identifying a root cause when you don’t know what the cause is. Other names for this tool include: Ishikawa Diagram and Cause and Effect Diagram. The six parts of the method are sometimes called the 6M’s, because you can select words that begin in the letter “M”:
The story read in our live-streaming video was fictional. You rarely have returned product to investigate, you rarely have a supportive team that helps you identify a root cause, and the process rarely as obvious as the story implies. The key to success is hard work and a rigorous investigation that might take more than a week. Rob Packard should not have agreed to a penalty if the CAPA plan was written by the end of the day.
Labeling complaint investigation tool – Internal auditing Read More »
An auditor quit, and you need some audit scheduling options to complete your audit schedule by the end of the year. Sound familiar?
It’s October 14, and there are 78 days left in 2025. You have four supplier audits and three internal audits to complete. Unfortunately, one of the lead auditors on your team just resigned. It will probably take a couple of months to fill the position. Top management wants to know how you are going to complete the audit schedule on time. Before you panic, ask yourself one question: “What will happen if you don’t finish your audit schedule by December 31?”

Most companies fear receiving an FDA 483 inspection observation or a nonconformity from a third-party auditor because they did not complete their audit schedule as planned. This might happen, but what are the consequences? During opening and closing meetings, we remind clients that there is only one possible outcome of any audit:

Opening a CAPA takes time and resources, but top management should never make the situation worse by reprimanding (or firing) someone because of an audit finding. If an employee is not doing their job, the quality system’s monitoring and measurement should identify the problem before the audit. Disciplinary action is not a corrective action. Top Management is responsible for providing the resources to maintain the effectiveness of the quality system. Regardless of why the audit schedule was not completed, the quality system needs to be robust enough to withstand the resignation of a single employee. Top management needs to temporarily reassign the former employee’s responsibilities to other employees and/or seek outside help. It may even be necessary to reschedule some activities, such as audits. Top management needs alternatives, including audit scheduling options, so they can create a transition plan while a replacement is recruited or promoted from within. That transition plan also needs to be documented.
Not all audits are equally important. If you have seven audits (i.e., two second-party and three first-party audits) left to complete, first evaluate the importance of each audit and assess the risks of delaying any of them. Any routine audits can be rescheduled. Just update your audit schedule to reflect new dates for the routine audits. Non-routine audits include: 1) supplier qualification, 2) investigation of supplier nonconformities, 3) CAPA effectiveness checks, and 4) investigation of internal processes with quality problems. If your incomplete scheduled audits were non-routine, they should be prioritized. Below is a list of audit scheduling options to consider:
There are some fantastic cartoons and jokes about doing more with less, but if you intend to complete seven audits before the end of the year, you might need some help.
Seventy-eight days might not be enough time to train a new auditor and complete all seven audits, but you can complete lead auditor training, and the newly trained auditor can help. If you are assigning a new auditor to conduct an audit, we recommend assigning them to conduct virtual audits via teleconference recordings (e.g., Zoom). These audits could be supplier audits or internal audits. This would allow an experienced lead auditor to review the recordings after the audit is completed. If the experienced auditor identifies any gaps or audit trails that should have been pursued, they can review the recordings with the auditor-in-training to identify follow-up actions if needed and to help them learn from their mistakes before their next audit. Historically, new lead auditors required a “shadow” to observe them during training. Today, we can use virtual auditing, and the observer’s feedback is actually better.
As we mentioned above, you can train new lead auditors. However, if you have one or more auditors who are qualified as lead auditors, you can schedule team audits instead. It takes less time to train an audit team member than it does to train a lead auditor. In a team audit, the audit can be completed more quickly. A team audit is an excellent solution for internal audits, because supplier audits usually require a single auditor. Adding a second auditor to a supplier audit would not save significant time, because travel to the supplier is still required. For an internal audit, the audit duration can be reduced from 3 or 4 days to 1.5 or 2 days. It is also possible to conduct partial internal audits that take less than a day.
The last quarter of the year is historically hectic for everyone — especially quality assurance auditors. Therefore, we try to avoid scheduling audits near the end of the year. It’s much easier to schedule audits in the first quarter of the year (i.e., January – March). Another audit scheduling option is to create an 18-month schedule rather than a 12-month one. As stated in the YouTube video embedded above, an 18-month audit schedule ensures that several months are remaining in your audit schedule at any time.
If you were only planning on-site supplier audits, considering remote supplier audits expands your audit scheduling options. Remote audits are always permitted for first- and second-party audits, but they are most effective when on-site audits of the supplier have been conducted previously. However, a remote audit is not the same as asking a supplier to complete a survey. ISO 19011:2018 provides guidance on remote auditing in the annexes. For a remote audit, you should still sample the same number of records—if not more. You should conduct interviews by phone, Zoom, or some similar technology. You should analyze any available data to help identify which processes appear to be effective and which need improvement. Suppose you are performing a remote audit for the first time. In that case, I recommend focusing on the same processes you would not generally audit in a conference room, rather than on those you would typically audit where they occur—such as production controls. Regardless of which method you use, you should always request data.
In parallel with your efforts to catch up on your audit schedule, top management should consider implementing a process metric for “on-time delivery” of audits and audit reports. This is an effective metric for managing an audit program, and it is especially important to monitor it when you have turnover among trained lead auditors. If any auditor or audit report is delivered late, investigate the reasons for the audit being overdue. If the occurrence was preventable, then I recommend initiating additional countermeasures to improve the audit process. This might include opening a CAPA. This will have two effects. First, your third-party auditors will see that you have identified the problem and taken appropriate corrective action(s). If you also discuss this during a Management Review, this information can be used effectively to change the grading of an audit finding to a “minor” or to potentially eliminate the finding altogether. Second, it will ensure that this doesn’t occur again.
Audit Scheduling Options: Are you running out of time? Read More »
This article explains how to prepare a regulatory pathway analysis and an investor pitch deck for a MedTech startup.

This article uses two case study examples to explain how to determine the correct regulatory pathway for your medical device through the US FDA. One of the case study examples is bipolar forceps for use with an electrosurgical generator. A picture of the forceps is provided above. The second case study example is resin for repairing dentures. Rather than providing the second example in detail, we provided the information as we would summarize it in an investor pitch deck. You can also download the pitch deck template at the end of the article.
Every consultant likes to answer this type of question with the answer, “It depends.” Well, of course, it depends. If there were only one answer, you could Google that question, and you wouldn’t need to pay a regulatory consultant to answer the question. A more helpful response is to start by asking five qualifying questions:
The first question is important because some products are not regulated as medical devices. If your product does not diagnose, treat, or monitor a medical condition, it may not be considered a device. For example, the product might be considered a general wellness product or clinical decision support software. In addition, some products have a systemic mode of action, and these products are typically categorized as a drug rather than a device–even if the product includes a needle and syringe.
The intended purpose of a product is the primary method used by the US FDA to determine how a product is regulated. This also determines which group within the FDA is responsible for reviewing your product’s submission. The US regulations use the term “intended use” of a device, but the decision is based upon the “indications for use,” which are more specific. To understand the difference, we created a video that explains it.
Even regulatory consultants sometimes forget to ask how many people need your product annually, but population size determines the regulatory pathway. Any patient population of less than 8,000 patients annually in the USA is eligible for a humanitarian device exemption, which offers a special regulatory pathway and pricing constraints. If your product is intended for a population of <8,000 people annually, your device could qualify for a humanitarian device exemption, and the market is small enough that there may not be any similar products on the market.
If similar products are already on the US market, determining the regulatory pathway is much easier. We can look up the competitor product(s) in the FDA’s registration and listing database. In most cases, you must follow the same pathway your competitors took, and the FDA database will tell us your regulatory pathway.
If all the products on the US market have different indications for use, or the technological characteristics of your product differ from those of other devices, then you need to categorize the risks associated with your product. For low-risk devices, general controls may be adequate. For medium-risk devices, the FDA requires special controls. For the highest-risk devices, the FDA typically requires a clinical study, a panel review of your clinical data, and pre-market approval (PMA).
The generic term used for regulator authorization is “approval,” but the US FDA reserves this term for Class 3 devices with a Premarket Approval (PMA) submission. The reason for this is that only these submissions include a panel review of clinical data to support the safety and effectiveness of the device. Approval is limited to ~30 devices each year, and approximately 1,000 devices have been approved through the PMA process since 1976, when the US FDA first began regulating medical devices.
Most Class 2 devices are submitted to the FDA as Premarket Notifications or 510k submissions. This process is referred to as “510k clearance,” because clinical data is usually not required with this submission, and there is no panel review of safety and effectiveness data. A 510 (k) was originally planned as a rare pathway that would only be used by devices that are copies of other devices already sold on the market. However, the 510 (k) pathway became the de facto regulatory pathway for 95% or more of devices sold in the USA.
For moderate and high-risk devices that are intended for rare patient populations (i.e., <8,000 patients per year in the USA), the humanitarian device exemption process is the regulatory pathway.
Class 1 devices typically do not require a 510k submission; most of these devices are exempt from design controls, and some are exempt from quality system requirements. These devices still require listing on the FDA registration and listing database; however, there is no FDA review to ensure that you have correctly classified and labeled Class 1 devices.
As stated above, one of the most critical questions is, “Is there a similar product already on the market?” For our example of bipolar forceps, the answer is “yes.” There are approximately 169 bipolar forceps that have been 510k cleared by the FDA since 1976. If you are developing new bipolar forceps, you must prepare a 510k submission. The first step of this process is to verify that a 510k submission is the correct pathway and to find a suitable competitor product to use as a “predicate” device. A predicate device is a device that meets each of the following criteria:
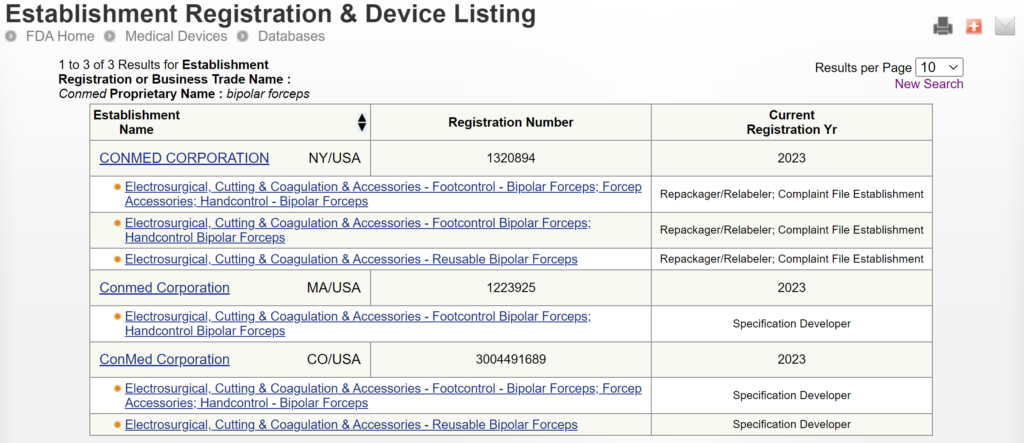
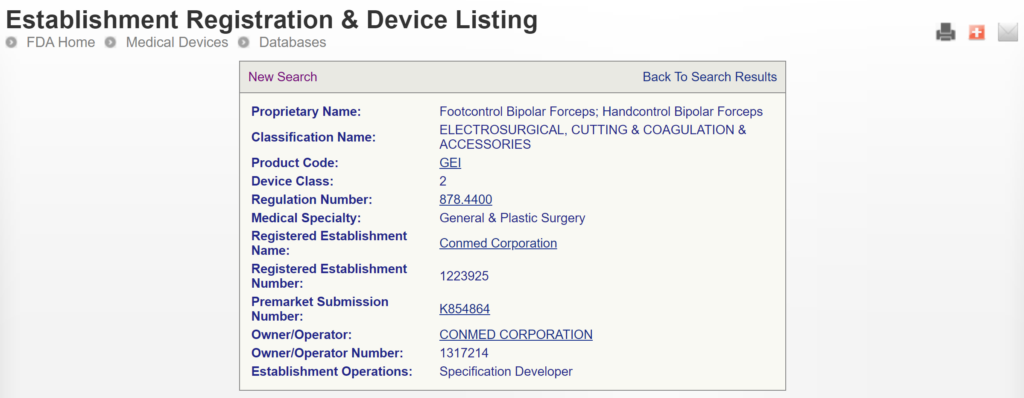
There are two search strategies we use to verify the product classification of a new device and to find a suitable predicate device. The first strategy is to use the free, public databases provided by the FDA. Ideally, you instantly think of a direct competitor that sells bipolar forceps for electrosurgery in the USA (e.g., Conmed bipolar forceps). You can use the registration and listing database to find a suitable predicate in this situation. First, you type “Conmed” into the database search tool for the name of the company, and then you type “bipolar forceps” in the data search tool for the name of the device.
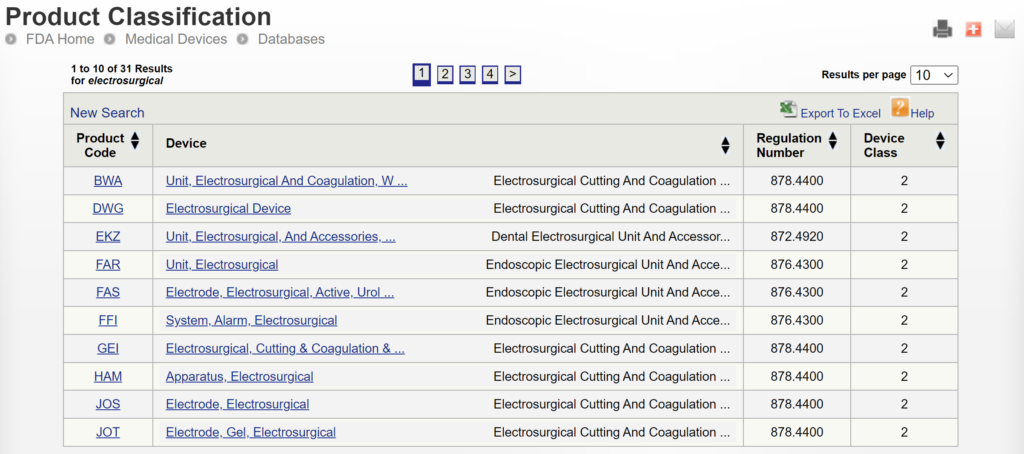
If you are unaware of any competitor products, you will need to search using the product classification database instead. Unfortunately, this approach will result in no results if you use the terms “bipolar” or “forceps.” Therefore, you will need to be more creative and use the word “electrosurgical,” which describes a broader product classification that encompasses both monopolar and bipolar surgical devices, which come in various sizes and shapes, including bipolar forceps. The correct product classification is seventh out of 31 search results.
The most significant disadvantage of the FDA databases is that they can only be searched separately. The search is also a Boolean-type search rather than using natural language algorithms that we all take for granted. The second strategy is to use a licensed database (e.g., Basil Systems).
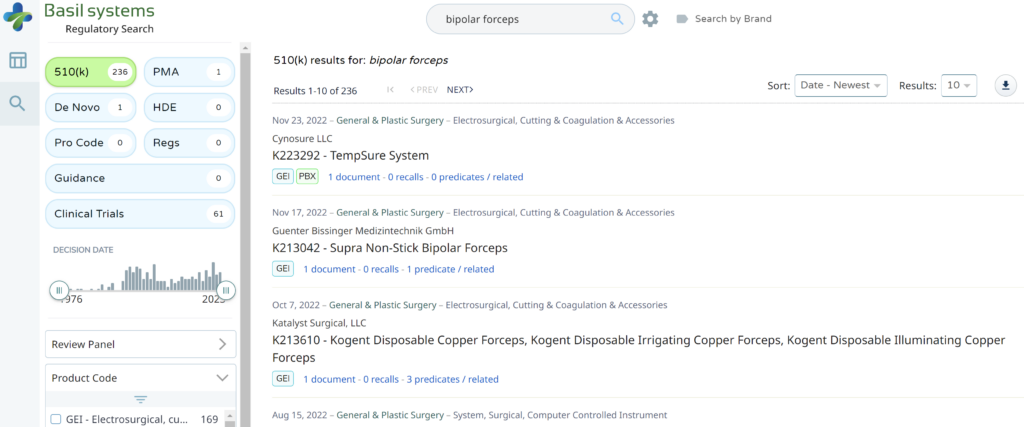
Searching these databases is more efficient, and the software will provide additional information that the FDA website does not offer, such as a predicate tree, review time, and models listed under each 510k number are provided below:
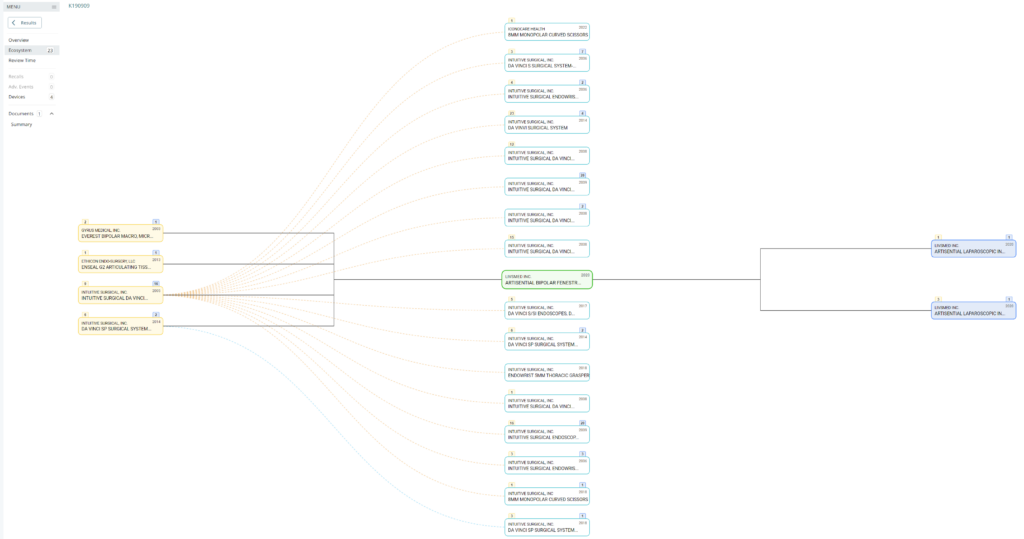
What does the predicate tree look like for the predicate device you selected?

A pitch deck is brief. You want to generate interest and encourage questions from the audience. If the audience specifies a time limit, practice your pitch until you can “hit the post.” For Project MedTech, the target is a 6-minute pitch. Replace the image with your own and be creative with your image cropping. Replace our logo with your own. Replace “Medical Device Academy, Inc.” with your company name. Replace “MedTech Pitch Deck” with the name of the group or person you are pitching.
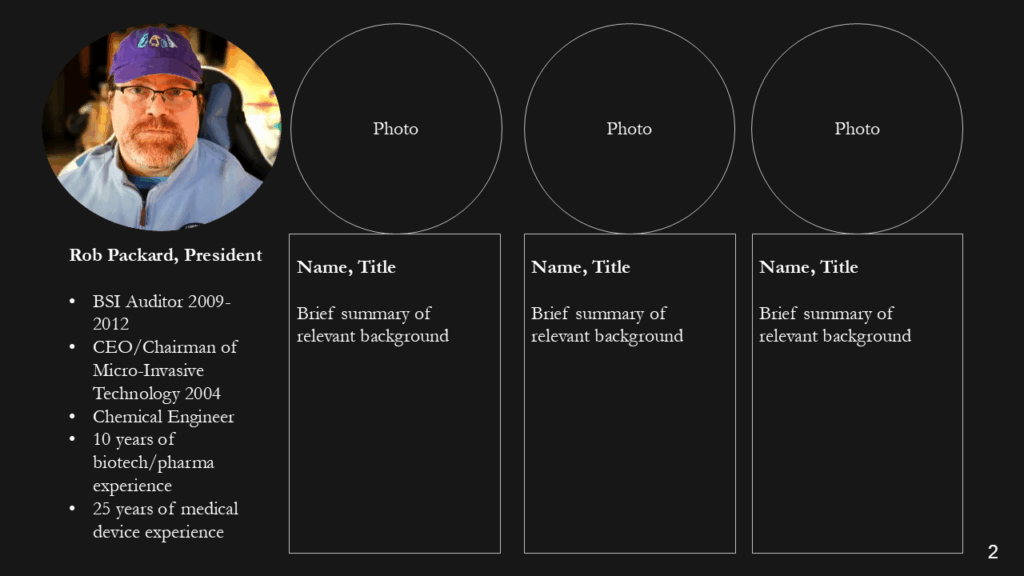
No need to label every slide. It should be obvious that this is your management team. Remember to focus on the relevant background, rather than everything. It’s just a brief summary, and this might be an opportunity to use the morph transition function to zoom in on each photo, name, and title as you say something NOT IN THE SLIDE about each of the people on the team. Consider a little self-deprecating humor (i.e., how each of them compensates for your weaknesses). The presenter does not need to talk about themselves because the quality of the pitch speaks volumes.
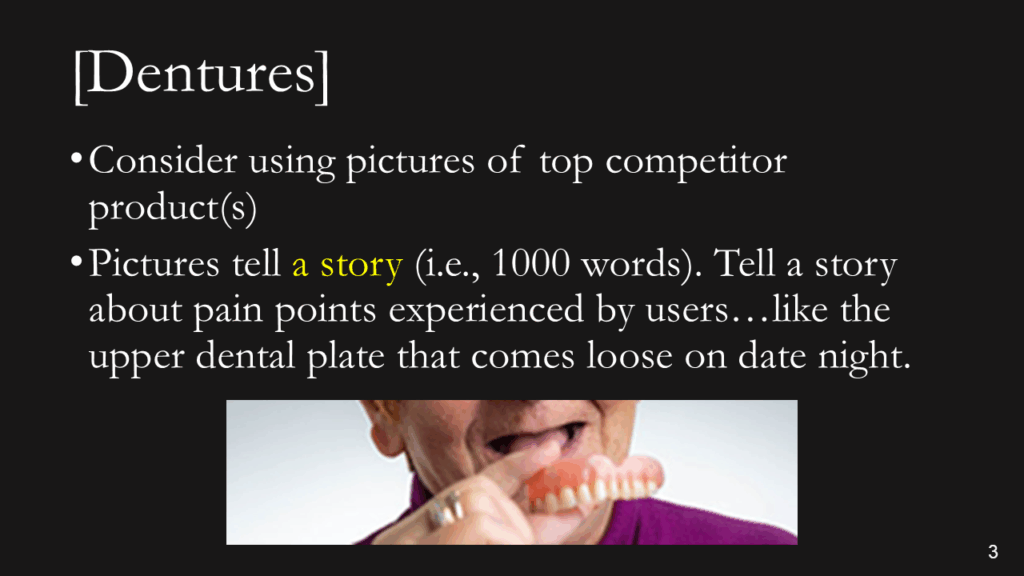
In general, use very few words. The focus of the presentation should be on the presenter, not reading the slides. After all, you submit a slide deck, but you want the opportunity to pitch investors. Black backgrounds with a few high contrast words is easy to read and won’t detract from the you—the presenter. In this slide, “a story” is highlighted to emphasize an important point and to show you how a dash of yellow draws attention to what’s important. “[Dentures]” should be replaced by the common name for your type of device. Don’t make potential investors think too hard. Your selection of pictures will help demonstrate that you know who your competitors are (i.e., competitive analysis). “We have no competition” is a mistake, because that means the market doesn’t exist yet, or it is too small to attract any competitors.
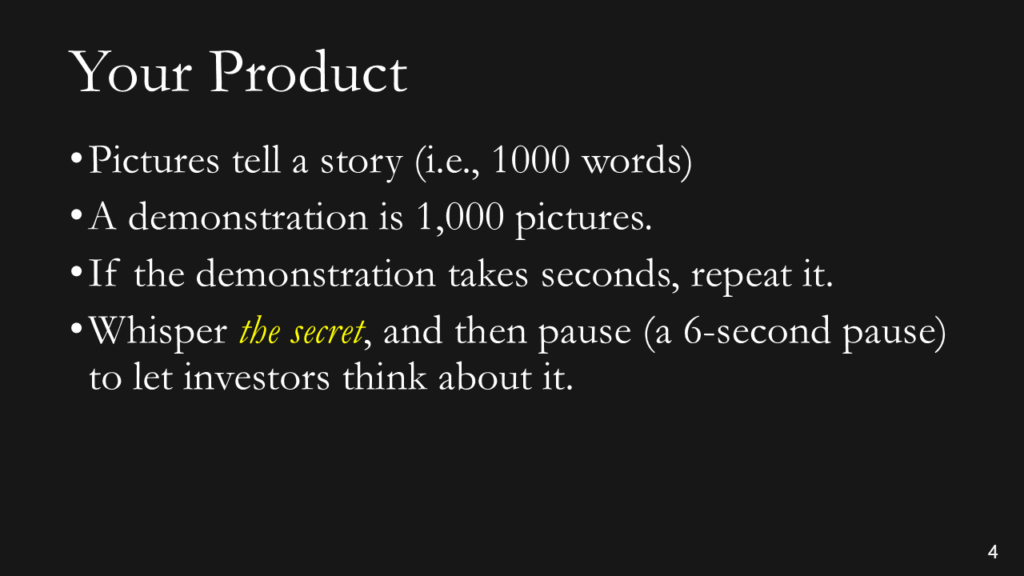
The ideal picture will immediately explain what makes your device unique and show investors what problem(s) you solved. If you can demonstrate this quickly in a presentation or video, do it. Vocal variety can also be used very effectively here by quietly telling the audience how your product is unique (i.e., it’s a secret). Concluding that secret with a silent 6-second pause is LOUDER than yelling. For example, you could whisper: “Our dentures won’t fall out.”
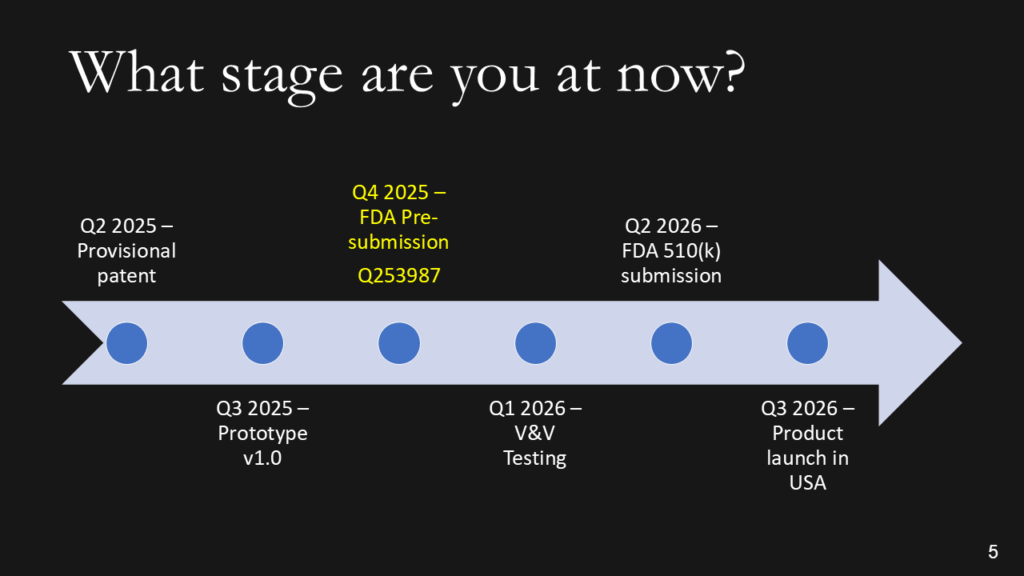
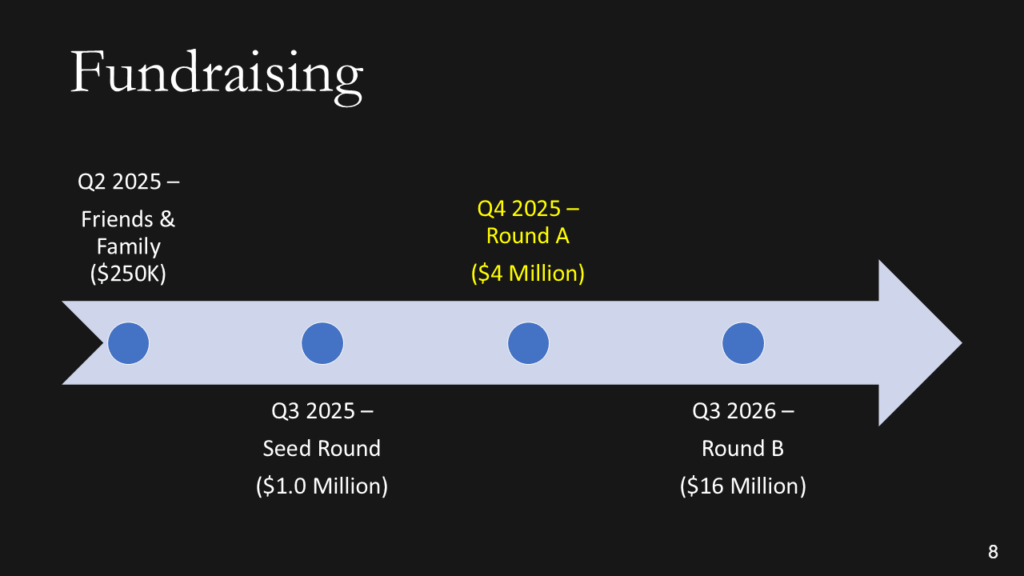
We don’t want the history of the universe. We need to know where you are, when you plan to submit to the FDA, and when you expect to start generating revenue. Adding the date of a patent or provisional patent with the document # is a clever way to say that you have a patent without wasting time with the words. The addition of the Q-sub number adds credibility. If you are conducting clinical studies, it is essential to note the cost of these studies, as they can be significant. If you are prepared to identify reimbursement milestones, add them. Resist building this out to two slides if you are a start-up. You should have revenues already if you need two slides.
After providing a timeline with regulatory milestones, investors will expect you to explain the regulatory pathway of your device.
The best strategy for obtaining 510k clearance is to select a predicate device with the same indications for use that you want and was recently cleared by the FDA. Therefore, you will need to review FDA Form 3881 for each of the potential predicate devices you find for your device. In the case of the bipolar forceps, there are 169 devices to choose from; however, FDA Form 3881 is not available for 100% of those devices, as the FDA database only displays FDA Form 3881 and the 510(k) Summary for devices cleared since 1996. Therefore, you should select a device cleared by the FDA within the past ten years, unless there are no equivalent devices with recent clearance.
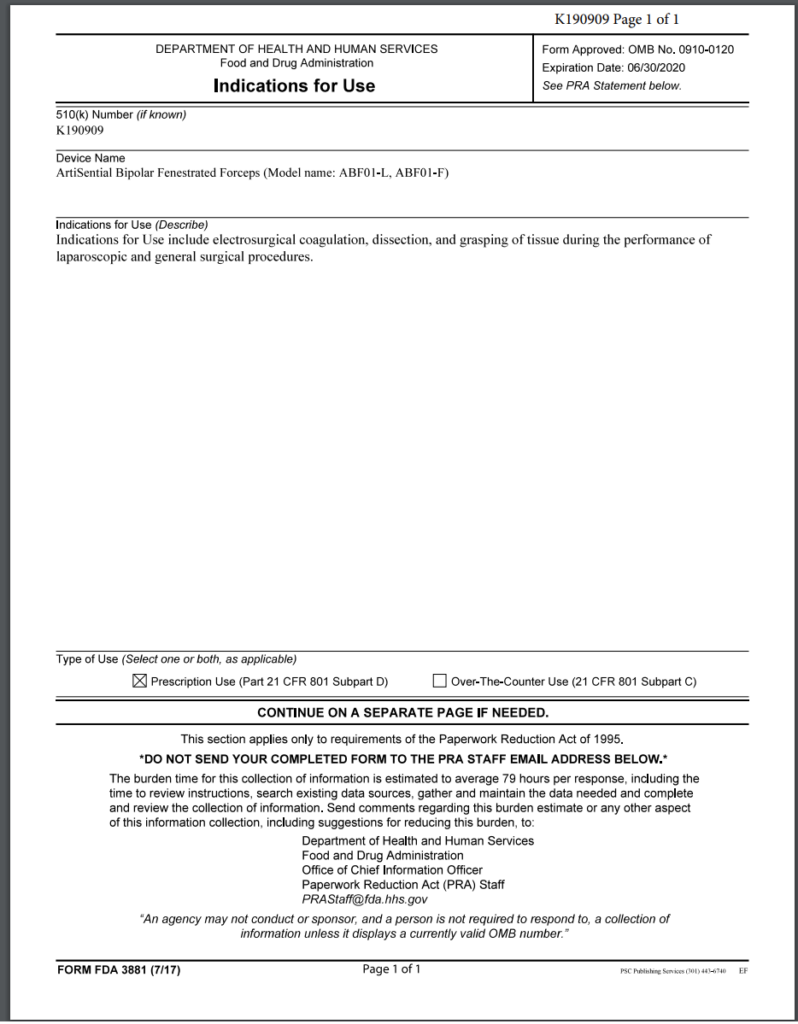
Note: The FDA no longer uses FDA Form 3881 in the FDA PreSTAR or eSTAR, but a similar section exists in both submission templates.
In addition to identifying the correct product classification code for your device and selecting a predicate device, you will also need to develop a testing plan for verifying and validating your device. For electrosurgical devices, there is an FDA special controls guidance that defines the testing requirements and the content required for a 510k submission. Once you have developed a testing plan, confirm that the FDA agrees with your regulatory strategy and testing plan in a pre-submission meeting.
There are three types of 510k submissions:
The special 510k pathway is intended for minor device modifications from the predicate device. However, this pathway is only eligible to your company if your company also submitted the predicate device. Originally, it was only permitted to submit a Special 510k for modifications that required the review of one functional area. However, the FDA recently completed a pilot study evaluating if more than one functional area could be reviewed. The FDA determined that up to three functional areas could be reviewed. However, the FDA determines whether they can complete the review within 30 days or if you need to convert your Special 510k submission to a Traditional submission. Therefore, you should also discuss the submission type with the FDA in a pre-submission meeting if you are unsure whether the device modifications will allow the FDA to complete the review in 30 days.
In 2019, the FDA updated the guidance document for Abbreviated 510k submissions. However, this pathway requires that the manufacturer use recognized consensus standards for the testing, and the manufacturer must provide a summary document for each test report. The theory is that abbreviated reports require less time for the FDA to review than full test reports. However, if you do not provide sufficient information in the summary document, the FDA will place your submission on hold and request additional information. This occurs in nearly 100% of abbreviated 510k submissions. Therefore, there is no clear benefit for manufacturers to take the time to write a summary for each report in the 510k submission. This also explains why less than 2% of submissions were abbreviated submission types in 2022.
The traditional type of 510k is the most common type of 510k submission used by manufacturers, and this is the type we recommend for all new device manufacturers.
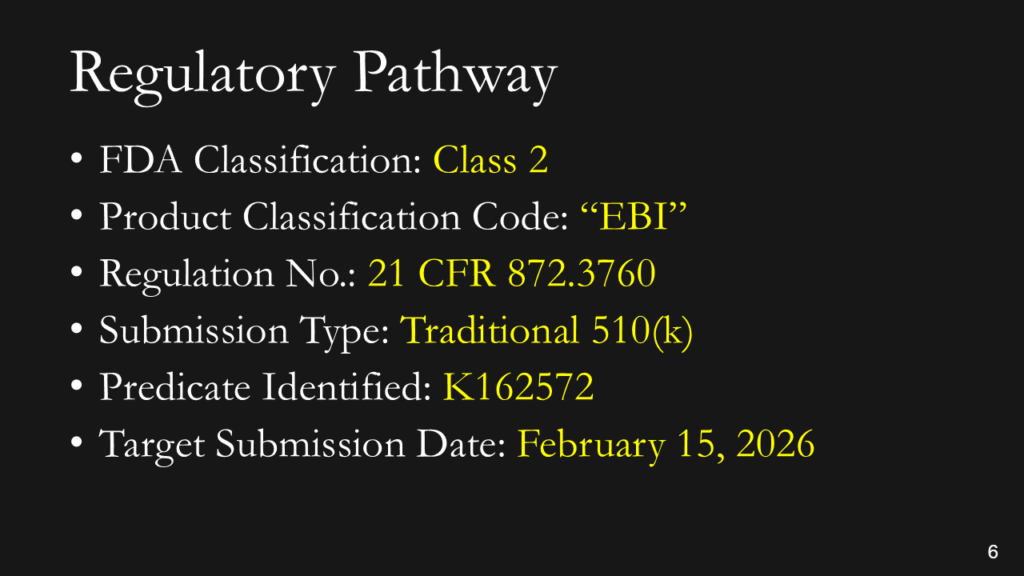
You don’t have to explain this. You could say, “This is a Class 2 device in the USA that requires a 510(k) submission. We have already identified a potential predicate, and we expect to submit our 510(k) in February.” If you don’t know the pathway this clearly, you should read our blog: https://medicaldeviceacademy.com/regulatory-pathway/. For most devices, we can answer this question in minutes. There are ~4,000 510(k) submissions each year, ~60 De Novo Submissions, and ~25 new PMAs (not including supplements). HDEs are even more rare. Therefore, if you plan to submit a De Novo application, you should already have a pre-submission or 513(g) classification request from the FDA to support it. Pre-subscriptions are always in the best interest of investors because they reduce the risk of having to repeat testing.
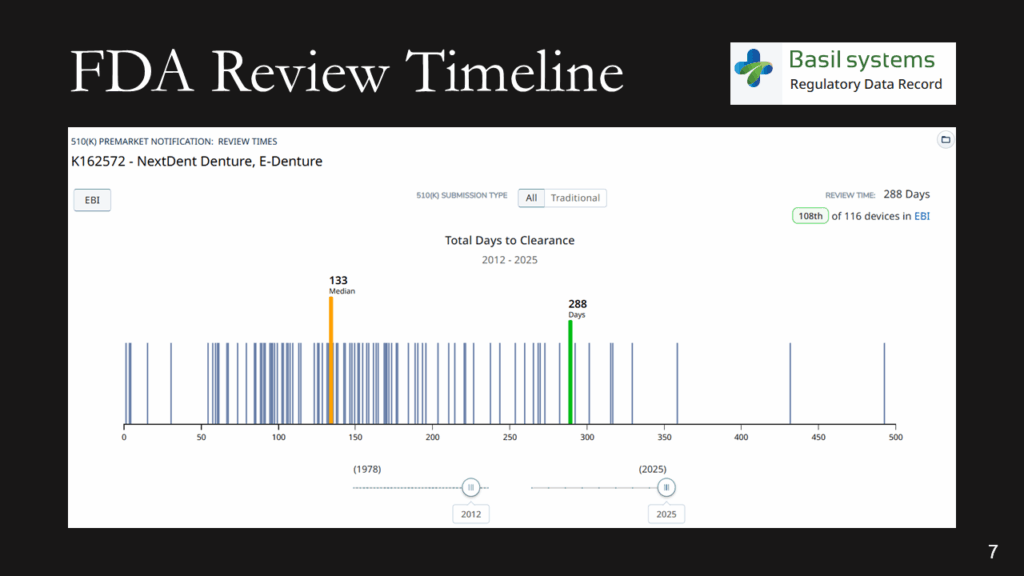
The FDA review timeline is variable. The target is 90 days for FDA review, but your submission can be placed on hold for various reasons. Therefore, historical data is the best indicator of the likely review timeline. The median review timeline is most likely. I only use data since 2012, as the RTA process, implemented in 2012, was a significant change to the FDA process. The eSTAR is a change in format, but it has made the process faster and more predictable. Basil Systems is the best tool for estimating the FDA review timeline and performing searches, but it’s only affordable for consultants who do this work daily and for large firms. The denture repair resin had 116 devices, but the example below for biopolar forceps has 2,263.
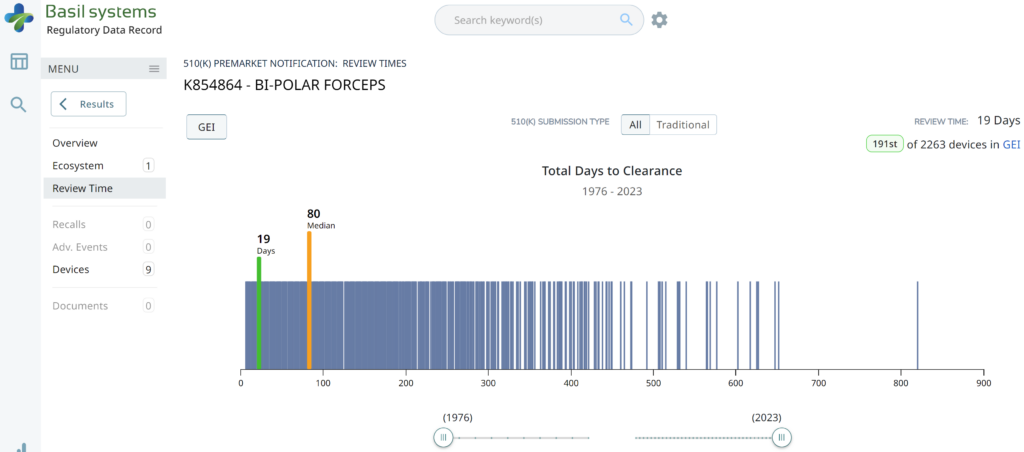
The two slides above in our MedTech investor pitch deck template are the only ones that specifically address the regulatory pathway. Another advantage of the Basil Systems software is that its database is lightning-fast, whereas the FDA database is a free government database (i.e., not quite as fast). Basil Systems also provides information that is hard to find in other places, such as the model number:
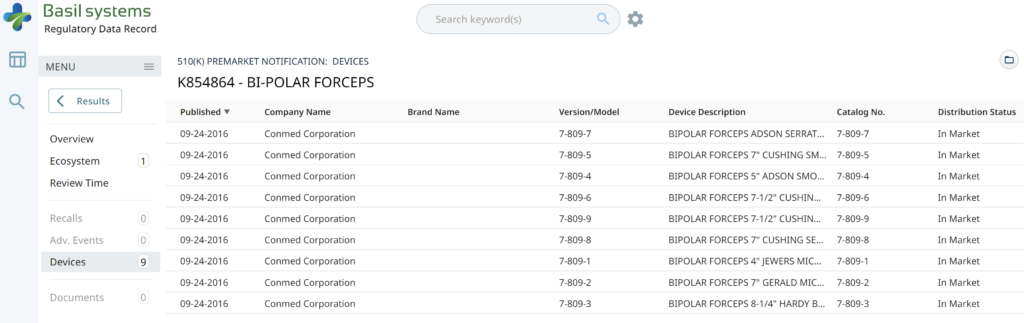
Wouldn’t having the model numbers for every device listed in the US FDA database be helpful?
Keep it simple. You aren’t sharing your CAP table, and if you aren’t confident when asking for money, nobody will give it to you.
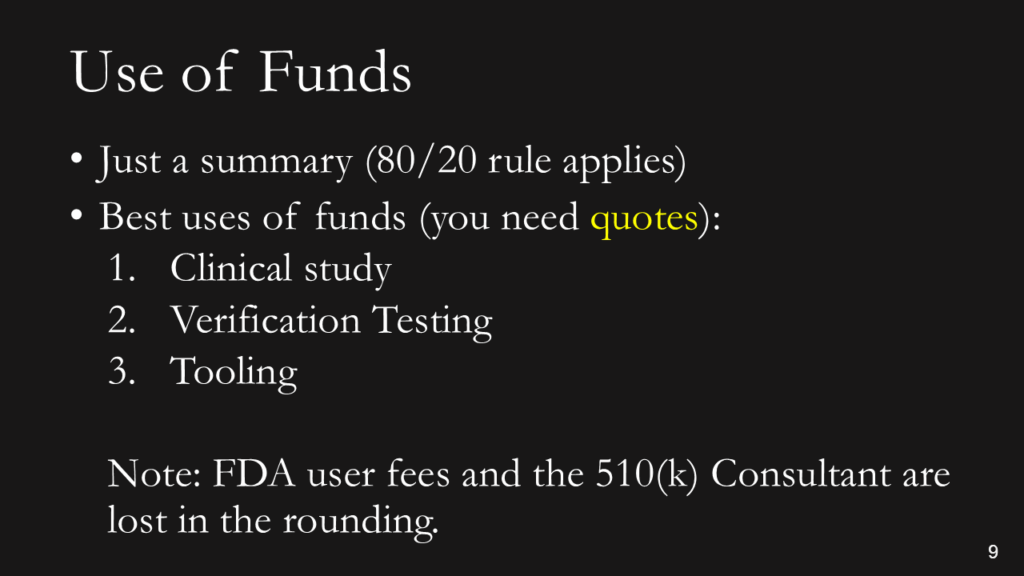
You need to explain where 80% of your money is going (not 100%). This is intended for potential investors, not an annual shareholder meeting or board meeting. You can always offer to answer more detailed questions after the presentation. To pay your salary is a horrible reason for using funds (suck it up and eat ramen), and to cover cash flow is the second-worst use of investor funds (that’s what loans are for). Sales, marketing, and developing sales channels are a good use of funds, but you have to be experienced in do this and have a specific plan you are prepared to defend. You also need to know who your potential suppliers will be, or you will not be prepared for fundraising. You need to have quotes in hand and be ready to spend that money.
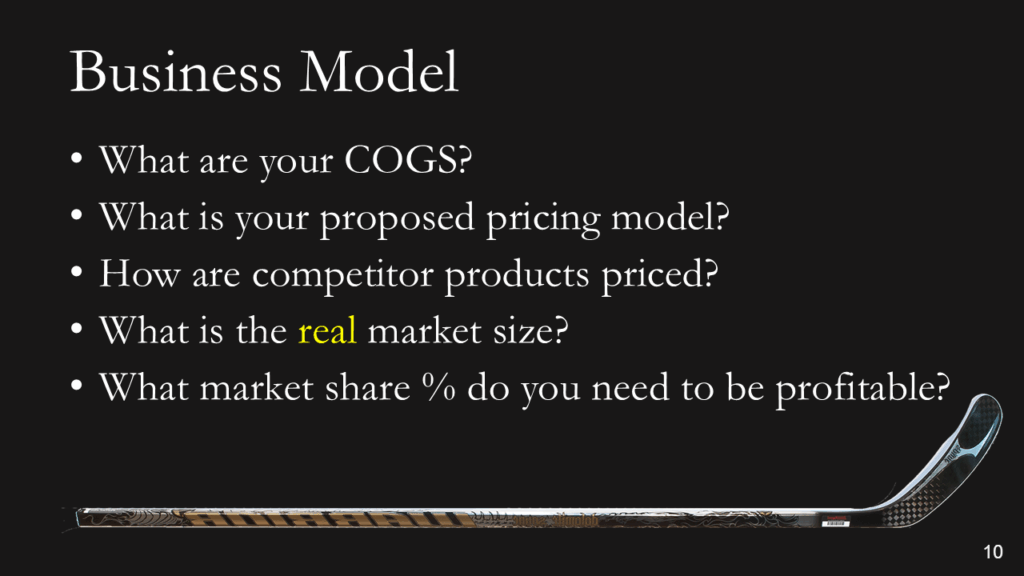
Most companies present a 5-year P&L Projection in graph form, and they all look the same: “A Hockey Stick.” Nobody can accurately predict a P&L summary before they have a product that is ready to sell. Therefore, if you are raising Round A, please describe your business model in simple terms (i.e., cost of goods sold and pricing model). For market size, don’t tell us you have a billion-dollar market. Instead, be specific about number of customers and how many devices they use per year. That will make it REAL. For the market share %, you need to do better than…”if we just capture 1% of the market,” and 10% is not a conservative market share for a start-up. 1-10 units is conservative.

Make it easy for people to contact you. You might not have your own YouTube channel, but you should have everything else on this page. No excuses!
Click on the button below for a copy of Medical Device Academy’s investor pitch deck template.

Regulatory pathway & MedTech investor pitch deck Read More »
This blog describes best practices for communicating audit findings during an audit, in the closing meeting, and in the audit report.
Would you like to be surprised by an auditor with a major nonconformity? Of course not! Nobody likes that kind of surprise. However, do you know how to effectively communicate your audit findings during the audit, in the closing meeting, and in your audit report?
Audit findings should be communicated at the time the objective evidence is gathered, and it should be clearly stated whether you think the finding is a nonconformity or an opportunity for improvement. Give the auditee an opportunity to correct you.
If you are auditing the process for creating a medical device file, and you are unable to find evidence of product specifications (i.e., ISO 13485:2016, Clause 4.2.3b), then you should restate the requirement and explain why this is a nonconformity. It may be a nonconformity because that requirement is not included in the procedure or index for your medical device file. It may be a nonconformity because the product specification is obsolete and needs to be updated. It may be a nonconformity because you were unable to find the product specification anywhere in the device master record (DMR) index or technical file index. You might also be surprised to learn that product specifications are included in the product user manual, but the process owner forgot that because they were very nervous. The morning after the audit, the process owner may be prepared to show you exactly what you were looking for, including procedural requirements and training.
Some auditors are irritated when they spend time following the audit trail, and after they have taken the time to write a nonconformity, the auditee finally produces the evidence requested. Some auditors say, “It’s too late. You were unable to provide the record when it was requested.” That’s not a value-added finding. The right approach is to say, “Excellent! Now we don’t need to issue a nonconformity or investigate the root cause for a missing product specification.” You might also add, “As a follow-up to this audit, consider ways you can make the product specifications and other required technical documentation easier to find during an audit.” If a similar scenario is repeated during the audit, you might consider writing an OFI beginning with the word “Consider.” However, be careful of suggesting solutions. Medical Device Academy adds cross-references to requirements in each procedure, but that is time-consuming and not required.
In our example above, if evidence of the product specification was not found, that would be a nonconformity. If several other requirements in the medical device file were not available, it would still be a nonconformity. Some people would grade a single lapse as a “minor,” but if multiple requirements are missing they would grade the finding as a “major.” This is not enough to deserve the grading of a “major” but grading subjectivity is difficult to avoid. The specification might exist, but it was accidentally omitted from the file. The specification might not be documented for the file sampled, but it may be easily identified for other product files. The specification might only be missing, because a new employee forgot it and the file was not thoroughly reviewed yet. Therefore, the auditor should consider the missing element an “audit trail.” They should review previous audit reports for similar nonconformities, sample additional requirements, sample other files, and review training records before determining the grading.
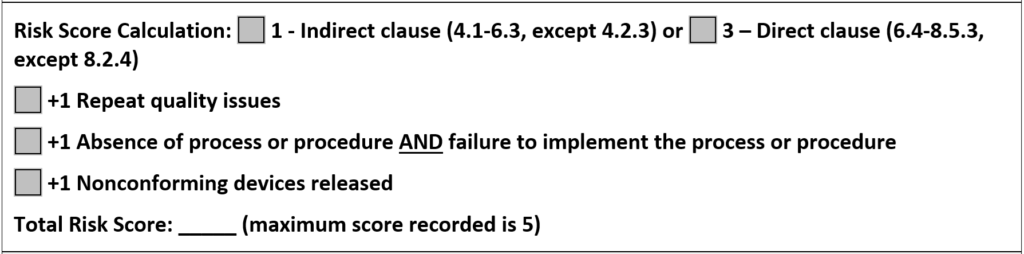
In 2012, the Global Harmonization Task Force (GHTF) published a guidance document for grading auditing findings. That guidance proposed a quantitative scoring system with a range of 1-5. Initially, I thought this system was overly complicated. Later, the Medical Device Single Audit Program (MDSAP) adopted the same quantitative scoring system. Since many of our clients adopted MDSAP, we had to learn the MDSAP audit approach and we had to learn how to grade audit findings quantitatively. After using the new system, I realized that the quantitative approach was faster because the objective grading reduced the time required to make a decision on the grade of the finding.
Experienced auditors have most of ISO 13485 memorized, and they usually know which requirements are included in Clauses 4.1-6.3, and which requirements are found later in the standard. Therefore, identifying whether the finding is “direct” or “indirect” is easy. Clauses 4.1-6.3 are indirect clauses, with the exception of 4.2.3 which is direct. There is also one exception to the direct clauses; Clause 8.2.4 is the only clause within Clauses 6.4-8.5.3 that is indirect. It would be easy to persuade someone that there should be additional exceptions, but it would just make the process slower and subjective. Using the clause number for each requirement to determine the initial scoring makes the process faster and more reliable.
There are three escalation rules to consider when grading a nonconformity in the GHTF or MDSAP audit approach. The image below is included in our CAPA form to help remind people of the scoring. The first rule is specific to a repeat nonconformity in the past three (3) years. The second escalation rule is controversial because many people believe the absence of a procedure or records should be sufficient by itself to escalate a finding. However, it’s just a grade, and if the finding is escalated, we want there to be no doubt that the process is not able to meet the requirements. The final escalation rule is the most serious because shipping nonconforming products requires implementation of a recall or field service corrective action (FSCA). Medical Device Academy applies these same three escalation rules when deciding whether a finding is a “major” if a client does not use the MDSAP audit scoring system. This ensures that our grading is objective and it is based on international guidance. We use this same scoring system for internal auditing, supplier auditing, and CAPAs.
In the paragraphs above, we discussed the grading of nonconformities; however, reporting audit findings involves more than just grading nonconformities. ISO 19011:2011 is the official guidance document for auditors of Quality Management Systems, and ISO 13485 is the quality system standard for medical device manufacturers. Section 6.4.2 of this Standard explains best practices for an opening meeting.
The opening meeting is the ideal opportunity to outline how you and your team will present audit findings and to clarify that you will discuss both the strengths and weaknesses of the quality system verbally in the closing meeting and in the audit report. If the auditee is new to auditing, you might even explain the three-part structure of how nonconformities are written.
The option to terminate an audit is typically reserved for a certification audit where multiple major nonconformities are identified, and there is no point in continuing. Termination is highly discouraged because it is better to be aware of all minor and major nonconformities immediately, rather than waiting until the certification audit is rescheduled. The certification body will charge you for their time anyway.
Another reason for termination is when an auditor acts unreasonably or inappropriately. This is rare, but it happens. If the audit is terminated, you should communicate this to upper management at both the certification body and the company, regardless of which side of the table you sit on. For FDA inspections, this is not an option. For audits performed by Notified Bodies, there is the possibility of suspension of a certificate in response to audit termination. Therefore, I always recommend appealing after the fact, instead of termination. Appealing also works for FDA inspections.
The closing meeting should be conducted as scheduled, and the time/location should be communicated to upper management in the audit agenda and during the opening meeting. Top management won’t be happy about nonconformities, but failure to communicate when the closing meeting will be conducted will irritate them further. You should also ensure that a teleconference invitation is set up in advance for the closing meeting, allowing top management to participate remotely if necessary.
At the closing meeting, the auditee should never be taken by surprise. If an issue remains unfulfilled at the closing meeting, the auditee should expect a minor nonconformity—unless the issue warrants a major nonconformity. Since a minor nonconformity can result from a single lapse in fulfilling a requirement, it is challenging for an auditee to argue that an issue does not warrant a minor nonconformity. Typically, the argument is that you are not consistent with other auditors. The most common response to that issue is, “Audits are just a sample, and previous auditors may not have seen the same objective evidence.” The more likely scenario, however, is that the previous auditor interprets the requirements, rather than reviewing them with the client and ensuring both parties agree before a finding is issued.
If a finding is major, the auditee should have very few questions. Additionally, I often find that the reason for a major nonconformity is a lack of management commitment to address the root cause of the problem. Issuing a major nonconformity is sometimes necessary to get management’s attention.
Regardless of the grading, all audit findings will require a corrective action plan—even an FDA warning letter requires a CAPA plan. Therefore, a major nonconformity is not a disaster. You just need to create a more urgent plan for action.
All guides and auditees should be informed of potential findings at the time an issue is identified. This is important so that an auditee has the opportunity to clarify the evidence being presented. Often, nonconformities result from miscommunication between the auditor and the auditee. This often occurs when the auditor lacks a thorough understanding of the process being audited. It is a tremendous waste of time for both sides when this occurs. If there is an actual nonconformity, it is also important to gather as much objective evidence as possible for the auditor to write a thorough finding and for the auditee to prepare an appropriate corrective action plan in response to the discovery.
As an auditor, I encourage auditees to provide honest feedback directly to me and to management, so that I can continue to improve. If you are providing feedback about an internal auditor or a supplier auditor, you should always give feedback directly to the person before going to their superior. You are both likely to work together in the future, and you should give the person every opportunity to hear the feedback firsthand.
When providing feedback from a third-party certification audit, you should know that there will be no negative repercussions against your company if you complain directly to the certification body. At most, the certification body will assign a new auditor for future audits and investigate the need for taking action against the auditor. In all likelihood, any action taken will be “retraining.” I never fired somebody for a single incident—unless they broke the law or did something unsafe. The key to providing feedback, however, is to be objective. Give specific examples in your complaint, and avoid personal feelings and opinions.
As an auditor, one of the most important (and difficult) things to learn is how to issue a nonconformity—especially a major. This is typically done at the closing meeting of an audit; however, the closing meeting is not where the process of issuing the nonconformity begins. Issuing a nonconformity starts in the opening meeting.
As the auditee, you should ask for the contact information of the certification body during the opening meeting. Ask with a smile—just in case you disagree, and so you can provide feedback (which might be positive). As the auditor, you should always provide the certification body’s contact information (if they are a third-party auditor). If you are conducting a supplier audit or an internal audit, you probably know the auditor’s boss, and there is perhaps no formal complaint or appeals process. In the case of a supplier audit, the customer is always right—even when they are wrong.
If you would like to learn more about auditing methods and best practices, consider registering for our Lead Auditor Training Course.
Audit Findings – How to communicate good and bad findings. Read More »
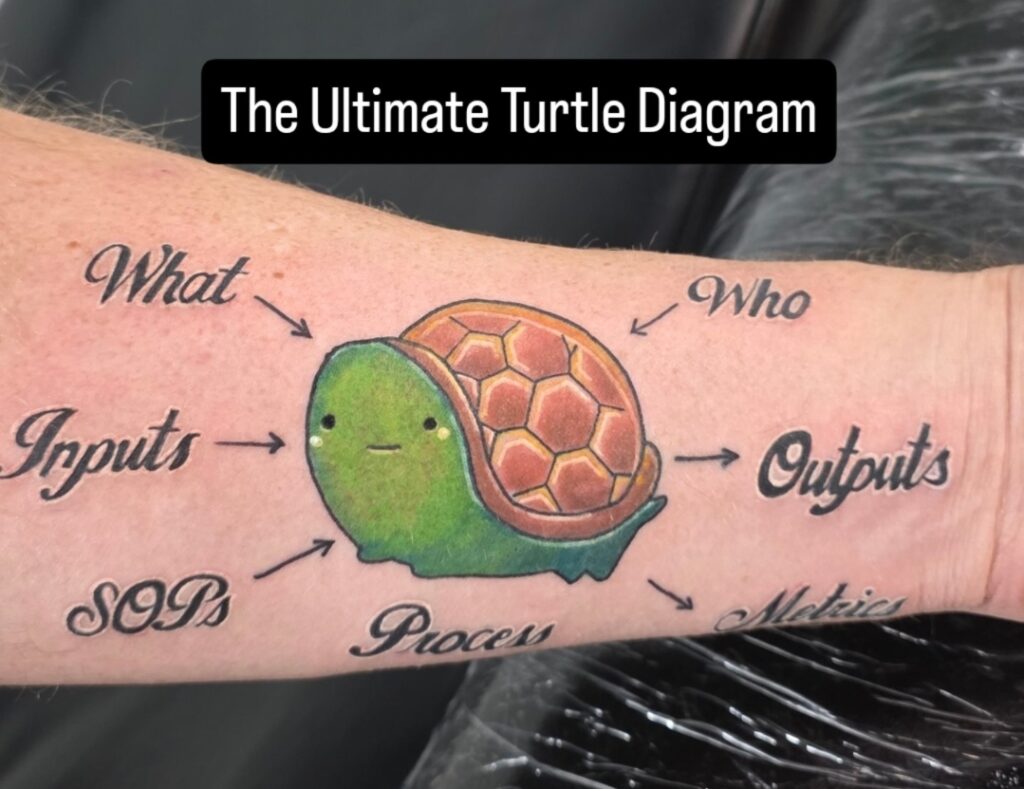
Watch a series of videos (shorts) with Rob Packard getting a turtle diagram tattoo on his arm in Atlantic City at Boardwalk Ink.
Boardwalk Ink was busy on Saturday when Tifany was getting her tattoo, but on Sunday, there were very few customers. The end of September is the beginning of the “off-season” for Atlantic City, and most of the boardwalk was closed on Monday. Therefore, Sunday afternoon turned out to be the ideal time for a tattoo. We started around 2:30 p.m., when the previous tattoo was completed. So I had plenty of time to sleep in, have breakfast, and drink an iced caramel coffee at Rita’s. We expected the session to last about 3 hours, and the timing worked out perfectly to go out for dinner once the tattoo was completed.
There are other tattoo parlors in Atlantic City, and the artists at Boardwalk Ink are not the only ones. In this case, I watched Tifany get her tattoo of a seagull. Jordan was very fast, her tattoo came out great, and she had no complaints. You should always watch the tattoo artist at work if you are trying to select a new artist, but it really helps to know the person they are tattooing. Just in case you were wondering, there are applicable regulations, and an agreement was signed.
Jordan and I both needed to take breaks because our muscles were starting to cramp. The bright blue ink is from the stencil that Jordan used. As he created outlines, he was adding ink over the stencils. The stencil can be removed with rubbing alcohol.
The longest part of the process was the outlining of the lettering and the turtle. Once that was completed, the turtle was filled in with color, and the letters were highlighted to provide some depth.

Jordan (@brutalnoodles) finished the tattoo around 6:00 p.m. ET. The arm was wrapped to keep it clean, and the wrap came off on Wednesday morning. It looks great and healed beautifully.
Always ask the tattoo artist to do a video of the tattoo when you are done. They do this all the time, and Jordan did an awesome job on the slow-motion video close-up. I’m not able to get the exact angle of shots on my own arm.
Absolutely. We have been in love with the image of this particular turtle for several years, and we wanted to incorporate it into our turtle diagrams. The resulting image was exactly what we wanted, and we have already used it in several training materials we are creating for our lead auditor course that is launching in December. I expect this turtle diagram will be used hundreds of times over the years, and I have no reason to regret getting it tattooed (it’s my fourth).
Regarding the pain, Jordan did a great job of minimizing it. My fingers falling asleep and tingling was the most painful part, but getting tattooed generally seems to bother me less than most people. In fact, I fell asleep during one tattoo session at the Philadelphia Convention Center.
Turtle Diagram Tattoo in Atlantic City Read More »
Learn how to apply the process approach when auditing design controls and discover how audit checklists fail to identify problems.
Audit checklists list each requirement in a standard or regulation. When auditing design controls, an audit checklist lists each of the ten subsections of the ISO 13485:2016 standard. For example, here are potential audit checklist questions for the first three subsections:
How can you improve the first question on the checklist?
The problem with the above questions is that they do not evaluate linkages with other processes. For example, when you ask what procedure(s) defines the design control process (e.g., SYS-008, Design Control Procedure and SYS-006, Change Control Procedure), you can also ask the revision of that procedure(s). The record associated with that document change can be used to evaluate the effectiveness of the document control process. For example, were all the job functions that reviewed and approved the previous version of the procedure represented during the review and approval of the current revision? The procedure itself can also be reviewed to make sure that it includes the appropriate elements for a procedure (e.g., scope, references, roles/responsibilities, description of the process, revision history, etc.). This approach to verifying the effectiveness of the document control process can be applied to every procedure within every process.
What are the problems with using an audit checklist?
An audit checklist is always based on the same regulation or standard. Therefore, when establishing a quality system, using an audit checklist is ideal preparation for the initial certification audit. However, if internal auditors ask the same questions during every audit, then auditees begin to anticipate the questions. Anything not included in the audit checklist may be overlooked. For example, when auditing design controls, there are no requirements for supplier controls mentioned in Clause 7.3. Therefore, an audit checklist will not include any questions about the qualification of suppliers that support design and development (e.g., software developers), as those requirements are already addressed in Clause 7.4.2 (i.e., purchasing information).
Another problem with using audit checklists is that auditors may rely too heavily on the checklist as a crutch. Auditors are supposed to plan the audit agenda based on the importance of areas and the results of previous audits. If the auditor relies solely on the checklist, each clause is assigned equal importance — regardless of its importance or the results of previous audits. Auditors also need to verify compliance with all applicable standards. Creating a checklist for risk management (i.e., ISO 14971), software lifecycle management (i.e., IEC 62304), usability engineering (i.e., IEC 62366), and information technology security management (i.e., ISO 27001) would be extremely time-consuming, and auditors would not be able to complete all of the checklist questions. Auditors require a more efficient method to assess the effectiveness of a process and verify compliance with requirements.
Basics of the process approach to auditing
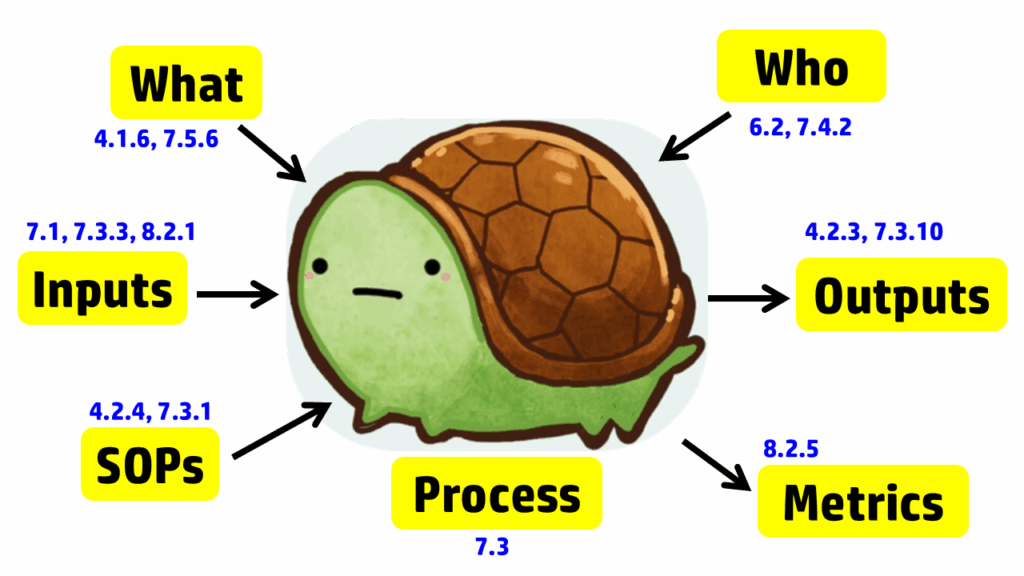
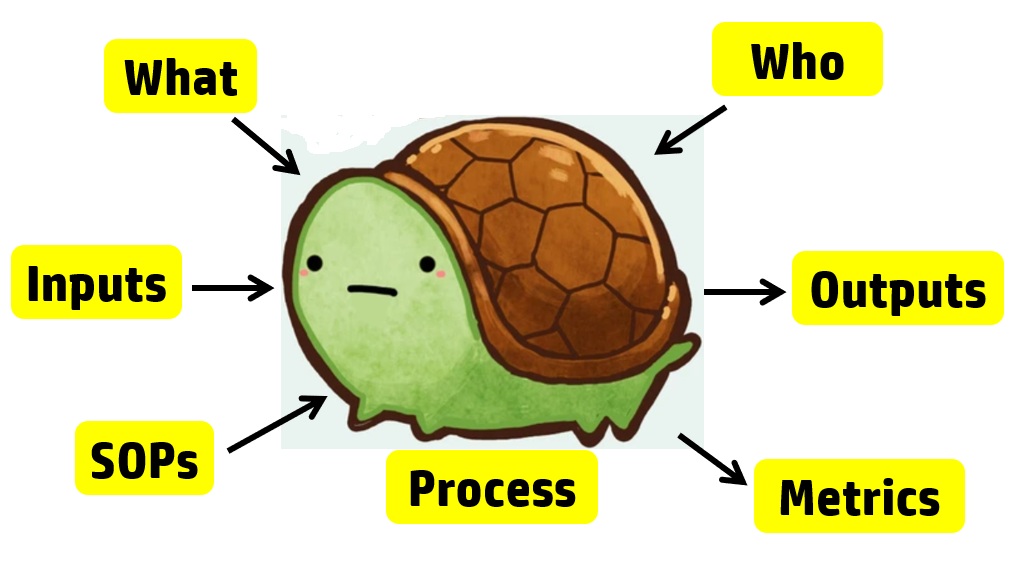
The process approach to auditing is different. Instead of creating a checklist that is specific to the requirements for each process in the standard, the process approach relies on asking seven basic questions and then following the audit trails presented by the answers to those questions. The tool we use to help us remember the seven questions is a “turtle diagram.” The shape of the turtle has seven elements:
Note: It’s only 7 steps. You don’t have to tattoo a turtle diagram on your arm.
The diagram below uses the image of a turtle to remind you of the seven elements, but we added the subclauses from ISO 13485 that are related to auditing design controls. A brief summary of how these subclauses are related is provided in the video above; more details on each part of the turtle diagram are provided below, specifically for design controls.
Step 1 – Describe the process
The first step in creating a process audit is to identify the process owner and conduct an interview with them. We recommend doing this in their office, not in the conference room, for three reasons:
After the process owner provides a brief description of the process, try to get answers to steps 2-7 directly from them in the same interview. Asking open-ended questions to prevent “yes/no” responses will be helpful. You also need a comprehensive understanding of the design control process before interviewing other team members or requesting design records.
Even when auditors use the process approach to auditing, this part of the turtle diagram is frequently incomplete when auditing design controls. The obvious answer is to review the auditee’s approval of design inputs. This is a required record for design controls in Clause 7.3.3; however, it is not the only process input for design controls. As stated in Clause 7.3.3, “These inputs shall include…c) applicable output(s) of risk management.” Additionally, Clause 8.2.1 states, “The information gathered in the feedback process shall serve as potential input into risk management for monitoring and maintaining the product requirements as well as the product realization or improvement processes.” Therefore, both risk management and post-market feedback should be included as inputs to the design process. Using the process approach when auditing design controls will show you if the interactions between the risk management process, post-market surveillance process, and the design control process are adequate. Other inputs that should be considered for the design control process include regulatory requirements, such as:
Most auditors do an excellent job of covering the process outputs when auditing design controls (or any process), as the outputs typically include records, and auditors document which records they reviewed in their audit report. For the design controls process, the Design History File (DHF) (i.e., Clause 7.3.10) is the primary record sampled, and the Device Master Record (DMR) is the second most commonly sampled record. With the changes to the FDA requirements for the QMSR, auditors will be looking for a Medical Device File (i.e., Clause 4.2.3) instead; however, the records should remain the same, with just a new name. If the device is CE marked, there should also be a technical file or a technical file index.
A critical part of auditing is to verify that a process is not only documented but also implemented. To implement any process, equipment, or software will likely be necessary. For the implementation of design controls, most companies utilize quality system software to manage documents and records for each design project. For example, Grand Avenue Software could be used for managing the medical device file (i.e., Clause 4.2.3), and AdaptivRisk may be used for managing the risk management file. There may also be some calibrated testing equipment that requires validation, calibration, and maintenance. Therefore, this step in the turtle diagram usually involves the following ISO 13485 clauses:
This is typically the step of a process audit where the auditor needs to identify “what resources” are used in the process. However, only companies that have software systems for design controls have resources dedicated to Design and Development. I have indicated this in the “Turtle Diagram” presented above.
The next step in the process approach to auditing design controls is to identify who is assigned to the design team for a design project. Sometimes companies assign large teams. In this case, the auditor should focus on the team members who must review and approve design inputs (see Clause 7.3.2) and design outputs (see Clause 7.3.4). All team members should have training records (i.e., Clause 6.2) for Design Control procedures and Risk Management procedures. However, if the device includes software and internet connectivity, some members of the design team will require additional training on specific standards and protocols. It is also necessary to outsource processes that cannot be performed by the manufacturer, such as software development, cybersecurity testing, biocompatibility testing, and EMC testing. For these outsourced processes, the company must document the supplier’s qualification and establish a written agreement with that supplier (i.e., Clause 7.4.2). Examples of agreements could be a supplier quality agreement, a consulting contract, or a signed GLP testing protocol.
Auditors using the process approach to auditing often discover ineffective processes when they expand the scope of design controls beyond the scope of the design control procedure. The design team leader will identify the design control procedure(s) and forms. However, the auditor should also request copies of the risk management procedure and other related procedures. The other procedures may have different process owners, and the design team leader may not be adequately trained in those procedures. The auditor should not read and review these procedures. Auditors never have the time to do this. Instead, ask the process owner to identify specific procedures or clauses within procedures where clauses in the ISO Standard are addressed. If the process owner knows exactly where to find what you are looking for, they’re training was effective, or they may have written the procedure(s). If the process owner has trouble locating the clauses you are requesting, spend more time sampling training records. You may also want to ask if there is another person who is more familiar with the procedure. This step of the process approach is also when you should be sampling records of document control (i.e., Clause 4.2.4).
The seventh step of the turtle diagram is typically where the auditor discovers the most value-added findings. The auditor will ask the process owner to identify some metrics (i.e., Clause 8.2.5) or quality objectives (i.e., Clause 5.4.1) they are using to monitor and improve the design and development process. This is a struggle for many process owners — not just the design team leader. If any metrics are not performing up to expectations, there should be evidence of actions being taken to address this. If the process owner is not tracking metrics, you may want to review how closely the actual project schedule aligns with the design project plan. Design projects are frequently delayed because the design team either does not request quotes early enough or does not involve the supply chain manager soon enough, or both. There is also considerable benefit derived from conducting retrospective reviews at the end of design phases and at the project’s conclusion. The team will identify changes in time estimates that should be considered for future design projects or other ongoing projects.
After all seven steps of the turtle diagram are complete, the process audit is not yet complete. The auditor needs to sample records and follow audit trails to ensure thoroughness. Therefore, additional records need to be sampled. We recommend sampling design changes because this is where inspectors and third-party auditors will typically focus. These external auditors will be looking for design changes that need regulatory approval and may not have been submitted for market authorization. The auditor may also sample using a risk-based approach when sampling design changes. In particular, we recommend looking for the following types of changes: 1) vendor change, 2) specification change, and 3) process change. By doing this, the audit will also cover the following clauses in ISO 13485:2016: 7.4 (purchasing), 7.3.9 (design changes), 7.5.6 (process validation), 7.1 (risk management), and 4.2.5 (control of records). If you would like to learn more about design changes, please watch our Design Changes Webinar.
FDA inspectors and third-party auditors have similar approaches to auditing design controls. Both will begin by reviewing your procedure to verify that it includes all of the required elements of ISO 13485:2016, Clause 7.3. Next, they will sample a recent design project that was completed and request a copy of the design history file (DHF). Many design projects are behind schedule, and therefore, this is an important metric for most companies. Now that you have completed your “Turtle Diagram,” if you have more time, you can conduct interviews with team members to review their roles in the design process. You could also sample-specific Technical Files, as I indicated above. If you are performing a thorough internal audit, I recommend doing both. To learn more about using the process approach to auditing, you can register for our webinar on the topic.
Auditing Design Controls Read More »
The process approach to auditing is demonstrated using Turtle Diagrams as a tool instead of using traditional auditor checklists.
ISO 9001 is the general quality system standard that was created in 1994. The ISO 9001 standard forms the basis for all other international quality system standards–including ISO 13485. There are seven quality system principles that form the basis of ISO 9001:
There are several different approaches to conducting an audit:
Each of these approaches to auditing is a valid approach. However, each approach has benefits and disadvantages. Therefore, an audit program manager should be knowledgeable of each approach when they are making recommendations to top management with regard to the audit program schedule.
The most common method of auditing is to use a regulatory checklist. This is the approach used by certification bodies for the Medical Device Single Audit Program (MDSAP). For each regulatory requirement or standard, there is a row in a checklist. This approach is also known as the element approach, because each clause or section of the applicable requirement constitutes an “element.” The requirements are in the left column, and the requirement is usually referenced (e.g., clause number). The subsequent columns of the checklist are intended to document which documents and records the auditor reviewed. The last column of the checklist is where the auditor documents what they looked for in those documents and records.
Each audit checklist is based on a standard or regulation. Therefore, if there are multiple applicable standards and regulations, multiple checklists would be needed to use this approach exclusively. The biggest disadvantage of this approach is that auditors use the checklist as a crutch and will ask only the questions on the checklist. The greatest benefit of this approach is that auditors can verify that all the requirements of a standard or regulation have been met. This is generally the best approach for internal auditing just prior to an initial certification audit (i.e., Stage 1 and Stage 2).
The procedural approach to auditing is similar to the element approach. However, a checklist does not need to be created in advance, and for supplier audits, it is not practical to invest the time in creating a checklist for a supplier’s procedures. In the procedural approach, the auditor reviews the procedure and identifies important elements of the procedure to verify are being performed. Often, this is achieved by making a copy of the procedure and highlighting requirements in the procedure to verify.
A contract audit is also similar to a procedural audit, but instead of using a procedure as the basis for the requirements, a supplier contract is used instead. If the supplier contract includes a quality agreement with all of the quality system and regulatory requirements defined, this approach may duplicate all requirements of a regulatory checklist. The biggest disadvantage of this approach is that it is unable to identify failures in the interactions between processes. This approach is ideal as an audit of a new or revised procedure, but the auditor may need to supplement this approach with the process approach to identify gaps in those interactions.
Product auditing involves auditing everything associated with a single product or product family. This is typically done when a new product is being launched, and the medical device manufacturer wants to audit manufacturing processes prior to launch (or a supplier if the manufacturing is outsourced). The auditor may review anything in the device master record (DMR – 21 CFR 820.181 in FDA QSR) or medical device file (MDF – ISO 13485:2016, Clause 4.2.3).
Product audits are also the approach used for unannounced audits. Unannounced auditors verify that the devices being manufactured and inspected match the drawings and specifications in the technical documentation that is approved for CE Marking. This verification includes inspection and testing methods for product release. Certification body auditors and FDA inspectors are both trained to focus on design changes, inspection methods, and especially the final test of devices prior to release. This focus is a risk-based approach where auditors sample the most important processes. If you are conducting a product audit, we recommend mirroring this approach.
The process approach is just a different way of organizing audits. Instead of auditing by clause, procedure, or product, you audit each process. Typical processes include:
The process approach to auditing is preferred over all other methods for two reasons. First, the process approach identifies linkages between processes as inputs and outputs. Therefore, if there is a problem with communication between departments, the process approach will expose it. If only a procedural audit is performed, the lack of communication to the next process is often overlooked.
Second, the process approach is a more efficient way to cover all the clauses of a standard than auditing each clause individually (i.e., the element approach). My rationale for the claim of greater efficiency is simple. There are 34 required procedures in the ISO 13485 Standard, but there are only 12 processes identified above. The “missing” procedures are incorporated into each process audit.
For example, each process audit requires a review of both the records as input and the outputs. In a process audit, training records can be sampled for each employee interviewed during the audit as part of an audit trail. Finally, nonconforming materials can be identified and sampled at incoming inspection, in assembly processes, during final inspection, during packaging, and even during shipment. The tool we use to teach the process approach is the “Turtle Diagram.” The diagram below illustrates the origin of the name.
 Interviewing with the Process Approach
The first skill to teach a new auditor is how to interview. Each process approach audit should begin with interviewing the process owner. The process owner and the name of the process are typically documented in the center of the turtle diagram. Next, most auditors will ask, “Do you have a procedure for ‘x process’?” This is a weak auditing technique because it is “closed-ended” or yes/no. Closed-ended questions do little to gather objective evidence. Instead, start your interview with this simple request: “Please describe the process?” A process description gives you a general overview of the process if you are unfamiliar with it.
After receiving a general overview, try asking this question: “How do you know how to start the process?” Inspectors know that there is material for incoming inspection because raw materials are in the quarantine area. Companies use visual systems, electronic materials requisition and planning (MRP) systems, and paper-based systems to notify QC inspectors that the product is ready to be inspected. As an auditor, you are looking for a record to trigger the inspection process. A follow-up question is, “What are the outputs of the inspection process?” Once again, auditors need documents and records to review. Sampling inspection records and any associated records (e.g., certificates of analysis) are records the auditor samples to verify the effectiveness of the inspection process (i.e., Clause 7.4.3) and the process for control of records (i.e., Clause 4.2.4). The process approach allows the auditor to verify compliance with two clauses simultaneously.
The next step of the process approach is to “determine what resources are used by incoming inspection.” This includes gauges used for measurement, cleanliness of the work environment, etc. This portion of the process approach is where an auditor can review calibration, gowning procedures, and software validation. After “With What Resources,” the auditor then needs to identify all the incoming inspectors on all shifts. From this list, the auditor should select people to interview and follow up with a request for training records.
The sixth step is to request procedures and forms. Many auditors believe that they need to read the procedure. However, if a company has long procedures, this could potentially waste valuable time. Instead, you can ask the inspector to show you where to find various regulatory requirements in the procedures. This approach has the added benefit of forcing the inspector to demonstrate they are trained in the procedures—a more effective assessment of competency than reviewing a training record.
The seventh and final step of the turtle diagram seems to challenge process owners the most. This is where the auditor should review department quality objectives and assess if the department objectives are linked with company quality objectives. Manufacturing often measures first pass yield and reject rates, but every process can be measured. If the process owner doesn’t measure performance, how does the process owner know that all the required work is getting done? The seventh step is also where the auditor can sample and review the monitoring and measurement of processes, and the trend analysis can be verified to be input into the CAPA process.
In my brief description of the process approach, I used the incoming inspection process. I typically choose this process for training new auditors because it is a process that is quite similar in almost every company, and it is easy to understand. More importantly, however, the incoming inspection process does an effective job of covering more clauses of the Standard than most audits. Therefore, new auditors get an appreciation for how almost all the clauses can be addressed in one process audit. If you are interested in learning more about Turtle Diagrams and the process approach to auditing, please register for our webinar on the process approach to auditing.
Process Approach to Auditing Read More »
The article reviews FDA guidance documents released in the past 90 days and provides links to those guidance.
For anyone responsible for monitoring new and revised regulatory requirements, you should check the FDA website for new and revised guidance documents at least once every month. If you are not familiar with these FDA resources, here are the links for two of the FDA web pages:
Medical Device Academy will be updating this post weekly. We will also be updating training webinars and procedures associated with these guidance documents. The intent of this review is to help quality system auditors, quality managers, and other personnel responsible for regulatory affairs. It is difficult to stay current with the FDA regulations, and we are trying to make this easier.
There have been three new final FDA guidance documents released in Q3 2025:
There have been no new draft FDA guidance documents released since January 2025 due to a shift in federal policy.
This guidance is specific to dental bone grafting material devices. This guidance was originally issued as a draft on March 29, 2024. The devices included within the scope of the guidance are limited to the class II bone grafting material devices regulated under 21 CFR 872.3930 with the following product codes: LYC, NPM, and NUN.
This guidance is specific to device software functions (i.e., SiMD or SaMD) that is enabled with artificial intelligence (AI). This guidance was originally issued December 4, 2024. The FDA is issuing this guidance to provide recommendations for predetermined change control plans (PCCPs) tailored to artificial intelligence (AI)-enabled devices. The guidance is intended to support iterative improvement through modifications to AI-enabled devices while continuing to provide a reasonable assurance of device safety and effectiveness.
This guidance is specific to small businesses (i.e., companies with annual revenue of less than $100 million). The small business qualification must be renewed each year. Most small businesses we work with fail to submit the form early enough to take advantage of this deduction, or the companies have difficulty gathering the tax records required for the application. You can download the applicable forms and guidance from our website using the links provided below (Updated July 2025):
Medical Device Academy has a web page dedicated to this process and we can help you complete the application and submit it as a consulting service if needed.
If you are interested in keeping up on new and revised regulations from the FDA, I wrote a blog explaining four ways to identify new and updated FDA regulations. The blog identifies FDA web pages for the following four types of updates:
If you would like to receive email notifications where there are new or revised FDA guidance documents, please sign-up for our Lead Auditor Training course. Anyone that purchases the course will receive email notification of updates. They will also receive access to new and revised training to help them audit new and revised regulations as they are released.
FDA Guidance Documents Released Recently Read More »
In the eSTAR and PreSTAR, the FDA inquires whether a request for designation (RFD) is associated with your device.
A request for designation is a formal request to the Office of Combination Products (OCP), where you request that OCP assign the agency division that will have jurisdiction over a combination product. In 21 CFR 3.7, the FDA outlines the information required in an RFD submission. The FDA encourages RFD submitters to review the agency’s guidance prior to submitting an RFD. It irritates the FDA when you don’t read the guidance and ask questions that are clearly answered within it. Read the guidance first (we provided links below).
Before you submit a request for designation, you need to understand what a combination product is. The term combination product includes:
Information regarding the drug/biologic constituent part of the combination product may be needed and accounted for throughout the various sections of your premarket submission. In addition, as described in Product Stability documentation, medicinal substance refers to the drug/biologic constituent part of the combination product as defined in 21 CFR 3.2(e).
We recommend that you always start with a pre-request for designation (pre-RFD). Once you have feedback from the FDA, then you will be ready to write your request for designation (RFD). The FDA published two guidance documents related to RFDs:
A pre-RFD is a submission that you make to the Office of Combination products (OCP) to request the FDA’s preliminary, nonbinding assessment of:
The FDA’s target review time is 60 days for providing the information requested, but a pre-RFD is not a tracked metric with budget impact. Therefore, you should set expectations with your senior management team and investors at approximately 90 days–just like the 513(g) submissions.
(a) Who should file: the sponsor of:
(b) When to file: a sponsor should file a request for designation before filing any application for premarket review, whether an application for marketing approval or a required investigational notice. Sponsors are encouraged to file a request for designation as soon as there is sufficient information for the agency to make a determination.
(c) What to file: an original and two copies of the request for designation must be filed. The request for designation must not exceed 15 pages, including attachments, and must set forth:
(d) Where to file: all communications pursuant to this subpart shall be addressed to the attention of the product jurisdiction officer. Such a request, in its mailing cover should be plainly marked “Request for Designation.” Concurrent submissions of electronic copies of Requests for Designation may be addressed to combination@fda.gov.
[56 FR 58756, Nov. 21, 1991, as amended at 68 FR 37077, June 23, 2003; 70 FR 49861, Aug. 25, 2005]
How to write a request for designation Read More »