Search Results for: root cause

NSE letter: A CAPA plan for your 510k process

Cry, complain, call the reviewer…you might feel a little better, but you received an NSE letter, and tomorrow you still can’t sell your device.

NSE Letter NSE letter: A CAPA plan for your 510k process

Instead, try approaching an NSE letter like a CAPA investigation. What is the issue? The FDA determined that your device is not substantially equivalent to the predicate you selected. What is the root cause? There are four (4) possible root causes.

NSE Letter Cause #1: You failed to verify that the predicate is a legally marketed device.

If your predicate device is not legally marketed, you need to select a new predicate and resubmit. However, it is doubtful that your device would pass the refusal to accept the (RTA) screening process if the predicate was not legally marketed. If your predicate was not registered and listed with the FDA (check using this link), then you should have submitted a pre-sub request to determine if the agency has any problem with using the device you chose as a predicate. This is an essential question if the manufacturer is no longer in business, and the product is no longer for sale.

NSE Letter Cause #2: You failed to evaluate the substantial equivalence of your device’s intended use with the predicate.

The intended use of your predicate device is documented for every potential predicate since February 1992 on FDA Form 3881–which you can download along with the 510k clearance letter for the predicate. There is also an intended use documented for every device category in the applicable regulation for that device. This intended use is more generic than FDA Form 3881, but both are applicable. The FDA Form 3881 you submit for your device must be equivalent. I recommend a point-by-point comparison with regard to the following elements: 1) OTC vs. prescription use, 2) user, 3) patient population, 4) illness or medical condition, 5) duration of use, 6) environment of use and 7) target part of the body. Any difference can raise new issues of risk and may result in an NSE decision. However, the FDA typically will work with the company to modify the wording of FDA Form 3881 to ensure the intended use is equivalent or to make sure you provide clinical evidence to address the differences. In my pre-submission requests, I include a comparison document for the intended use to ensure that the FDA is aware of any differences in the intended use.

Cause #3: You failed to convince the FDA that technological differences do not raise different questions of safety and effectiveness.

Unless your device is identical in every way to the predicate device, you will have to persuade the FDA that differences do not raise questions of safety and effectiveness. At the beginning of the 510(k) process, it is helpful to document technological differences systematically. Specifically, this should include: 1) materials, 2) design, 3) energy source, and 4) other features. For each difference, you must justify why the difference does not raise different issues, or you must provide data to prove it. It is also possible that you were not aware of questions of safety and performance raised by technological differences. To avoid this problem, you can submit a detailed device description and draft labeling to the FDA in a pre-sub meeting request. If you ask questions about differences in a pre-sub meeting, you can avoid an NSE letter.

Cause #4: You failed to provide data demonstrating equivalence.

For each difference, you should determine an objective method for demonstrating that the difference is equivalent in safety and performance to the predicate. Your test method can be proposed to the FDA in a pre-sub request before testing. The FDA sees more than 3,000 companies propose testing methods to demonstrate equivalence each year. They have more experience than you do. Ask them in a pre-sub before you test anything. There may be a better test method, or you might need to adjust your test method. Sometimes results are unclear, but there might be another test you can perform to demonstrate equivalence, and then you can resubmit your 510k. Possibly you were unaware of the need to perform a test, and you were unable to complete a test within the 180 days the FDA allowed for submitting additional information. The good news is you now have all the time you need.

What is similar between all four causes of the NSE letter?

In all four root causes identified above, you could benefit greatly from the pre-sub meeting. Now you have an NSE letter, and you know which of the four reasons why your submission did not result in 510(k) clearance. However, the correction to your NSE letter may not be clear. Therefore, you should consider requesting a pre-sub meeting as quickly as you can. Most companies choose not to submit a pre-sub meeting request because they don’t want to wait 60-75 days. However, sometimes pre-sub meetings are scheduled sooner. In addition, 60-75 days is not as costly as receiving a second NSE letter.

Prevent a future NSE letter by requesting a pre-sub meeting

Regardless of your corrections for the current NSE letter, you should prevent future occurrences by planning to submit a pre-sub meeting request for every submission. I try to help clients gather all the information they need without a pre-sub meeting, but each new 510k reminds me why a pre-sub meeting is so valuable. You always learn something that helps you with the preparation of your 510k.

Help with Pre-sub meeting requests

The FDA published a guidance document for pre-sub meeting requests. If you need additional help, there is a webinar on this topic.

NSE letter: A CAPA plan for your 510k process Read More »

Integrating usability testing into your design process

This article explains how you should be integrating usability testing into your design control process–especially formative usability testing.

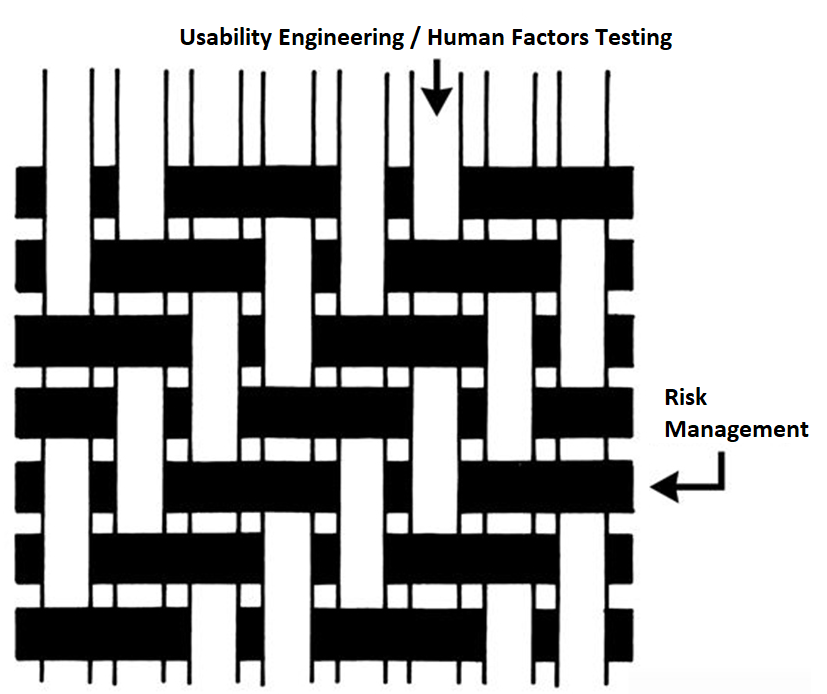
Integrating Usability Engineering and Risk Management into your Design Control Process Integrating usability testing into your design process

Why you should be integrating usability testing into the design

We recently recorded an updated usability webinar and released a usability procedure (SYS-048) with help from Research Collective–a firm specializing in human factors testing. After listening carefully to the webinar, and reading through the new usability procedure, I felt we needed to update our combined design/risk management plan to specify formative testing during phase 3 and summative (validation) testing during phase 4 of the design process. This is necessary to ensure your usability testing is interwoven with your risk management process. Integrating usability testing into all phases of your design process is critical–especially design planning (phase 1), feasibility (phase 2), and development (phase 3).

Integrating usability testing into your design plan helps identify issues earlier

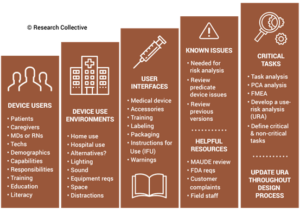
During the usability training webinar, Research Collective provided a diagram showing the various steps in the usability engineering process. The first five steps should be included in Phases 1 and 2 of your design process. Phase 1 of the design process is planning. In that phase, you should identify all of the usability engineering tasks that need to be performed during the design process and estimate when each activity will be performed. The first of these usability activities is the identification of usability factors related to your device. Identifying usability factors is performed during Phase 2 of your design process before hazard identification.

Indentifying Usability Issues 300x209 Integrating usability testing into your design process

Before performing hazard identification, which should include identifying potential use errors, you need to identify five key usability elements associated with your device:

  1. prospective device users during all stages of use must be defined
  2. use environments must be identified
  3. user interfaces must be identified
  4. known use errors with similar devices and previous generations of your device must be researched
  5. critical tasks must be described in detail and analyzed for potential use errors

Defining users must include the following characteristics: physical condition, education, literacy, dexterity, experience, etc. Use environment considerations may consist of low lighting, extreme temperatures or humidity, or excessive uncontrolled motion (e.g., ambulatory devices). User interfaces may include keyboards, knobs, buttons, switches, remote controllers, or even a touch screen display.

Often the best reason for developing a new device is to address an everyday use error that is inherent to the design of your current device model or a competitor’s product. Therefore, a thorough review of adverse event databases and literature searches for potential use errors is an important task to perform before hazard identification. This review of adverse event data and literature searches of clinical literature are key elements of performing post-market surveillance, and now ISO 13485:2016 requires that post-market surveillance shall be an input to your design process.

Finally, the step-by-step process of using your device should be analyzed carefully to identify each critical user task. User tasks are defined as “critical” for “a user task which, if performed incorrectly or not performed at all, would or could cause serious harm to the patient or user, where harm is defined to include compromised medical care.” Not every task is critical, all critical tasks must be identified, and ultimately you need to verify that each critical task is performed correctly during your summative (validation) usability testing.

Evaluating Risk Control Options – Formative Usability Testing in Phase 3 (Development)

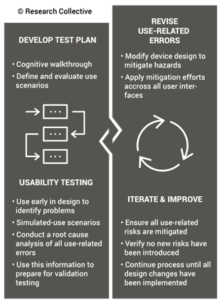
Once your design team has conducted hazard identification and identified your design inputs (i.e., design phase 2), you will begin to evaluate risks and compare various risk control options. Risk control option analysis requires testing multiple prototype versions to assess which design has the optimum benefit/risk ratio. This is an iterative process that involves screening tests. For any use risks you identify, formative usability testing should be performed. Sometimes the risk controls you implement will create new use errors or new risks of other types. In this case, you must compare the risks before implementing a risk control with risks created by the risk control.

Formative Usability Testing Process 220x300 Integrating usability testing into your design process

Ideally, each design iteration will reduce the risks further until all risks have been eliminated. The international risk management standard (ISO 14971) states that risks shall be reduced as low as reasonably practicable (ALARP). However, the European medical devices regulations require risks to be reduced as far as possible, considering the state-of-the-art. For example, all small-bore connectors in the USA are now required to have unique connectors that are incompatible with IV tubing Luer lock connections to prevent potential use errors. That requirement is considered “state-of-the-art.” If your device is marketed in both the USA and Europe, you will need to reduce errors as far as possible–before writing warnings and precautions in your instructions for use.

Reaching the point where use errors cannot be reduced any further may require many design iterations, and each iteration should be subsequently evaluated with formative usability testing. Formative testing can be performed with prototypes, rather than production equivalents, but the formative testing conditions should also address factors such as the use environment and users with different levels of education and/or experience. Ultimately, if the formative testing is done well, summative (validation) testing will be a formality.

Risk Control Effectiveness During Phase 4 – Summative Usability Testing during Verification

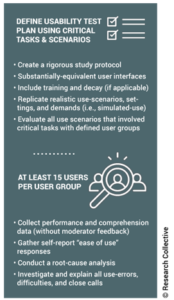
Once your team freezes the design, you will need to conduct verification testing. This includes integrating usability testing into the verification testing process. Summative (validation) testing must be performed once your design is “frozen.” If you are developing an electrical medical device, then you will need to provide evidence of usability testing as part of your documentation for submission to an electrical safety testing lab for IEC 60601-1 testing. There is a collateral standard for usability (i.e., IEC 60601-1-6). For software as a medical device (SaMD), you will also be expected to conduct usability testing to demonstrate that the user interface does not create any user errors.

Summative Usability Testing Process 174x300 Integrating usability testing into your design process

When you conduct summative (validation) testing, it is critical to make sure that you are using samples that are production equivalents rather than prototypes. Also, it is crucial to have your instructions for use (IFU) finalized. Any residual risks for use errors should be identified in the precautions section of your IFU, and the use of video is encouraged as a training aid to ensure use errors are identified, and the user understands any potential harm. When the summative testing is performed, there should be no deviations and no use errors. Inadequate identification of usability factors during Phase 2, or inadequate formative testing during Phase 3, is usually the root cause of failed summative testing. If your team prepared sufficiently in Phase 2 and 3, the Phase 4 results would be unsurprisingly successful.  

Additional Training Resources for Usability Engineering

The following additional training resources for usability engineering may be helpful to you:

Integrating usability testing into your design process Read More »

ISO 14971 Risk Management Updates in ISO/DIS 14971:2018

This article describes updates being made to the ISO 14971 Standard in the new draft version released for comment in July 2018.

There are two versions of ISO 14971 that are currently available. The first is the international version: ISO 14971:2007. The second is the European normative version: EN ISO 14971:2012. There is also a new draft being created by the TC210 committee for release in 2019.

Explanation of the different versions of the ISO 14971 standard

In 2000, the first edition of ISO 14971 was released as the international standard for risk management of medical devices. In 2007, the second edition of ISO 14971 was released. When new international standards are released, a European normative version is also released. The “European Norm” or EN version is intended to identify any gaps between the international standard and the requirements of the applicable European directives (i.e., the MDD, AIMD, and the IVDD). These gaps historically were included in the ZA annex at the end of the EN version. However, in 2009 this annex was split into three annexes (i.e., ZA, ZB, and ZC) to address each of the three directives separately. In reality, the 2009 annex only differed concerning the directive referenced. In 2012, a new EN version was released. This new standard included seven deviations, which were controversial. These deviations were intended to identify contradictions between the directives and the international standard, but the interpretations were not agreed with by companies or most of the Notified Bodies. Ultimately, the seven deviations were required to be addressed in the risk management files for any medical device that was CE Marked.

What changed between ISO 14971:2007 and ISO/DIS 14971:2018?

The TC210 working group assigned to update the ISO 14971 standard (JWG1) was tasked with improving guidance for the implementation of ISO 14971. Still, the committee was also tasked with making these improvements without changing the risk management process. Also, the committee was asked to move the informative annexes at the end of ISO 14971 from the standard to the guidance document ISO/TR 24971. Therefore, in July, the committee released a draft for comment and voting. Draft versions are identified with the prefix “ISO/DIS.” The ISO/DIS 14971 standard released in July has only three annexes: A) Rationale for the requirements, B) Risk management process for medical devices, and C) Fundamental risk concepts (formerly Annex E). The other seven annexes were moved to the draft of ISO/TR 24971. The reason stated for moving these Annexes to the guidance document was to make future revisions to the guidance easier to implement because it is a guidance rather than a standard. However, there were also some objectionable recommendations in the informative annexes that were the subject of deviation #3—ALARP from Annex D.8 vs. “As far as possible,” in the first indent of section 2 of Annex I in the MDD.

Although the committee was tasked to make improvements in the implementation of ISO 14971 without changing the process, the new draft has subtle changes in the process. Most of these changes can be identified quickly by reviewing the updated risk management flow chart provided in Figure 1. The updated flow chart now has two places where risks are evaluated. The first place is identical to the original Figure 1, but now the associated section is clarified to be specific to evaluating individual risks. The second place in the flow chart is new and specific to the evaluation of overall residual risks. The draft standard also states that different acceptability criteria and methods of evaluation may be used for each evaluation phase in the process. There have also been subtle changes to the names of process phases:

  • Section 7.4 is now “Benefit/Risk” analysis instead of “Risk/Benefit” analysis—although the draft flow chart does not reflect this.
  • Section 9 is now “Risk Management Review” instead of “Risk Management Report”
  • Section 10 is now “Production and post-production activities” instead of “Production and post-production information”

There is also more detail in the diagram under the phases for 1) risk analysis, 2) risk control, and 3) production and post-production activities.

Three new definitions are introduced in the draft standard: 3.2, benefit; 3.15, reasonably foreseeable misuse; and 3.28, state of the art. The section for identification of hazards, Clause 5.4, was reworded and expanded to consider the reasonably foreseeable sequences or combinations of events that can result in a hazardous situation. The draft standard now states that your risk management plan must also include a method to evaluate the overall residual risk and the criteria for the acceptability of the overall residual risk. In the section for risk estimation, Clause 5.5, the draft standard states that if the probability of the occurrence of harm cannot be estimated, the possible consequences shall be listed for use in the risk evaluation and risk control. The risk control option analysis priorities in section 7.1 are updated to match the new MDR, Regulation (EU) 2017/745, nearly exactly. In section 9, risk management reports were changed to risk management review, and the Clause now requires determining when to conduct subsequent reviews and when to update reports. This emphasizes the requirement to continuously update risk management documentation with input from production and post-production information. This mirrors the emphasis on continually updating post-market clinical follow-up in Regulation (EU) 2017/745, Annex XIV, Part B, Section 5, and continuously updating clinical evaluations in Regulation (EU) 2017/745, Annex XIV, Part A, Section 1.

Will ISO 14971 2019 eliminate the deviations ISO 14971 Risk Management Updates in ISO/DIS 14971:2018

Will ISO 14971:2019 address the 7 Deviations in EN ISO 14971:2012?

The new MDR, Regulation (EU) 2017/745, revised and clarified the wording of the essential requirements in the MDD. The MDR attempts to explain the requirements for risk management files of CE Marked products, but the MDR remains different from the requirements of ISO 14971. Unfortunately, because the ISO/DIS 14971 was not intended to change the risk management process of ISO 14971:2007, there will continue to be “deviations” between the MDR and standard.

Some people have tried to use ISO/TR 24971, the risk management guidance, as the official interpretation of how the risk management standard. However, the guidance is also a product of the TC210 committee, and it does not meet all requirements of the MDD or the MDR.

The new draft does, however, include changes that address some of the deviations in EN ISO 14971:2012. Below, each of the seven variations is listed, and hyperlinks are provided to other articles on each deviation.

  1. Negligible Risks – The word “negligible” was only in one location in the body of the standard as a note referring to Annex D.8. In the draft, Annex D was removed and relocated to ISO/TR 24971, and the note was eliminated from Clause 3.4—now Clause 4.4 in the draft. The draft should fully resolve this deviation.
  2. Risk Acceptability – Clause 7 was renumbered to Clause 8 in the draft. Still, the title of this Clause was also changed from “Evaluation of overall residual risk acceptability” to “Evaluation of overall residual risk.” However, if you read the Clause it still refers to determining the acceptability of risks. In note 2 of Annex ZA of the draft, it states that determining acceptable risk must comply with Essential Requirements 1, 2, 5, 6, 7, 8, 9, 11, and 12 of the Directive. The draft should fully resolve this deviation.
  3. ALARP vs. “As far as possible” – The European Commission believes that the concept of “ALARP” implies economic considerations, and some companies have used economics as a reason for not implementing certain risk controls. ALARP was eliminated from the notes in the risk management plan clause and by moving Annex D.8 to ISO/TR 24971 and adding note 1 in Annex ZA. The draft should fully resolve this deviation.
  4. Benefit/Risk Analysis – The contradiction in requirements between the International Standard and the MDD, as it relates to determining when a benefit/risk analysis must be conducted, has not been updated. The draft does not resolve this deviation. Companies that CE Mark products will need to perform a benefit/risk analysis for all residual risks and all individual risks—despite the wording of the standard.
  5. Risk Control – The contradiction in requirements between the International Standard and the MDD, as it relates to determining when risk controls must be implemented. The International Standard gives companies the option to avoid the implementation of risk controls if the risk is acceptable. At the same time, the MDD requires that risk controls be implemented for all risks unless the risk controls create additional risks that increase risks, or the risk controls do not reduce risks further. The draft does not resolve this deviation. Companies that CE Mark products will need to implement risk controls for all individual risks—despite the wording of the standard.
  6. Risk Control Options – The intent of Clause 6.2 in ISO 14971:2007 was likely to be the same as the MDD. However, the European Commission identified the missing word “construction” as being significant. Therefore, to prevent any misunderstandings, the TC210 committee copied the wording of Regulation (EU) 2017/745. The draft should fully resolve this deviation.
  7. IFU Validation – Again, to prevent any misunderstandings, the TC210 committee copied the wording of Regulation (EU) 2017/745. However, the examples of information for safety (i.e., warnings, precautions, and contraindications) were not included. Hopefully, the final version of the 3rd edition will consist of these examples. Clause 8, evaluation of overall residual risk, was also reworded to state, “the manufacturer shall decide which residual risks to disclose and what information is necessary to include in the accompanying documentation to disclose those residual risks.” The draft should fully resolve this deviation.

Recommendations for your Risk Management Process?

The most important consideration when establishing a risk management process for medical devices is whether you plan to CE Mark products. If you intend to CE Mark products, then you should write a procedure that is compliant with the current requirements of the MDD and future requirements of Regulation (EU) 2017/745. Therefore, the seven deviations should be addressed. Also, you need to maintain compliance with the current version of the standard.

I recommend creating a process based upon the newly updated process diagram in the latest draft. The process should begin with a risk management plan. For your plan, you may want to create a template and maintain it as a controlled document. It could also be part of your design and development plan template, but the plan should include each of the following risk management activities:

  1. Hazard identification
  2. Risk estimation
  3. Risk evaluation
  4. Risk control option analysis
  5. Risk control verification of effectiveness
  6. Benefit/Risk analysis
  7. Evaluation of overall residual risk
  8. Risk management review
  9. Production and post-production activities

Your procedure should also be integrated with other processes, such as 1) design control, 2) post-marketing surveillance, and 3) clinical evaluation. Your procedure must indicate the priority for the implementation of risk control options. The best strategy for ensuring risk control priorities are compliant is to copy the wording of the new EU Regulations verbatim. Your process should include performing benefit/risk analysis. You should also define your process for risk management review. Your review process should specify when subsequent reviews will be done, and when your risk management report will be updated. Finally, you should identify a post-market surveillance plan for each device or device family, and use that post-market surveillance data as feedback in the risk management process.

The one element that appears to be weakly addressed in the body of the standard is the requirement for traceability of each hazard to the other aspects of the risk management process. Although traceability is mentioned in Clause 3.5 of the 2nd edition, and Clause 4.5 of the draft 3rd edition of ISO 14971, that is the only place is mentioned in the body of the standard. Traceability is mentioned several more times in Annex A, but the focus seems to be on the risk management file. Companies need more guidance on how to achieve this traceability. The appropriate place for this guidance is probably in ISO/TR 24971. Still, in order to maintain this documentation, a software database will likely be critical to maintaining traceability as changes are made during design iterations and after commercialization. This type of software tool is also needed to expedite the review of risk management documentation during a complaint investigation.

Which Risk Analysis Tool should you use?

In Annex G of ISO 14971:2007 and the EN 2012 version, there are five different risk analysis tools described. The word “described” is emphasized because informative annexes are not “recommended.” The committee that created the 2nd edition of ISO 14971 wanted to provide several suggestions for possible risk analysis tools to consider. However, each tool has strengths and weaknesses. Additionally, the widespread use of the failure-mode-and-effects analysis (FMEA) tool in the automotive and aerospace industries has spread to the medical device industry, and companies seem to believe that regulators prefer the FMEA tool. This is not true. Companies should be trained in all of these tools, and training should consist of more than just reading Annex G, and the tools should be used where they are most beneficial. My recommendations are below:

  1. Preliminary Hazard Analysis (PHA) – This process is critical during the development of design inputs. It is also the most underutilized analysis tool. I have not seen a single example of this tool written in a procedure by any medical device company. I believe this process should be continuously updated as part of training new design team members and should be both product and project-specific.
  2. Fault-tree Analysis (FTA) – This process is a top-down approach to risk analysis. It is heavily utilized by transportation engineers when intersections are designed, and accidents are investigated. This tool depicts risk analysis pictorial as a tree of fault modes representing each possible root cause for failure. At each level of the tree, fault mode combinations are described with logical operators (i.e., AND, OR). The information displays the frequency of each fault mode quantitatively. Therefore, when you are investigating a complaint, the tree can be used to help identify possible fault modes that may have been the root cause of device failure. You may also be interested in the standard specific to Fault tree analysis (FTA): IEC 61025:2006.
  3. Failure Mode and Effects Analysis (FMEA) – This process is a bottom-up approach to risk analysis. The automotive and aerospace industries heavily utilize it. This tool systematically lists all failure modes in groups organized by component. Risks are estimated based upon the severity of effect, probability of occurrence, and detectability. Over time, the FMEA process split into three tools: 1) process FMEA (pFMEA), 2) design FMEA (dFMEA), and 3) use FMEA (uFMEA). The first is ideal for analyzing and reducing risks associated with the manufacturing of devices. In particular, the detectability factor can be linked closely with process validation. The second evolved from the realization that the detection of a risk after the device is in the user’s hands does not reduce risk. A risk reduction only occurs if detectability is proactive. Therefore, this was stated in Annex G.4, and companies began to eliminate detectability and continued to use FMEA as their primary tool. Due to the widespread familiarity with the FMEA tool, usability FMEAs became popular for documenting risks associated with the use of a device. Unfortunately, the only real advantages of a dFMEA and uFMEA are familiarity with the tool. You may also be interested in the standard specific to FMEA: IEC 60812:2018.
  4. Hazard and Operability Study (HAZOP) – In addition to the risks of using devices, there are also risks associated with the production of devices. Processes related to coating, cleaning, and sterilization are all processes that typically involve hazardous chemicals. The chemical and pharmaceutical industries use HAZAP as a tool to analyze these process risks and prevent injuries. You may also be interested in the standard specific to HAZOP: IEC 61882:2016.
  5. Hazard Analysis and Critical Control Point (HACCP) – This process is primarily used by the food industry to prevent the spread of contaminated food supplies. Even though medical device manufacturers do not typically use it, it should be considered as a tool for managing the supply chain for devices. This model is useful when manufacturing is outsourced, or secondary processing is conducted at second and third-party suppliers. Since many FDA inspectors started in the food industry as inspectors, this is also a method that is supported by the FDA as a risk control process for outsourced processes.

How to document your risks?

For simple devices, risk management documentation is a burdensome task. For complex devices, a spreadsheet could include hundreds of lines or more than even one thousand individual lines. Also, the requirement for traceability requires additional columns in a table. Therefore, it becomes nearly impossible for you to include all the required information on a page that is 11 inches wide. If you expand your page to 17 inches wide, the size of your font will need to be very small. If you make a change, your spreadsheet can be challenging to update quickly. You could purchase a 43” widescreen TV for your monitor, or you can use dual monitors for your display, but changes remain challenging to implement without a mistake.

You need to stop relying upon spreadsheets. Use a database, and don’t use Microsoft Access. Purchase a database that is designed to document design controls and risk management traceability. If your company has software expertise, develop your software tool to do this. You should also design standardized templates for exporting your reports. By doing this, it will only take minutes to create an updated report when you make design changes. If you describe the risk management activities as notes in your software, the description of these activities can also be automatically converted into summary pages for each report summarizing that risk management activity. You can even prompt the user to answer questions in the software to populate a templated document. For example, you can prompt users to input subsequent updates of your risk management reviews, and that can be automatically converted into a summary paragraph. This reporting capability is especially helpful when responding to FDA review questions asking for cybersecurity risks.

Additional Training Resources for ISO 14971

The risk management training webinar has been completely rewritten for the second time (i.e. the first time was on October 19, 2018). The newest version will be a two-part webinar series. Part one of two will focus on Clauses 1 through 7.1 of the ISO 14971:2019 standard. Part two of two will focus on Clauses 7.2 through 10. We selected Clause 7.2 to begin the second part of this webinar series, because it marks the beginning of the verification of the risk controls your company has implemented (i.e. – Post “Design Freeze”). Part 1 will be hosted live on March 29, 2022 @ 9-10:30 am EDT, and Part 2 will be hosted live on April 5, 2022 @ 9-10:30 am EDT. Both sessions will be recorded if you are unable to participate in the live sessions.

SYS-010, Medical Device Academy’s Risk Management Procedure, is compliant with EN ISO 14971:2019. The procedure includes templates for documentation of design risk management and process risk management. The procedure is also compliant with ISO/TR 24971:2020 and Regulation (EU) 2017/745. Both the two-part risk management training webinar, and the risk management procedure, are included in Medical Device Academy’s turnkey quality system

ISO 14971 Risk Management Updates in ISO/DIS 14971:2018 Read More »

Purchasing Controls and Supplier Qualification

This article identifies the requirements for purchasing controls and supplier qualification procedures, as well as best practices for implementation.

Purchasing Controls

Sourcing suppliers in the medical device industry is not as simple as going on the internet and finding your material and purchasing it. As part of a compliant quality management system, purchasing controls must be in place to ensure that quality products and materials are going into your device and that any service providers that your company uses in the production of your product or within your quality management system are qualified.

ISO 13485 Requirements

In light of that, ISO 13485:2016 sections 7.4.1 Purchasing process, 7.4.2 Purchasing information, and section 7.4.3 Verification of purchased product outline the purchasing requirements. The following are requirements for the evaluation and selection of suppliers:

  • The organization must have established criteria for the evaluation and selection of suppliers.
  • The criteria need to evaluate the supplier’s ability to provide a product that meets the requirements.
  • It needs to take into consideration the performance of the supplier.
  • It must consider the criticality and the effect that the purchased product may have on the quality of the medical device.
  • The level of supplier assessment and monitoring should be proportionate to the level of risk associated with the medical device.

Maintaining Purchasing Controls

To start, in the most basic sense, purchasing controls involve procedures that ensure you are only purchasing from suppliers who can meet your specifications and requirements. The best way to keep track of your qualified suppliers is to maintain an Approved Supplier List (ASL). You should only purchase products or services that affect your product or quality management system from companies on the ASL (you would not necessarily need to qualify things like office supplies or legal assistance through purchasing controls).

When used effectively, the Approved Supplier List can be a great tool to manage the key facets of purchasing control and keep track of supplier monitoring. Items that you can capture on the ASL include:

  • Supplier Name
  • Scope of Approved Supplies
  • Contact Information
  • Status of Approval (Approved, Pending, Unapproved, etc.)
  • Qualification Criteria
  • Supplier Certification and expiry dates
  • Monitoring Requirements/Activities
    • Date of Last Review
    • Date of Next Review

The first step in your purchasing procedure should involve checking to see if the supplier is under active approved status on the ASL. The second step will be to ensure that you are purchasing an item/service that is within the scope of approval of that supplier. If you have not approved the supplier, or the intended purchase is beyond the scope of that supplier, your purchaser will need to go through the necessary channels to add the supplier to the ASL or modify their scope on the ASL.

Supplier Qualification Criteria

As required by the FDA, the level of supplier assessment should be proportionate to the level of risk associated with the medical device. The FDA is not prescriptive about the use of specific qualifications or assessments for different types of suppliers, so that is up to your company to determine. This is a somewhat grey area but based on years working with companies and suppliers, as well as participating in FDA and ISO 13485 audits, there are some general expectations of vendor qualifications that we have observed and would recommend.

It is good practice to have a form or template that guides your supplier evaluation process. Using input from engineering and QA to first determine the level of risk and the requirements of that supplier, and then base your qualification plan on that information. If you have a higher risk supplier who may be supplying a critical component to your device, or providing a critical service such as sterilization, then your qualification process will be much more involved.

Here is an example of two different levels of criteria based on the type of supplier (the intent is not for the following items to be rules, and your company is responsible for determining the adequate acceptance criteria for suppliers, but this is a general example of what you may expect).

  • Critical Custom Component Supplier
    • ISO 13485 Certification
    • On-site audit of supplier’s facility
    • References
    • Provides Certificates of Analysis (CoA)
    • A written agreement that the supplier will communicate with the company regarding any changes that could affect their ability to meet requirements and specifications.
    • You validate a production sample, and it meets requirements
  • Non-Critical Consumable Supplier
    • Product available that meets the needs of the company.
    • An associate has previously used by an associate who recommends the supplier.
    • Adequate customer service returns allowed.

Additional Function of Supplier Evaluation Forms

The supplier evaluation form can also be used as the plan to assign responsibility and track completion and results during the initial evaluation. It can also include the plan for ongoing monitoring and control of the supplier. This evaluation form should be maintained as a quality record, and auditors will frequently ask to see supplier evaluations.

Are Supplier Audits Required as Purchasing Controls?

Also valuable, supplier audits may be included as part of an evaluation plan for a new supplier, the change of scope of a supplier, a routine audit as part of ongoing monitoring, or as part of a nonconformity investigation of a high-risk product. While it is not required by ISO 13485, nor does the FDA does specify in the CFR that you must audit suppliers, it is a very good idea to audit your critical suppliers. If an auditor or FDA inspector sees evidence that your current purchasing controls are inadequate, performing supplier audits may be forced as a corrective action.

Beyond that, you can gain so much value, and gather countless clues and important information in an audit that you just cannot get without visiting your critical supplier. You can see where they plan to/are making/cleaning/sterilizing/storing your product. Talk to the people on the line, are they competent and trained? Does the company maintain their facility well? How secure is it? Do they maintain adequate records and traceability? Have there been any nonconformities relating to your product that have been detected? Etc.

Supplier audits should also include evaluation of the procedures, activities, and records of the supplier that could have an impact on the product or service they are providing your company. If it is not the first audit of the company, you should be sure to review the previous audit report findings and ensure the company has addressed any nonconformities, review supplier performance data, information about any changes that may have occurred at the supplier since your last visit, etc.

Record Maintenance and Ongoing Evaluation of Suppliers

No matter the method of supplier qualification, it is best practice to maintain supplier files that contain useful information relative to the supplier that may include:

  • The original supplier qualification form
  • Supplier certificates
  • References
  • Audit reports
  • Subsequent performance evaluations
  • Expanded scope qualifications
  • Supplier communications
  • Current contact information
  • Copies of any non-conforming material reports related to the supplier, etc.

ISO 13485 requires monitoring and re-evaluation of suppliers, and maintaining detailed supplier files will assist in meeting this requirement, and will help in the feedback system to identify and recurring problems or issues with a supplier. On a planned basis, whether that is annually, or every order (dependent on the criticality of the product), your company should conduct a formal supplier evaluation to determine whether the supplier has continued to meet requirements – In general, annual supplier reviews are standard. Additionally, you must specify this frequency in your procedure (auditors will look for what period you specify in your procedure, and then will check your ASL to make sure all of your suppliers have been reviewed within that timeframe).

During the supplier evaluation, if you find there have been issues, you need to determine and weigh the risks associated with staying with that supplier, and document that in the supplier file. If you determine the supplier should no longer be qualified, then you must also indicate on the ASL that the company no longer approves of the supplier.

Making the Purchase

When you have verified your supplier is approved on the ASL, you are authorized to purchase a product. Engineering is usually responsible for identifying the product specifications, requirements for product acceptance, and adequacy of specified purchasing requirements before communication to the supplier. The specifications may be in the form of drawings or written specifications. Additional information communicated to the supplier should also include, as applicable, an agreement between your company and the supplier that the supplier will notify you before the implementation of changes relating to the product that could affect its ability to meet specified purchasing requirements. When the first batch of product is received from a particular supplier, it is a good idea to verify that the product performs as intended before entering into production with new material or components.

Supplier Nonconformity

From time to time, you may encounter issues with a supplier. Sources of nonconformity include incoming inspections, production nonconformities, final inspection, or customer complaints. You must notify your supplier of the nonconformity and record their response and assessment. Depending on the level of criticality of the vendor, it is reasonable to require them to perform a root cause analysis to determine and alleviate the cause of failure. You should also request documentation of an effectiveness check to ensure the supplier has taken corrective actions. You should maintain copies of supplier nonconformity reports in the supplier file, and discuss nonconformities during ongoing supplier evaluations.

If the supplier does not cooperate or fails to address the nonconformity in an acceptable manner, or if there is a pattern of nonconformities with the vendor, then you should disqualify the supplier, and indicate that the supplier is “not approved” on the ASL.

Purchasing Controls Procedures You Might Need

Medical Device Academy developed a Supplier Qualification Procedure, Purchasing Procedure, and associated forms that will meet purchasing controls regulatory requirements for ISO 13485:2016 and 21 CFR 820.50. These procedures will help you ensure that goods and services purchased by your company meet your requirements and specifications. If you have any questions or would like help in developing a custom procedure or work instructions that meet your company’s unique needs, please feel free to email me or schedule a call to discuss.

Purchasing Controls and Supplier Qualification Read More »

Implementing Procedures for CAPA, NCMR & Receiving Inspection

The article shares lessons learned from implementing procedures for a new ISO 13485 quality system. This is the second in a series. The first month of procedure implementation was covered in a previous article titled, “How to implement a new ISO 13485 quality system plan in 2016.”

Implementing Procedures Implementing Procedures for CAPA, NCMR & Receiving Inspection

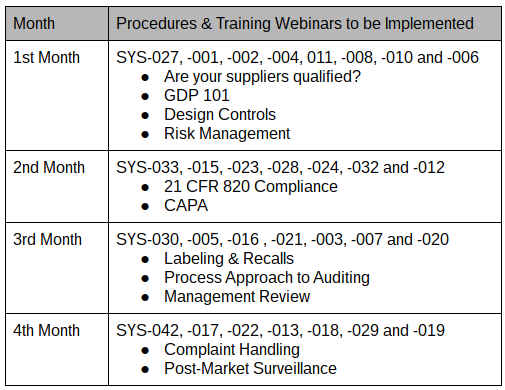
Typically, I recommend implementing a new ISO 13485 quality system over six months. Still, recently I a few clients have requested my assistance with implementing a quality management system within four months. In November, I wrote an article about implementing a new ISO 13485 quality system. That article described implementing procedures for the first month. Specifically, the implementation of the following procedures was covered:

  1. SYS-027, Purchasing
  2. SYS-001, Document Control
  3. SYS-002, Record & Data Control
  4. SYS-004, Training & Competency
  5. SYS-011, Supplier Quality Management
  6. SYS-008, Product Development
  7. SYS-010, Risk Management
  8. SYS-006, Change Control

These eight procedures are typically needed first. This article covers the implementation of the next set of procedures. During this month, I recommend conducting company-wide quality management system training for the ISO 13485 and 21 CFR 820.

Implementing Receiving Inspection Procedures

During the first month, procedures for purchasing components and services are implemented. As these products are shipped and received by your company, you need to create records of incoming inspection. It is not sufficient to merely have a log for receiving inspection. You need records of the results of the inspection. You may outsource the inspection activities, but receiving personnel must review the records of inspection for accuracy and completeness before moving product to your storage warehouse or production areas. Even if the inspection is 100% outsourced, it is still recommended to verify the inspection results independently on a sampling basis periodically. This should be a risk-based sampling that takes into account the importance of the item being inspected and the existence of in-process and final inspection activities that will identify potential nonconformities.

The most challenging part of this process typically is identifying inspection procedures and calibrated devices for inspection. Your company must find a balance between inspections performed by suppliers, incoming inspection, in-process inspection, and final inspection. Each of these process controls requires time and resources, but implementation should be risk-based and take into account the effectiveness of each inspection process–as determined by process validation. Sample sizes for inspection should also be risk-based.

Implementing Procedures for Identification and Traceability

The lot or a serial number of components must be identified throughout product realization–including incoming inspection, storage, production, final inspection, and shipping. In addition to determining what things are, you must also identify the status of each item throughout the product realization process. For example:

  • Is the product to be inspected or already inspected?
  • After the inspection, is product accepted or rejected?
  • Which production processes have been completed?
  • Is the product released for the final shipment?

The procedure for identification and traceability should be implemented immediately after the purchasing process, implemented during 1st month, because traceability requirements should be communicated to suppliers as part of supplier quality agreements and as part of each purchase order.

Initially, when this process is implemented, there is a tendency to complete forms for every step of the process and to distribute copies of the forms to communicate status. Completing forms and copying paperwork requires labor and adds no value. Therefore, learn manufacturing methods and visual indicators such as color-coding are recommended as best practices for identifying products and their status.

Implementing CAPA Procedures

When a product is identified as nonconforming, corrective actions need to be implemented to prevent a recurrence. Procedures need to include the requirement for planning corrective actions, containing a nonconforming product, correcting nonconformities, and implementing actions to prevent any future nonconformities. These procedures also need to address negative trends to prevent nonconformities before the product is out of specification (i.e., preventive actions). Procedures also need to provide guidelines on how to verify the effectiveness of corrective and preventive actions. Initially, the actions implemented will be specific to a purchased product that is received and rejected. However, over time data analysis of process monitoring and internal auditing will identify additional corrective and preventive actions that are needed.

The effectiveness of CAPA processes, in general, requires three key elements:

  1. A well-designed CAPA form
  2. Proper training on root cause analysis
  3. Performing effectiveness checks

In the CAPA training provided during the second month, the best practices for CAPA form design are covered. The training includes several methods for root causes analysis too. Finally, the training emphasizes using quantitative measurements to verify the effectiveness of corrective actions. It is recommended to identify the quantitative acceptance criteria for an effective corrective action before initiating actions to ensure that the actions planned are sufficient to prevent a recurrence.

Monitoring Your Procedure Implementation Process

As indicated in November’s article, I recommend using quantitative metrics to track the progress of procedure implementation. For example:

  1. % of procedures implemented,
  2. duration of document review and approval process, and
  3. % of required training completed.

Implementing Procedures for ISO 13485:2016

If you already have a quality system in place, you are implementing procedures that are modified for ISO 13485:2016 compliance, some of the same lessons learned to apply. If you are interested in learning more about the changes required for compliance with the 2016 version of the standard, we recorded two live webinars on March 24, 2016.

Implementing Procedures for CAPA, NCMR & Receiving Inspection Read More »

FDA 483 Inspection Observations Pareto Chart for FY 2015 Data

This article presents a Pareto Analysis of FDA 483 inspection observations from FY 2015. It compares the trends observed with a similar Pareto analysis that was performed a couple of years ago on FY 2013 data.

FY 2015 Pareto Analysis of FDA 483s FDA 483 Inspection Observations Pareto Chart for FY 2015 Data

Method of Data Analysis for FDA 483 Inspection Observations

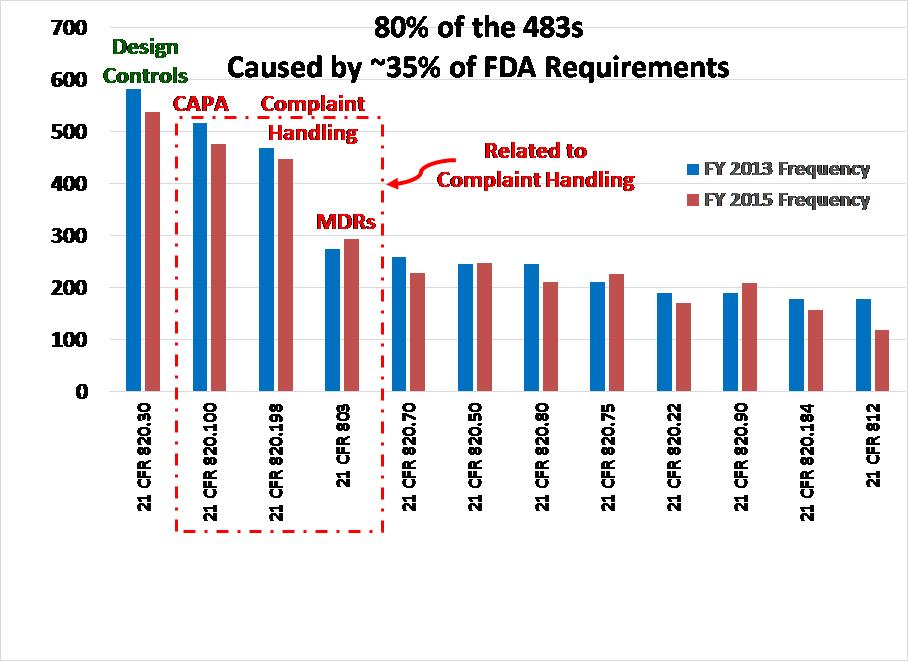
The FDA posts Excel spreadsheets on the website to download data for FDA 483 Inspection Observations. These spreadsheets include inspection results for all the divisions of the FDA. To perform data analysis for FY 2015 results, I deleted the sheets that were not specific to medical device manufacturer inspections (i.e., only used data from CDRH). I sorted the data by the regulation that was referenced. For example, all the sub-clauses for 21 CFR 803 were combined into one category for the Pareto analysis. The combined categories were then sorted from the most frequent 483 inspection observations to the least frequent 483 inspection observations. The data was then added to the graph that I produced in February 2014 using FY 2013 results as a second data set. The resulting graph is shown above.

Comparison of FDA 483 Inspection Observations between FY 2013 and FY 2015

For MDR Compliance (i.e., 21 CFR 803), there was a slight increase in the number of 483 observations issued from FY 2013 to FY 2015. However, the difference was only a 1% increase from 6.2% to 7.2% of the total number of 483s issued. There was an even smaller increase in the number of findings related to purchasing controls (i.e., 5.6% increased to 6.1%). I noticed a slight drop in the number of findings related to design controls, CAPA, and complaint handling. However, the overall trend for FY 2013 and FY 2015 is essentially the same.

There are two other categories where an increase was observed: 1) process validation increased by 0.7% from 4.8% to 5.5%, and 2) control of nonconforming product increased 0.8% from 4.3% to 5.1%. These areas are important. Control of nonconforming product is one of the major sources of CAPAs and often results in design changes. Therefore, FDA inspectors are reviewing your data for a nonconforming product during inspections to help them identify potential CAPAs and design changes that may have been made. The typical sequence is 1) nonconformity, 2) investigate nonconformity as part of a CAPA, and 3) initiate a design change as a corrective action.

Process validation is a completely different area that is separate from CAPA, complaint handling, and MDRs. However, inadequate process validation is a common root cause of nonconformities. Therefore, inspectors often follow an audit trail from a nonconforming product record back to a process change that was implemented but inadequately validated. Thus, an increased focus on nonconformities may be the reason for an increase in FDA 483 inspection observations related to process validation.

So what’s the big deal?

This proves that the FDA inspectors continue to be predictable. The “playbook” for FDA inspections is the QSIT Manual. It hasn’t changed since 1996. Yet, companies continue to be shocked and amazed by FDA inspectors.

Additional Resources

If you want to learn how to prepare for FDA inspections, I recorded a webinar you can download (FREE). I recorded the webinar in May of 2014, but it’s been a couple of years, and I’ve learned a few new tricks. Therefore, I’m going to re-record the webinar and update it for lessons learned. I’ll even share a few tools and approaches to avoid findings and reduce the risk of warning letters. I’m also evaluating a new application that is designed for teams to have private chats and file sharing during an inspection. Stay tuned to my webinars page, and I’ll post that webinar soon. Maybe I’ll record something from Germany next month.

Until then, I am working on a webinar specific to medical device reporting. Many companies have still not updated their MDR procedures to reflect the eMDR process using electronic submissions gateways. Therefore, I’m releasing an updated procedure for MDRs, and I am offering a webinar bundle to train people on how to comply with 21 CFR 803 and the procedure. You might also be interested in my previous webinar specific to control of the nonconforming product.

FDA 483 Inspection Observations Pareto Chart for FY 2015 Data Read More »

Minimum Data Points Constituting a Trend Is 3?

This article explains why three is never the right answer, and this article explains why asking how many minimum data points are needed to identify a trend is the wrong question.

Minimum Data Points for CAPA Minimum Data Points Constituting a Trend Is 3?

Recently a client sent me an email asking the same question about data analysis in two different ways. The first question asked, “How many of the same situation need to occur before it is considered a trend?” The second question asked, “How many nonconformities can occur before a CAPA should be opened?” This question can be asked a hundred different ways, but it’s the wrong question.

Minimum Data Points for Variable Data

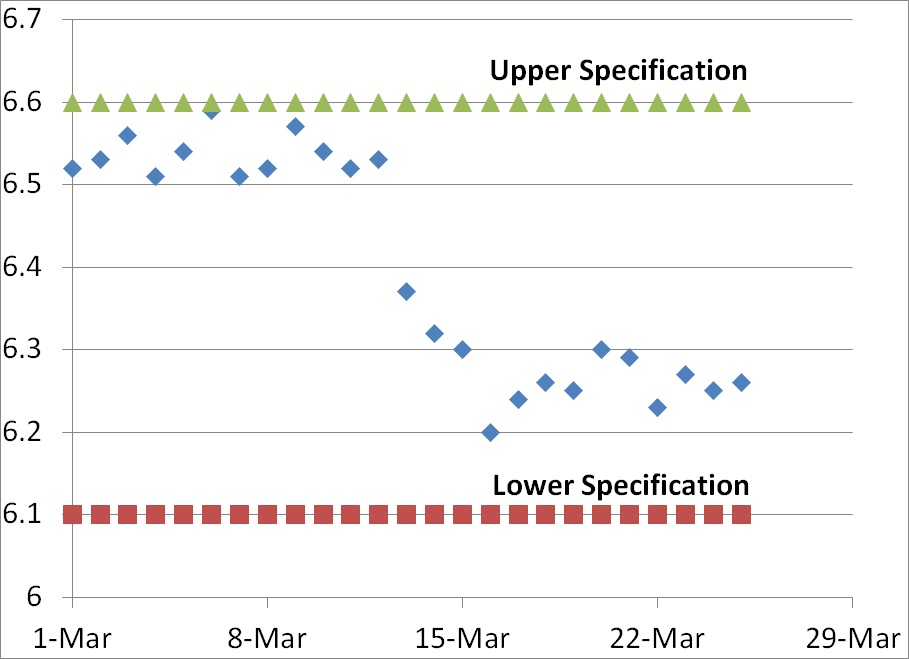
In the graph above we have variable data rather than attribute data. When you have variable data, the answer regarding the number of minimum data points is always a quantitative answer that is objective rather than subjective. Typically the new data point lies outside of the upper or lower specification for the element being measured (i.e., >6.6 or <6.1 in the graph above). Even if the new data point remains within specifications, a CAPA may still be issued if the new data indicates that there has been a shift in the normal distribution of data.

In our graph above, on March 13 the newest data point was 6.37. Although this value is within specifications, in fact close to the center of the range, this value represented a shift in the trend that exceeded the normal distribution of data observed for the previous 12 days of the month.  The mean for the first 12 days was 6.54 and the standard deviation was 0.0250. Many people establish alert limits that equal mean +/- 2x standard deviation (i.e., 6.59 and 6.49) and the action limit is often set equal to the mean +/- 3x standard deviation (i.e., 6.62 and 6.47). Therefore, a value of 6.37 is well outside the normal distribution for the first 12 days of the month–but not outside specifications.

The shift in data values for this graph indicates a shift, but the process was capable of remaining within specifications before the shift and process capability actually appears to be slightly better after the shift. In this case, there is no need for a CAPA but if the reason for the shift is unknown an investigation would be recommended. However, if different lower specification were chosen (e.g., 6.4) then the new data point on March 13 would be outside the specification and product would be identified as nonconforming.

Nonconforming results should always trigger in an investigation?

If the process was validated and the mean +/- 2x standard deviations remains within the specifications, then greater than 95% of the product should be conforming. If the the mean +/- 3x standard deviations remains within the specifications, then greater than 99.5% of the product should be conforming. Therefore, based upon the data from the first 12 days of March any data points that are lower than 6.47 should be very rare unless there is a process shift.

An investigation of the data point on March 13 should result in a CAPA unless the outlying data can be explained and a new trend with a lower mean is expected. If the new data point cannot be explained, then only one new data point is needed and the data does not even need to be nonconforming. If no actions are taken the drop in the measured value could continue and nonconforming product could result, while any action taken on March 13 is a preventive action.

Minimum Data Points for Attribute Data

In the case of the first question, the negative customer situation that is reported to a company may be an attribute rather than variable data. For example, “customer unsubscribed” after an email blast went out is a negative customer situation. If you know the % of customers that unsubscribed when email blasts go out, then you have variable data. If you only know that one person unsubscribed, then you only have an attribute (i.e., unsubscribed instead of continued subscription). The first time an unsubscription occurs, you should do an investigation to see if there is an issue other than frequent email blasts that exceed a customer’s expectations in frequency. The action taken could be to establish an alert and action limit for unsubscribed emails based upon industry norms or the % calculated from the first event.

What are the right questions?

Instead of asking how many minimum data points are needed to initiate a CAPA, we should make sure we are measuring the right variables. The % of unsubscribed is a valuable variable data point, but knowing that one person unsubscribed without knowing how many people received that email blast is not nearly as helpful in making future decisions. Another question is to ask, “Why did the person unsubscribe?” If the reason is unknown, you may want to contact the former subscriber and ask them–but probably not by email. If you have a theory why people are unsubscribing you can also perform an experiment to test your hypothesis. If you think the cause is that emails are being sent too frequently, then you can split your list and send the same emails to two halves of a list at different frequencies. If you are correct, then the list that has more frequent emails should also have a higher % of unsubscribers. This type of design of experiment (DOE) is one of the root cause investigation tools I recommend in my Risk-Based CAPA webinar.

Recommendations for Trend Analysis

Whenever you establish a new metric or quality objective, you should also establish a limit for when you intend to investigate and when you intend to take preventive or corrective actions. If you simply start measuring a variable or attribute, you may have difficulty recommending actions to management during your next management review and explaining why actions were not taken during an FDA inspection or an audit.

Additional Related Reading
If you are interested in reading more about how this might be applied to inspection results, please read my blog titled, “21 CFR 820.80: 3 Ways to Record Inspection Results.”

Minimum Data Points Constituting a Trend Is 3? Read More »

Case Study Part 2: Packaging CAPA Preventive Action and Corrective Action

This article explains details of implementing a CAPA preventive action and corrective action for packaging issues. Specifically, containment measures, corrections, corrective actions, and preventive actions to address the root cause identified in part 1 of this case study.

Screenshot 2015 11 08 at 12.34.46 PM 1024x504 Case Study Part 2: Packaging CAPA Preventive Action and Corrective Action
Comparing Incoming Inspection Results as a CAPA Preventive Action

CAPA Step 1: Containment of Product with Defective Packaging

When you learn of a packaging complaint related to a specific lot, you also need to determine if another product associated with the lot is safe to ship to customers. You should not attempt a correction and removal of the product unless you have a reasonably high level of confidence that there is a packaging issue with the lot or a portion of a lot, but you might consider placing product from the same lot in your inventory on hold until your investigation is completed. If you confirm that you have an issue with a specific lot, lots, or portion of a lot, then you should initiate correction and removal of product to prevent potentially, a non-sterile product from being used. This type of problem could result in a Class 1 recall (i.e., the most severe of the three categories). Therefore, you need to act quickly and according to established procedures for corrections and removals.

CAPA Step 2: Correction(s) of Defective Packaging

If you find a problem, there is little you can do to fix the existing defective packaging other than to repackage the product. If the product has only been sterilized once, and you have revalidated the product for resterilization, then you can repackage, relabel and resterilize. To ensure traceability to the lot that has been reworked, you may need to revise the labeling (e.g., add an “R” to the lot number). If you have not revalidated the resterilization of the product, you may want to use this lot for validation of resterilization instead of throwing it out. However, sometimes your best option is to scrap the product.

Additional corrections may involve correcting the calibration of a testing device or performing a repair to sealing equipment. You might modify a specification on a drawing. You might correct a work instruction that did not have the correct, validated sealing parameters. All of these could be corrections.

CAPA Step 4: Corrective Action(s) for Packaging Issues

Investigation of root cause (CAPA Step 3) occurs in parallel with containment (CAPA Step 1) and correction (CAPA Step 2). Corrective actions (CAPA Step 4) prevent the packaging issues from recurring, and they occur after the first three steps because you can only implement corrective actions once you understand the root cause of the quality issue. The best tool for evaluating your current process controls and evaluating the implementation of new corrective actions is a process risk control plan. In order to do this, you need a process flow diagram and a process risk analysis. Each step of the process, from the raw material fabrication of film to the released product, needs to have potential hazards identified, risks evaluated, and risk controls implemented. You should use your process validation to verify the effectiveness of process risk controls quantitatively. If the process capability is greater than 95% for each parameter, and you have addressed every possible source of problems, then you probably won’t gain much from additional risk controls. However, many companies reduce their sampling or rely on certificates of conformity to ensure that the process is controlled adequately.

CAPA Step 5: CAPA Preventive Action for Packaging Issues

You already had a packaging issue with one lot of products, but you could have another issue with a different product or lot for the same reason or a different reason. If the product is the same, and the reason is the same, then the actions taken are corrective actions. If you take action to prevent the occurrence of this issue with a different product, or you prevent other potential causes of packaging issues by initiating more robust monitoring and process controls, then your actions are preventive. Often you will want to implement both types of actions.

In the box plot example provided in this article, Lot D was detected at incoming inspection as having peel test results that were outside the alert limit but acceptable when compared to the specification limit for peel testing. The alert limit was established during validation of the pouches and comparison of lots A, B, C, and D, demonstrate that Lot D is slightly lower in peel strength. The manufacturer may choose to use the lot, but the sampling plan for in-process peel testing may be altered, or the manufacturer may choose to place the new lot in quarantine while an investigation is performed. This is a CAPA preventive action.

Below I have listed six additional potential CAPA preventive actions to consider for your packaging process:

  1. Perform peel testing and/or bubble leak testing of packaging raw materials as part of the receiving inspection process and perform data analysis of the incoming inspection samples to determine if lower or higher alert and action limits should be established for the new lot of raw materials. The limits should be based upon the manufacturer’s seals as well as your seal.
  2. Retain remnants of in-process peel testing, include the remnants with the sterilization load, and then store the remnants for real-time aging.
  3. Consider implementing visual inspection tools that are able to detect sealing imperfections non-destructively.
  4. Increase the number of samples you test (e.g., 1 to 3 or 3 to 5) for each lot of product sealed to increase your confidence that the seals will be within specifications.
  5. Perform statistical analysis of in-process data for seal peel strength in order to identify potential lots with packaging issues prior to release.
  6. Evaluate the performance of the packaging at temperature and humidity extremes that may be higher or lower than the conservative estimates for ambient conditions (e.g., 30C vs. 25C).

Additional Resources

In addition to the previous article that was part 1 of this case study, I have posted ten other blogs specifically on the topic of CAPA. There is also a CAPA procedure you can download from this website.

Risk-based CAPA Webinar

If you are interested in learning more about a risk-based approach to CAPAs, then please click here.

Case Study Part 2: Packaging CAPA Preventive Action and Corrective Action Read More »

Strategic planning of a mock FDA inspection

This article shows you how to think strategically when you plan a mock FDA inspection to ensure that you successfully prevent an unpleasant FDA inspection.

strategic planning Strategic planning of a mock FDA inspection

For the past couple of years, several clients have asked me to conduct mock FDA inspections to prepare them for a potential FDA inspection. I am writing from Shanghai, China, where I am conducting a mock FDA inspection for a medical device client with another auditor from the company’s business unit in the USA.

The mock FDA inspections I conduct are internal audits and technically not an inspection because inspectors are looking for nonconformities, and I am looking for conformity with the FDA regulations (i.e., 21 CFR 820, 21 CFR 803 and 21 CFR 806). Inspections are conducted by FDA investigators that are conducting an inspection in accordance with the FDA QSIT manual (http://www.fda.gov/ICECI/Inspections/InspectionGuides/ucm074883.htm). I use the process approach to conduct audits of the four major quality systems that FDA inspectors focus on during an FDA inspection. Still, as an auditor, I have several advantages that an inspector doesn’t.

  1. I can evaluate auditees and coach them on how to respond to an FDA inspector more effectively.
  2. I can teach my client’s internal auditors and management team how to use internal audits and Notified Body audits as practice for their next FDA inspection.
  3. I can avoid any area that my client wants me to and focus on areas of concern.
  4. I can help my client identify the most likely product or product family to be targeted by the FDA.
  5. I can give my client advice and help them implement corrective actions.
  6. I can teach my client how to respond to potential FDA Form 483s to avoid a Warning Letter.

Opening meeting for a mock FDA inspection

FDA inspections are not planned, but it is important to make sure that the right people are available and present during a mock FDA inspection, or your “inspector(s)” may not be able to review the records or interview the most important people. Therefore, I provide an agenda ahead of time, indicating which processes I will be auditing on which days. My agenda for a mock FDA inspection begins with an opening meeting, but the purpose of this opening meeting is primarily training. I take advantage of having all the senior managers in one room as an opportunity to explain how they can benefit most from the audit, and to remind them of what to expect during a real FDA inspection.

CAPA Sources

After the opening meeting, I take a brief tour—unless I already know the facility well. Before I leave for the tour, I ask my client to be prepared for me to begin auditing nonconformities, complaint handling, MDRs, and recalls when I return to the conference room. I select these areas because the FDA always starts with the CAPA process, but they look closely at the sources of CAPAs at the same time. I believe that inspectors rarely take “random samples.” Instead, most inspectors use the sources of CAPAs to help them bias there sampling of CAPAs.

Production and Process Controls

The next major process in my agenda after CAPAs and sources of CAPAs is production and process controls. The sequence of my process for auditing this area is always the same: 1) request the Device Master Record (DMR) for the target product or product family, 2) request two or more recent Device Master Records (DHRs) that were associated with a complaint record or MDR (remember samples are never random), and 3) I then go to the production areas identified in the DHR, and I try to interview the people that produced the lot identified in the DHR—rather than the people the department manager feels are the most experienced. This process of working backward from complaint records and MDRs to the activities on the production floor often allows me to help companies identify a root cause that they missed when the complaint or MDR was initially investigated.

Design Controls

Auditing a Design History File (DHF) is about as exciting as watching paint dry for most auditors. Still, I am always fascinated with how things work, so I am more engaging with the design team members I interview during a mock FDA inspection. I also like to focus on aspects of the design that have proven to be less than perfect—by reviewing nonconformities, complaints, MDRs, recalls, and CAPAs first. For example, if I see several complaints related to primary packaging failures, I am going to spend more time reviewing the shipping validation and shelf-life testing, than I might normally allocate.

Management Processes

The FDA is somewhat limited in this area because, in accordance with 21 CFR 820.180(e), the records of internal audits, supplier evaluations, and management reviews are exempt from FDA inspections. During a mock FDA inspection, I do not have this constraint. Therefore, I will often look more closely at these three areas than an FDA inspector to make sure my client has effective management processes. While procedures and schedules are the focus of an FDA inspector, I will make sure that the problems I observed in nonconformities, complaints, MDRs, and recalls are being addressed by management. As a quality manager, this is not always easy to do. Still, as an independent consultant, I have the luxury of being blunt when a senior manager needs to hear from someone other than the typical “yes men.” I also can use this part of mock FDA inspections to benchmark best practices I have learned from the hundreds of companies against what my client is currently doing to manage their quality system.

When to schedule a mock FDA inspection

Scheduling a mock FDA inspection immediately after an FDA inspection is pointless, but there is an optimal time for scheduling your mock FDA inspection. The FDA target is to conduct inspections once every two years for Class II device manufacturers. However, some district offices do better or worse than this target. Therefore, it’s important to keep track of the typical frequency in your district and the date of your last inspection. If the FDA is on a two-year cycle, you want to conduct your mock FDA inspection approximately 6-9 months before the next FDA inspection to ensure that you have time to implement corrective actions before the FDA inspector arrives.

Additional Resources

If you are interested in learning more about this topic, I highly recommend watching and listening to my free webinar on how to prepare for an FDA inspection:

http://robertpackard.wpengine.com/how-to-prepare-for-an-fda-medical-device-inspection/

In addition to preparing for an actual inspection, every company must know how to respond effectively to an FDA 483 inspection observation:

http://robertpackard.wpengine.com/7-steps-respond-fda-483-inspection-observation/

In addition to my blog, I also have recorded a webinar on this topic:

http://robertpackard.wpengine.com/7-steps-respond-fda-483-inspection-observation-webinar/

Finally, every manager needs to be reminded that FDA 483s are just another opportunity to write a CAPA and improve their quality system. Therefore, do yourself a favor and watch my new webinar on creating a risk-based CAPA process:

http://robertpackard.wpengine.com/create-a-risk-based-capa-process/.

Strategic planning of a mock FDA inspection Read More »

CAPA Training – Risk-based

This CAPA training webinar explains how to create a risk-based CAPA process, and you will learn how to implement corrective and preventive actions step-by-step.

Your cart is empty
Risk based CAPA Process Diagram CAPA Training   Risk based

When is CAPA Training?

The CAPA training webinar for risk-based CAPA was last recorded on April 5, 2017. We are recording an updated webinar on June 30, 2020, at 8:30 am EDT.  We also recorded a webinar on How to improve your CAPA process on May 17, 2015. The content of both webinars will be combined into the new update webinar. If you already purchased either webinar, you will receive an automated email inviting you to participate in the new live webinar. If this is a new purchase of the webinar, you will receive a link for downloading the old webinars and an invitation to participate in the new live webinar. Everyone that purchases the webinar will receive a link to download the recording if they are unable to attend the live webinar.

This CAPA training recording is only $129 (AND INCLUDES NATIVE SLIDE POWERPOINT PRESENTATION FILES):

Capa how to1 CAPA Training   Risk based
Create a Risk-Based CAPA Process
How to Create a Risk-Based CAPA Process. This webinar includes the most recent updates to ISO 13485:2016, ISO 9001:2015, and ISO 14971:2019.
Price: $129.00

20- Question Exam and Training Certificate available for $49.00:

Exam CAPA CAPA Training   Risk based
CAPA EXAM
This is a 10 question quiz with multiple choice and fill in the blank questions. The completed quiz is to be submitted by email to Rob Packard as an MS Word document. Rob will provide a corrected exam with explanations for incorrect answers and a training effectiveness certificate for grades of 70% or higher.
Price: $49.00

Do you also need a CAPA Procedure?

Companies that receive a non-conformity or FDA 483 inspection observation often need a new CAPA procedure as well as CAPA training. Our CAPA procedure, and all of our quality system procedures, are risk-based. Specifically, we use the GHTF grading system to score CAPAs in the same numeric scoring system used for MDSAP audit findings. Therefore, this is the perfect CAPA procedure and form for ISO 13485 certification and MDSAP certification.

Description of the CAPA training webinar on how to create a risk-based CAPA process

A risk-based CAPA process is a common goal of medical device manufacturers, but until recently “risk-based” was not clearly defined. The two quality management system standards, ISO 9001 and ISO 13485 were revised and re-issued. The current versions are: ISO 9001:2015 released in October 2015 and ISO 13485:2016  released in February 2016. The biggest fundamental change in both standards is an emphasis on risk-based process management. The CAPA process is the heart of your quality system and one of the most important processes. Therefore, this CAPA training gives you a whole new set of tools for managing your CAPA process using a risk-based approach.

A risk-based CAPA process is more than prioritization

This CAPA training goes beyond simple prioritization of CAPAs and color-coding of CAPAs as high, medium, and low risks. Instead, Rob Packard reviews best practices in risk management (i.e., ISO 14971:2019 and ISO/TR 24971:2020) and he applies the more rigorous risk management process to the CAPA process.

This is a “must-see” presentation for anyone that is responsible for the CAPA process or participates in their company’s CAPA Board. Register for our CAPA training and our speaker will help you integrate risk management activities with your CAPA process.

This CAPA training includes:

  • Revised requirements for ISO 9001:2015 and ISO 13485:2016
  • An outline of the CAPA process and proposed risk management activities
  • Various risk control options that can be integrated with corrective actions
  • How to reconcile conflicts between the definitions for risk in ISO 9001:2015 and ISO 13485:2016
  • Root Cause Analysis Tools
  • 5 Why Analysis
  • Is/Is Not Analysis
  • Fishbone diagrams
  • Brainstorming
  • Pareto analysis
  • Effectiveness checks
  • Sources of corrective and preventive actions
  • Pareto analysis of service issues
  • Trending CAPAs, average aging of CAPAs, “Death by CAPA”
  • Risk Management: risk-based CAPAs, risk thresholds, 7 criteria for estimating risk
  • Documenting CAPAs
  • How to write an effective CAPA SOP
  • Auditing the CAPA process
  • Problem-solving A3 reports
  • Key elements of CAPA forms

VIEW OUR PROCEDURES – CLICK HERE OR IMAGE BELOW:

SOPS CAPA Training   Risk based

About Your Instructor


Home page video cropped 150x150 CAPA Training   Risk basedRob Packard is a regulatory consultant with 30 years of experience in the medical device, pharmaceutical, and biotechnology industries. He is a graduate of UConn in Chemical Engineering. Robert was a senior manager at several medical device companies—including President/CEO of a laparoscopic imaging company. His Quality Management System expertise covers all aspects of developing, training, implementing, and maintaining ISO 13485 and ISO 14971 certifications. From 2009-2012, he was a lead auditor and instructor for one of the largest Notified Bodies. Robert’s specialty is regulatory submissions for high-risk medical devices, such as implants and drug/device combination products for CE marking applications, Canadian medical device applications, and 510(k) submissions. The most favorite part of his job is training others. Specialties: CE Marking, Canadian Medical Device Applications, Post-Marketing Activities, Supplier Quality, CAPA, Risk Management, Auditing, Sterilization Validation, Lean Manufacturing, Silicone Chemistry, Extrusion, Bioprocess Engineering, and Strategy. He can be reached via phone at 802.258.1881 or by email. You can also follow him on Google+, LinkedIn, YouTube, or Twitter.

CAPA Training – Risk-based Read More »

Scroll to Top