Design controls

Auditing Design Controls

Learn how to apply the process approach when auditing design controls and discover how audit checklists fail to identify problems.

Examples of auditing design controls with an audit checklist:

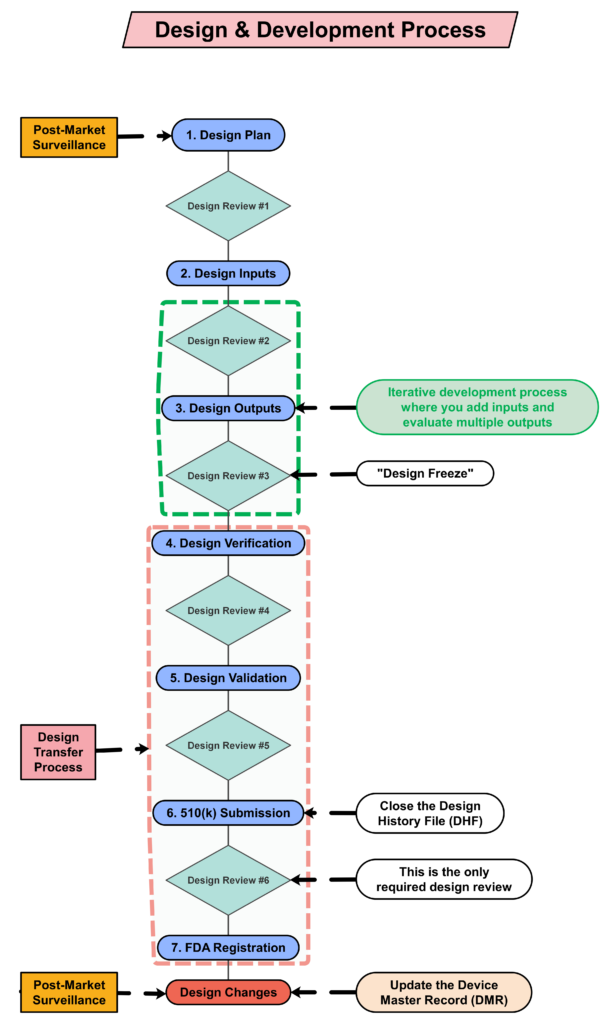
Audit checklists list each requirement in a standard or regulation. When auditing design controls, an audit checklist lists each of the ten subsections of the ISO 13485:2016 standard. For example, here are potential audit checklist questions for the first three subsections:

  • Clause 7.3.1 – Which procedure(s) defines your design control process?
  • Clause 7.3.2 – What is the design plan for your new product? When was the plan last updated?
    • a) What are the phases of your project plan?
    • b) In which phases are design reviews planned?
    • c) In which project phases are verification, validation, and design transfer activities performed?
    • d) Who is responsible for approval of design changes during the project? Who is responsible for updating the design plan as the project progresses?
    • e) How do you demonstrate traceability between hazards, design inputs, design outputs, and testing requirements?
    • f) What equipment and software do you use? What are the training requirements for your design team?
  • Clause 7.3.3 – How do you document design inputs? When were the design inputs reviewed and approved?
    • a) What are the performance requirements? What are the safety requirements? What are the usability requirements?
    • b) What are the applicable regulatory requirements and standards?
    • c) Which hazards have you identified?
    • d) Which design requirements were transferred from a previous design of your device?
    • e) How do you ensure that essential principles of safety and performance are met?

Square subscribe to our blog button 281x300 Auditing Design Controls

How can you improve the first question on the checklist?

The problem with the above questions is that they do not evaluate linkages with other processes. For example, when you ask what procedure(s) defines the design control process (e.g., SYS-008, Design Control Procedure and SYS-006, Change Control Procedure), you can also ask the revision of that procedure(s). The record associated with that document change can be used to evaluate the effectiveness of the document control process. For example, were all the job functions that reviewed and approved the previous version of the procedure represented during the review and approval of the current revision? The procedure itself can also be reviewed to make sure that it includes the appropriate elements for a procedure (e.g., scope, references, roles/responsibilities, description of the process, revision history, etc.). This approach to verifying the effectiveness of the document control process can be applied to every procedure within every process.

What are the problems with using an audit checklist?

An audit checklist is always based on the same regulation or standard. Therefore, when establishing a quality system, using an audit checklist is ideal preparation for the initial certification audit. However, if internal auditors ask the same questions during every audit, then auditees begin to anticipate the questions. Anything not included in the audit checklist may be overlooked. For example, when auditing design controls, there are no requirements for supplier controls mentioned in Clause 7.3. Therefore, an audit checklist will not include any questions about the qualification of suppliers that support design and development (e.g., software developers), as those requirements are already addressed in Clause 7.4.2 (i.e., purchasing information).

Another problem with using audit checklists is that auditors may rely too heavily on the checklist as a crutch. Auditors are supposed to plan the audit agenda based on the importance of areas and the results of previous audits. If the auditor relies solely on the checklist, each clause is assigned equal importance — regardless of its importance or the results of previous audits. Auditors also need to verify compliance with all applicable standards. Creating a checklist for risk management (i.e., ISO 14971), software lifecycle management (i.e., IEC 62304), usability engineering (i.e., IEC 62366), and information technology security management (i.e., ISO 27001) would be extremely time-consuming, and auditors would not be able to complete all of the checklist questions. Auditors require a more efficient method to assess the effectiveness of a process and verify compliance with requirements.

Basics of the process approach to auditing

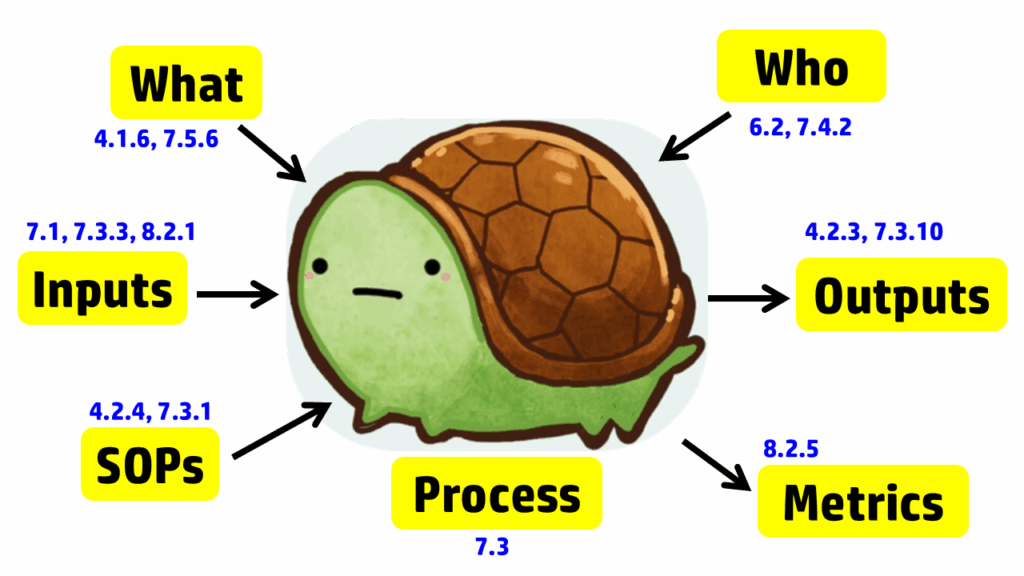
The process approach to auditing is different. Instead of creating a checklist that is specific to the requirements for each process in the standard, the process approach relies on asking seven basic questions and then following the audit trails presented by the answers to those questions. The tool we use to help us remember the seven questions is a “turtle diagram.” The shape of the turtle has seven elements:

  1. body (description of the processes)
  2. head (inputs to the process)
  3. tail (outputs from the process)
  4. leg #1 (what equipment and software is required)
  5. leg #2 (who performs the process)
  6. leg #3 (what procedures and forms are used in the process)
  7. leg #4 (which metrics are used to monitor the process)

Note: It’s only 7 steps. You don’t have to tattoo a turtle diagram on your arm.

The diagram below uses the image of a turtle to remind you of the seven elements, but we added the subclauses from ISO 13485 that are related to auditing design controls. A brief summary of how these subclauses are related is provided in the video above; more details on each part of the turtle diagram are provided below, specifically for design controls.

Auditing Design Controls 9 30 2025 1024x576 Auditing Design Controls

Step 1 – Describe the process

The first step in creating a process audit is to identify the process owner and conduct an interview with them. We recommend doing this in their office, not in the conference room, for three reasons:

  1. Auditor effectiveness will improve if you periodically get up and walk around, because it will make you more alert.
  2. Conference rooms isolate auditors from daily operations, and the auditor may not gain an appreciation for where people perform their work or the proximity of the design team leader to the rest of the team.
  3. Auditees will be more relaxed in their office when being interviewed than they would be in a conference room.

After the process owner provides a brief description of the process, try to get answers to steps 2-7 directly from them in the same interview. Asking open-ended questions to prevent “yes/no” responses will be helpful. You also need a comprehensive understanding of the design control process before interviewing other team members or requesting design records.

Step 2 – Inputs

Even when auditors use the process approach to auditing, this part of the turtle diagram is frequently incomplete when auditing design controls. The obvious answer is to review the auditee’s approval of design inputs. This is a required record for design controls in Clause 7.3.3; however, it is not the only process input for design controls. As stated in Clause 7.3.3, “These inputs shall include…c) applicable output(s) of risk management.” Additionally, Clause 8.2.1 states, “The information gathered in the feedback process shall serve as potential input into risk management for monitoring and maintaining the product requirements as well as the product realization or improvement processes.” Therefore, both risk management and post-market feedback should be included as inputs to the design process. Using the process approach when auditing design controls will show you if the interactions between the risk management process, post-market surveillance process, and the design control process are adequate. Other inputs that should be considered for the design control process include regulatory requirements, such as:

  • Common Specifications (EU)
  • General Safety & Performance Requirements
  • Applicable Safety and Performance Standards
  • Applicable FDA Guidance

Step 3 – Outputs

Most auditors do an excellent job of covering the process outputs when auditing design controls (or any process), as the outputs typically include records, and auditors document which records they reviewed in their audit report. For the design controls process, the Design History File (DHF) (i.e., Clause 7.3.10) is the primary record sampled, and the Device Master Record (DMR) is the second most commonly sampled record. With the changes to the FDA requirements for the QMSR, auditors will be looking for a Medical Device File (i.e., Clause 4.2.3) instead; however, the records should remain the same, with just a new name. If the device is CE marked, there should also be a technical file or a technical file index.

Step 4 – What Resources

A critical part of auditing is to verify that a process is not only documented but also implemented. To implement any process, equipment, or software will likely be necessary. For the implementation of design controls, most companies utilize quality system software to manage documents and records for each design project. For example, Grand Avenue Software could be used for managing the medical device file (i.e., Clause 4.2.3), and AdaptivRisk may be used for managing the risk management file. There may also be some calibrated testing equipment that requires validation, calibration, and maintenance. Therefore, this step in the turtle diagram usually involves the following ISO 13485 clauses:

  • Clause 7.5.6 – process validation
  • Clause 6.3 – infrastructure (i.e., maintenance)
  • Clause 7.6 – monitoring of measurement equipment (i.e., calibration)

This is typically the step of a process audit where the auditor needs to identify “what resources” are used in the process. However, only companies that have software systems for design controls have resources dedicated to Design and Development. I have indicated this in the “Turtle Diagram” presented above.

Step 5 – Who

The next step in the process approach to auditing design controls is to identify who is assigned to the design team for a design project. Sometimes companies assign large teams. In this case, the auditor should focus on the team members who must review and approve design inputs (see Clause 7.3.2) and design outputs (see Clause 7.3.4). All team members should have training records (i.e., Clause 6.2) for Design Control procedures and Risk Management procedures. However, if the device includes software and internet connectivity, some members of the design team will require additional training on specific standards and protocols. It is also necessary to outsource processes that cannot be performed by the manufacturer, such as software development, cybersecurity testing, biocompatibility testing, and EMC testing. For these outsourced processes, the company must document the supplier’s qualification and establish a written agreement with that supplier (i.e., Clause 7.4.2). Examples of agreements could be a supplier quality agreement, a consulting contract, or a signed GLP testing protocol.

Step 6 – Standard Operating Procedures (SOPs) or “How done”

Auditors using the process approach to auditing often discover ineffective processes when they expand the scope of design controls beyond the scope of the design control procedure. The design team leader will identify the design control procedure(s) and forms. However, the auditor should also request copies of the risk management procedure and other related procedures. The other procedures may have different process owners, and the design team leader may not be adequately trained in those procedures. The auditor should not read and review these procedures. Auditors never have the time to do this. Instead, ask the process owner to identify specific procedures or clauses within procedures where clauses in the ISO Standard are addressed. If the process owner knows exactly where to find what you are looking for, they’re training was effective, or they may have written the procedure(s). If the process owner has trouble locating the clauses you are requesting, spend more time sampling training records. You may also want to ask if there is another person who is more familiar with the procedure. This step of the process approach is also when you should be sampling records of document control (i.e., Clause 4.2.4).

Step 7 – Metrics

The seventh step of the turtle diagram is typically where the auditor discovers the most value-added findings. The auditor will ask the process owner to identify some metrics (i.e., Clause 8.2.5) or quality objectives (i.e., Clause 5.4.1) they are using to monitor and improve the design and development process. This is a struggle for many process owners — not just the design team leader. If any metrics are not performing up to expectations, there should be evidence of actions being taken to address this. If the process owner is not tracking metrics, you may want to review how closely the actual project schedule aligns with the design project plan. Design projects are frequently delayed because the design team either does not request quotes early enough or does not involve the supply chain manager soon enough, or both. There is also considerable benefit derived from conducting retrospective reviews at the end of design phases and at the project’s conclusion. The team will identify changes in time estimates that should be considered for future design projects or other ongoing projects.

Supplementary questions for auditing design controls

After all seven steps of the turtle diagram are complete, the process audit is not yet complete. The auditor needs to sample records and follow audit trails to ensure thoroughness. Therefore, additional records need to be sampled. We recommend sampling design changes because this is where inspectors and third-party auditors will typically focus. These external auditors will be looking for design changes that need regulatory approval and may not have been submitted for market authorization. The auditor may also sample using a risk-based approach when sampling design changes. In particular, we recommend looking for the following types of changes: 1) vendor change, 2) specification change, and 3) process change. By doing this, the audit will also cover the following clauses in ISO 13485:2016: 7.4 (purchasing), 7.3.9 (design changes), 7.5.6 (process validation), 7.1 (risk management), and 4.2.5 (control of records). If you would like to learn more about design changes, please watch our Design Changes Webinar.

Record sampling for auditing design controls

FDA inspectors and third-party auditors have similar approaches to auditing design controls. Both will begin by reviewing your procedure to verify that it includes all of the required elements of ISO 13485:2016, Clause 7.3. Next, they will sample a recent design project that was completed and request a copy of the design history file (DHF). Many design projects are behind schedule, and therefore, this is an important metric for most companies. Now that you have completed your “Turtle Diagram,” if you have more time, you can conduct interviews with team members to review their roles in the design process. You could also sample-specific Technical Files, as I indicated above. If you are performing a thorough internal audit, I recommend doing both. To learn more about using the process approach to auditing, you can register for our webinar on the topic.

Auditing Design Controls Read More »

Design Controls Implementation

Design controls can be overwhelming, but you can learn the process using this step-by-step guide to implementing design controls.
Design and development process HD 610x1024 Design Controls ImplementationDesign Controls Implementation

You can implement design controls at any point during the development process, but the earlier you implement your design process the more useful design controls will be. The first step of implementing design controls is to create and design controls procedure. You will also need at least two of the following additional quality system procedures:

  1. Risk Management Procedure (SYS-010)
  2. Software Development and Validation (SYS-044)
  3. Usability Procedure (SYS-048)
  4. Cybersecurity Work Instruction (WI-007)

A risk management file (in accordance with ISO 14971:2019) is required for all medical devices, and usability engineering or human factors engineering (in accordance with IEC 62366-1) is required for all medical devices. The software and cybersecurity procedures listed above are only required for products with 1) software and/or firmware, and 2) wireless functionality or an access point for removable media (e.g., USB flash drive or SD card).

Square subscribe to our blog button 281x300 Design Controls Implementation

Step 2: Design controls training

Even though the requirement for design controls has been in place for more than 25 years, there are still far too many design teams that struggle with understanding these requirements. Medical device regulations are complex, but design controls are the most complex process in any quality system. The reason for this is that each of the seven sub-clauses represents a mini-process that is equivalent in complexity to CAPA root cause analysis. Many companies choose to create separate work instructions for each sub-clause.

Medical Device Academy’s training philosophy is to distill processes down to discrete steps that can be absorbed and implemented quickly. We use independent forms to support each step and develop training courses with practical examples, instead of writing a detailed procedure(s). The approach we teach removes complexity from your design control procedure (SYS-008). Instead, we rely upon the structure of step-by-step forms completed at each stage of the design process.

If you are interested in design control training, Rob Packard will be hosting the 3rd edition of our Design Controls Training Webinar on Friday, August 11, 2023, @ 9:30 am EDT.

Step 3: Gathering post-market surveillance data

Post-market surveillance is not currently required by the FDA in 21 CFR 820, but it is required by ISO 13485:2016 in Clause 7.3.3c) (i.e., “[Design and development inputs] shall include…applicable outputs(s) of risk management”). The FDA is expected to release the plans for the transition to ISO 13485 in FY 2024, but most companies mistakenly think that the FDA does not require consideration of post-market surveillance when they are designing new devices. This is not correct. There are three ways the FDA expects post-market surveillance to be considered when you are developing a new device:

  1. Complaints and adverse events associated with previous versions of the device and competitor devices should be identified as input to the risk management process for hazard identification.
  2. If the device incorporates software, existing vulnerabilities of the off-the-shelf software (including operating systems) should be identified as part of the cybersecurity risk assessment process.
  3. During the human factors process, you should search for known use errors associated with previous versions of the device and competitor devices; known use-related risks should also include any potential use errors identified during formative testing.

Even though the FDA does not currently require compliance with ISO 13485, the FDA does recognize ISO 14971:2019, and post-market surveillance is identified as an input to the risk management process in Clause 4.2 (see note 2), Clause 10.4, and Annex A.2.10. 

Step 4: Creating a design plan 

You are required to update your design plan as the development project progresses. Most design and development projects take a year before the company is ready to submit a 510k submission to the FDA. Therefore, don’t worry about making your first version of the plan perfect. You have a year to make lots of improvements to your design plan. At a minimum, you should be updating your design plan during each design review. One thing that is important to capture in your first version, however, is the correct regulatory pathway for your intended markets. If you aren’t sure which markets you plan to launch in, you can select one market and add more later, or you can select a few and delete one or more later. Your design plan should identify the resources needed for the development project, and you should estimate when you expect to conduct each of your design reviews.

Contents of your design plan

The requirement for design plans is stated in both Clause 7.3.1 of the ISO Standards, and Section 21 CFR 820.30b of the FDA QSR. You can make your plan as detailed as you need to, but I recommend starting simple and adding detail. Your first version of a design plan should include the following tasks:

  • Identification of the regulatory pathway based on the device risk classification and applicable harmonized standards.
  • Development of a risk management plan
  • Approval of your design plan (1st design review) 
  • Initial hazard identification
  • Documentation and approval of user needs and design inputs (2nd design review) 
  • Risk control option analysis
  • Reiterative development of the product design
  • Risk analysis 
  • Documentation and approval of design outputs implementation of risk control measures (3rd design review) 
  • Design verification and verification of the effectiveness of risk control measures (4th design review)
  • Design validation and verification of the effectiveness of risk control measures that could not be verified with verification testing alone
  • Clinical evaluation and benefit/risk analysis (5th design review)
  • Development of a post-market surveillance plan with a post-market risk management plan
  • Development of a draft Device Master Record/Technical File (DMR/TF) Index
  • Regulatory approval (e.g., 510k clearance) and closure of the Design History File (DHF)
  • Commercial release (6th and final design review)
  • Review lessons learned and initiate actions to improve the design process

Step 5: Create a detailed testing plan

Your testing plan must indicate which recognized standards you plan to conform with, and any requirements that are not applicable should be identified and documented with a justification for the non-applicability. The initial version of your testing plan will be an early version of your user needs and design inputs. However, you should expect the design inputs to change several times. After you receive feedback from regulators is one time you may need to make changes to design inputs. You may also need to make changes when you fail your testing (i.e., preliminary testing, verification testing, or validation testing). If your company is following “The Lean Startup” methodology, your initial version of the design inputs will be for a minimum viable product (i.e., MVP). As you progress through your iterative development process, you will add and delete design inputs based on customer feedback and preliminary testing. Your goal should be to fail early and fail fast because you don’t want to get to your verification testing and fail. That’s why we conduct a “design freeze,” prior to starting the design verification testing and design transfer activities.

Design Timeline with 513g 1024x542 Design Controls Implementation

Step 6: Request a pre-submission meeting with the FDA

Design inputs need to be requirements verified through the use of a verification protocol. If you identify external standards for each design input, you will have an easier time completing the verification activities, because verification tests will be easier to identify. Some standards do not include testing requirements, and there are requirements that do not correspond to an external standard. For example, IEC 62366-1 is an international standard for usability engineering, but the standard does not include specific testing requirements. Therefore, manufacturers have to develop their own test protocol for validation of the usability engineering controls implemented. If your company is developing a novel sterilization process (e.g., UV sterilization), you will also need to develop your own verification testing protocols. In these cases, you should submit the draft protocols to the FDA (along with associated risk analysis documentation) to obtain feedback and agreement with your testing plan. The method for obtaining written feedback and agreement with a proposed testing plan is to submit a pre-submission meeting request to the FDA (i.e., PreSTAR).

Step 7: Iterative development is how design controls really work

Design controls became a legal requirement in the USA in 1996 when the FDA updated the quality system regulations. At that time, the “V-diagram” was quite new and limited to software development. Therefore, the FDA requested permission from Health Canada to reprint the “Waterfall Diagram” in the design control guidance that the FDA released. Both diagrams are models. They do not represent best practices, and they do not claim to represent how the design process is done in most companies. The primary information that is being communicated by the “Waterfall Diagram” is that user needs are validated while design inputs are verified. The diagram is not intended to communicate that the design process is linear or must proceed from user needs, to design inputs, and then to design outputs. The “V-Diagram” is meant to communicate that there are multiple levels of verification and validation testing that occur, and the development process is iterative as software bugs are identified. Both models help teach design and development concepts, but neither is meant to imply legal requirements. One of the best lessons to teach design and development teams is that this is a need to develop simple tests to screen design concepts so that design concepts can fail early and fail fast–before the design is frozen. This process is called “risk control option analysis,” and it is required in clause 7.1 of ISO 14971:2019.

Step 8: “Design Freeze”

Design outputs are drawings and specifications. Ensure you keep them updated and control the changes. When you finally approve the design, this is approval of your design outputs (i.e., selection of risk control options). The final selection of design outputs or risk control measures is often conducted as a formal design review meeting. The reason for this is that the cost of design verification is significant. There is no regulatory or legal requirement for a “design freeze.” In fact, there are many examples where changes are anticipated but the team decides to proceed with the verification testing anyway. The best practice developed by the medical device industry is to conduct a “design freeze.” The design outputs are “frozen” and no further changes are permitted. The act of freezing the design is simply intended to reduce the business risk of spending money on verification testing twice because the design outputs were changed during the testing process. If a device fails testing, it will be necessary to change the design and repeat the testing, but if every person on the design team agrees that the need for changes is remote and the company should begin testing it is less likely that changes will be made after the testing begins.

Step 9: Begin the design transfer process

Design transfer is not a single event in time. Transfer begins with the release of your first drawing or specification to purchasing and ends with the commercial release of the product. The most common example of a design transfer activity is the approval of prototype drawings as a final released drawing. This is common for molded parts. Several iterations of the plastic part might be evaluated using 3D printed parts and machined parts, but in order to consistently make the component for the target cost an injection mold is typically needed. The cost of the mold may be $40-100K, but it is difficult to change the design once the mold is built. The lead time for injection molds is often 10-14 weeks. Therefore, a design team may begin the design transfer process for molded parts prior to conducting a design freeze. Another component that may be released earlier as a final design is a printed circuit board (PCB). Electronic components such as resistors, capacitors, and integrated circuits (ICs) may be available off-the-shelf, but the raw PCB has a longer lead time and is customized for your device.

Step 10: Verification of Design Controls

Design verification testing requires pre-approved protocols and pre-defined acceptance criteria. Whenever possible, design verification protocols should be standardized instead of being project-specific. Information regarding traceability to the calibrated equipment identification and test methods should be included as a variable that is entered manually into a blank space when the protocol is executed. The philosophy behind this approach is to create a protocol once and repeat it forever. This results in a verification process that is consistent and predictable, but it also eliminates the need for review and approval of the protocol for each new project. Standardized protocols do not need to specify a vendor or dates for the testing, but you might consider documenting the vendor(s) and duration of the testing in your design inputs to help with project management and planning. You might also want to use a standardized template for the format and content of your protocol and report. The FDA provides a guidance document specifically for the report format and content for non-clinical performance testing.

Step 11: Validation of Design Controls

Design validation is required to demonstrate that the device meets the user’s and patient’s needs. User needs are typically the indications for use–including safety and performance requirements. Design validation should be more than bench testing. Ensure that animal models, simulated anatomical models, finite element analysis, and human clinical studies are considered. One purpose of design validation is to demonstrate performance for the indications for use, but validating that risk controls implemented are effective at preventing use-related risks is also important. Therefore, human factors summative validation testing is one type of design validation. Human factors testing will typically involve simulated use with the final version of the device and intended users. Validation testing usually requires side-by-side non-clinical performance testing with a predicate device for a 510k submission, while CE Marking submissions typically require human clinical data to demonstrate safety and performance.

Step 12: FDA 510k Submission

FDA pre-market notification, or 510k submission, is the most common type of regulatory approval required for medical devices in the USA. FDA submissions are usually possible to submit earlier than other countries, because the FDA does not require quality system certification or summary technical documents, and performance testing data is usually non-clinical benchtop testing. FDA 510k submissions also do not require submission of process validation for manufacturing. Therefore, most verification and validation is conducted on “production equivalents” that were made in small volume before the commercial manufacturing process is validated. The quality system and manufacturing process validation may be completed during the FDA 510k review.

Step 13: The Final Design Review 

Design reviews should have defined deliverables. We recommend designing a form for documenting the design review, which identifies the deliverables for each design review. The form should also define the minimum required attendees by function. Other design review attendees should be identified as optional—rather than required reviewers and approvers. If your design review process requires too many people, this will have a long-term impact upon review and approval of design changes.

The only required design review is a final design review to approve the commercial release of your product. Do not keep the DHF open after commercial release. All changes after that point should be under production controls, and changes should be documented in the (DMR)/Technical File (TF). If device modifications require a new 510k submission, then you should create a new design project and DHF for the device modification. The new DHF might have no changes to the user needs and design inputs, but you might have minor changes (e.g., a change in the sterilization method requires testing to revised design inputs).

Step 14: FDA Registration

Within 30 days of initial product distribution in the USA, you are required to register your establishment with the FDA. Registration must be renewed annually between October 1 and December 31, and registration is required for each facility. If your company is located outside the USA, you will need an initial importer that is registered and you will need to register before you can ship the product to the USA. Non-US companies must also designate a US Agent that resides in the USA. At the time of FDA registration, your company is expected to be compliant with all regulations for the quality system, UDI, medical device reporting, and corrections/removals.

Step 15: Post-market surveillance is the design control input for the next design project

One of the required outputs of your final design review is your DMR Index. The DMR Index should perform a dual function of also meeting technical documentation requirements for other countries, such as Canada and Europe. A Technical File Index, however, includes additional documents that are not required in the USA. One of those documents is your post-market surveillance plan and the results of post-market surveillance. That post-market surveillance is an input to your design process for the next generation of products. Any use errors, software bugs, or suggestions for new functionality should be documented as post-market surveillance and considered as potential inputs to the design process for future design projects.

Step 16: Monitoring your design controls process

Audit your design controls process to identify opportunities for improvement and preventive actions. Audits should include a review of the design process metrics, and you may consider establishing quality objectives for the improvement of the design process. This last step, and the standardization of design verification protocols in step five (5), are discussed in further detail in another blog by Medical Device Academy.

Design Controls Implementation Read More »

Scroll to Top