Search Results for: root cause

Minimum Data Points Constituting a Trend Is 3?

This article explains why three is never the right answer, and this article explains why asking how many minimum data points are needed to identify a trend is the wrong question.

Minimum Data Points for CAPA

Recently a client sent me an email asking the same question about data analysis in two different ways. The first question asked, “How many of the same situation need to occur before it is considered a trend?” The second question asked, “How many nonconformities can occur before a CAPA should be opened?” This question can be asked a hundred different ways, but it’s the wrong question.

Click here to subscribe to our blog feed

Minimum Data Points for Variable Data

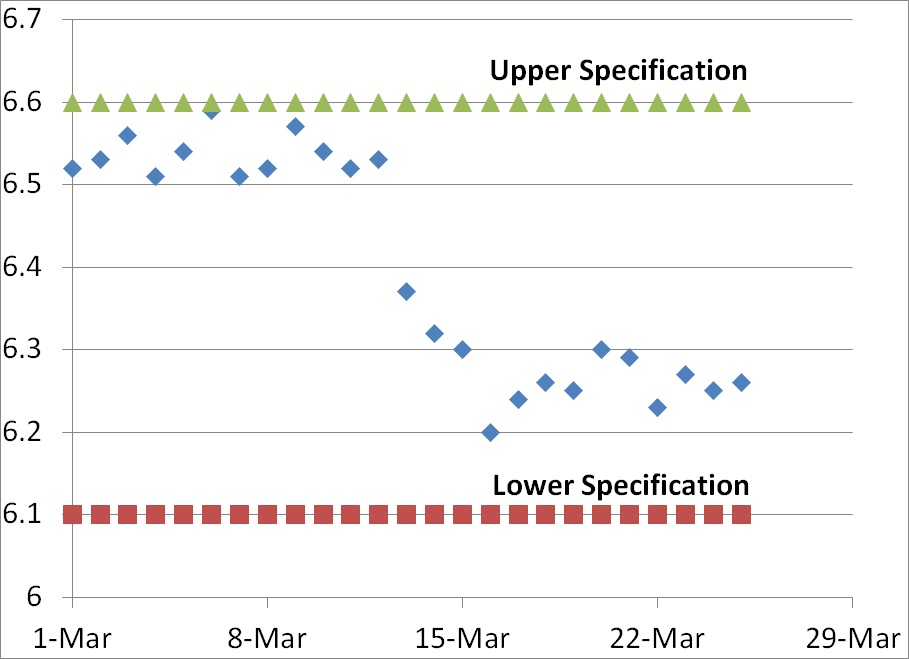
In the graph above we have variable data rather than attribute data. When you have variable data, the answer regarding the number of minimum data points is always a quantitative answer that is objective rather than subjective. Typically the new data point lies outside of the upper or lower specification for the element being measured (i.e., >6.6 or <6.1 in the graph above). Even if the new data point remains within specifications, a CAPA may still be issued if the new data indicates that there has been a shift in the normal distribution of data.

In our graph above, on March 13 the newest data point was 6.37. Although this value is within specifications, in fact close to the center of the range, this value represented a shift in the trend that exceeded the normal distribution of data observed for the previous 12 days of the month.  The mean for the first 12 days was 6.54 and the standard deviation was 0.0250. Many people establish alert limits that equal mean +/- 2x standard deviation (i.e., 6.59 and 6.49) and the action limit is often set equal to the mean +/- 3x standard deviation (i.e., 6.62 and 6.47). Therefore, a value of 6.37 is well outside the normal distribution for the first 12 days of the month–but not outside specifications.

The shift in data values for this graph indicates a shift, but the process was capable of remaining within specifications before the shift and process capability actually appears to be slightly better after the shift. In this case, there is no need for a CAPA but if the reason for the shift is unknown an investigation would be recommended. However, if different lower specification were chosen (e.g., 6.4) then the new data point on March 13 would be outside the specification and product would be identified as nonconforming.

Nonconforming results should always trigger in an investigation?

If the process was validated and the mean +/- 2x standard deviations remains within the specifications, then greater than 95% of the product should be conforming. If the the mean +/- 3x standard deviations remains within the specifications, then greater than 99.5% of the product should be conforming. Therefore, based upon the data from the first 12 days of March any data points that are lower than 6.47 should be very rare unless there is a process shift.

An investigation of the data point on March 13 should result in a CAPA unless the outlying data can be explained and a new trend with a lower mean is expected. If the new data point cannot be explained, then only one new data point is needed and the data does not even need to be nonconforming. If no actions are taken the drop in the measured value could continue and nonconforming product could result, while any action taken on March 13 is a preventive action.

Minimum Data Points for Attribute Data

In the case of the first question, the negative customer situation that is reported to a company may be an attribute rather than variable data. For example, “customer unsubscribed” after an email blast went out is a negative customer situation. If you know the % of customers that unsubscribed when email blasts go out, then you have variable data. If you only know that one person unsubscribed, then you only have an attribute (i.e., unsubscribed instead of continued subscription). The first time an unsubscription occurs, you should do an investigation to see if there is an issue other than frequent email blasts that exceed a customer’s expectations in frequency. The action taken could be to establish an alert and action limit for unsubscribed emails based upon industry norms or the % calculated from the first event.

What are the right questions?

Instead of asking how many minimum data points are needed to initiate a CAPA, we should make sure we are measuring the right variables. The % of unsubscribed is a valuable variable data point, but knowing that one person unsubscribed without knowing how many people received that email blast is not nearly as helpful in making future decisions. Another question is to ask, “Why did the person unsubscribe?” If the reason is unknown, you may want to contact the former subscriber and ask them–but probably not by email. If you have a theory why people are unsubscribing you can also perform an experiment to test your hypothesis. If you think the cause is that emails are being sent too frequently, then you can split your list and send the same emails to two halves of a list at different frequencies. If you are correct, then the list that has more frequent emails should also have a higher % of unsubscribers. This type of design of experiment (DOE) is one of the root cause investigation tools I recommend in my Risk-Based CAPA webinar.

Recommendations for Trend Analysis

Whenever you establish a new metric or quality objective, you should also establish a limit for when you intend to investigate and when you intend to take preventive or corrective actions. If you simply start measuring a variable or attribute, you may have difficulty recommending actions to management during your next management review and explaining why actions were not taken during an FDA inspection or an audit.

Additional Related Reading
If you are interested in reading more about how this might be applied to inspection results, please read my blog titled, “21 CFR 820.80: 3 Ways to Record Inspection Results.”

Minimum Data Points Constituting a Trend Is 3? Read More »

Case Study Part 2: Packaging CAPA Preventive Action and Corrective Action

This article explains details of implementing a CAPA preventive action and corrective action for packaging issues. Specifically, containment measures, corrections, corrective actions, and preventive actions to address the root cause identified in part 1 of this case study.

CAPA preventive action is Box Plot of Incoming Inspection Results
Comparing Incoming Inspection Results as a CAPA Preventive Action

CAPA Step 1: Containment of Product with Defective Packaging

When you learn of a packaging complaint related to a specific lot, you also need to determine if another product associated with the lot is safe to ship to customers. You should not attempt a correction and removal of the product unless you have a reasonably high level of confidence that there is a packaging issue with the lot or a portion of a lot, but you might consider placing product from the same lot in your inventory on hold until your investigation is completed. If you confirm that you have an issue with a specific lot, lots, or portion of a lot, then you should initiate correction and removal of product to prevent potentially, a non-sterile product from being used. This type of problem could result in a Class 1 recall (i.e., the most severe of the three categories). Therefore, you need to act quickly and according to established procedures for corrections and removals.

Click here to subscribe to our blog feed

CAPA Step 2: Correction(s) of Defective Packaging

If you find a problem, there is little you can do to fix the existing defective packaging other than to repackage the product. If the product has only been sterilized once, and you have revalidated the product for resterilization, then you can repackage, relabel and resterilize. To ensure traceability to the lot that has been reworked, you may need to revise the labeling (e.g., add an “R” to the lot number). If you have not revalidated the resterilization of the product, you may want to use this lot for validation of resterilization instead of throwing it out. However, sometimes your best option is to scrap the product.

Additional corrections may involve correcting the calibration of a testing device or performing a repair to sealing equipment. You might modify a specification on a drawing. You might correct a work instruction that did not have the correct, validated sealing parameters. All of these could be corrections.

CAPA Step 4: Corrective Action(s) for Packaging Issues

Investigation of root cause (CAPA Step 3) occurs in parallel with containment (CAPA Step 1) and correction (CAPA Step 2). Corrective actions (CAPA Step 4) prevent the packaging issues from recurring, and they occur after the first three steps because you can only implement corrective actions once you understand the root cause of the quality issue. The best tool for evaluating your current process controls and evaluating the implementation of new corrective actions is a process risk control plan. In order to do this, you need a process flow diagram and a process risk analysis. Each step of the process, from the raw material fabrication of film to the released product, needs to have potential hazards identified, risks evaluated, and risk controls implemented. You should use your process validation to verify the effectiveness of process risk controls quantitatively. If the process capability is greater than 95% for each parameter, and you have addressed every possible source of problems, then you probably won’t gain much from additional risk controls. However, many companies reduce their sampling or rely on certificates of conformity to ensure that the process is controlled adequately.

CAPA Step 5: CAPA Preventive Action for Packaging Issues

You already had a packaging issue with one lot of products, but you could have another issue with a different product or lot for the same reason or a different reason. If the product is the same, and the reason is the same, then the actions taken are corrective actions. If you take action to prevent the occurrence of this issue with a different product, or you prevent other potential causes of packaging issues by initiating more robust monitoring and process controls, then your actions are preventive. Often you will want to implement both types of actions.

In the box plot example provided in this article, Lot D was detected at incoming inspection as having peel test results that were outside the alert limit but acceptable when compared to the specification limit for peel testing. The alert limit was established during validation of the pouches and comparison of lots A, B, C, and D, demonstrate that Lot D is slightly lower in peel strength. The manufacturer may choose to use the lot, but the sampling plan for in-process peel testing may be altered, or the manufacturer may choose to place the new lot in quarantine while an investigation is performed. This is a CAPA preventive action.

Below I have listed six additional potential CAPA preventive actions to consider for your packaging process:

  1. Perform peel testing and/or bubble leak testing of packaging raw materials as part of the receiving inspection process and perform data analysis of the incoming inspection samples to determine if lower or higher alert and action limits should be established for the new lot of raw materials. The limits should be based upon the manufacturer’s seals as well as your seal.
  2. Retain remnants of in-process peel testing, include the remnants with the sterilization load, and then store the remnants for real-time aging.
  3. Consider implementing visual inspection tools that are able to detect sealing imperfections non-destructively.
  4. Increase the number of samples you test (e.g., 1 to 3 or 3 to 5) for each lot of product sealed to increase your confidence that the seals will be within specifications.
  5. Perform statistical analysis of in-process data for seal peel strength in order to identify potential lots with packaging issues prior to release.
  6. Evaluate the performance of the packaging at temperature and humidity extremes that may be higher or lower than the conservative estimates for ambient conditions (e.g., 30C vs. 25C).

Additional Resources

In addition to the previous article that was part 1 of this case study, I have posted ten other blogs specifically on the topic of CAPA. There is also a CAPA procedure you can download from this website.

Risk-based CAPA Webinar

If you are interested in learning more about a risk-based approach to CAPAs, then please click here.

Case Study Part 2: Packaging CAPA Preventive Action and Corrective Action Read More »

Strategic planning of a mock FDA inspection

This article shows you how to think strategically when you plan a mock FDA inspection to ensure that you successfully prevent an unpleasant FDA inspection.

Strategic Planning of a mock FDA inspection

For the past couple of years, several clients have asked me to conduct mock FDA inspections to prepare them for a potential FDA inspection. I am writing from Shanghai, China, where I am conducting a mock FDA inspection for a medical device client with another auditor from the company’s business unit in the USA.

Click here to subscribe to our blog feed

The mock FDA inspections I conduct are internal audits and technically not an inspection because inspectors are looking for nonconformities, and I am looking for conformity with the FDA regulations (i.e., 21 CFR 820, 21 CFR 803 and 21 CFR 806). Inspections are conducted by FDA investigators that are conducting an inspection in accordance with the FDA QSIT manual (http://www.fda.gov/ICECI/Inspections/InspectionGuides/ucm074883.htm). I use the process approach to conduct audits of the four major quality systems that FDA inspectors focus on during an FDA inspection. Still, as an auditor, I have several advantages that an inspector doesn’t.

  1. I can evaluate auditees and coach them on how to respond to an FDA inspector more effectively.
  2. I can teach my client’s internal auditors and management team how to use internal audits and Notified Body audits as practice for their next FDA inspection.
  3. I can avoid any area that my client wants me to and focus on areas of concern.
  4. I can help my client identify the most likely product or product family to be targeted by the FDA.
  5. I can give my client advice and help them implement corrective actions.
  6. I can teach my client how to respond to potential FDA Form 483s to avoid a Warning Letter.

Opening meeting for a mock FDA inspection

FDA inspections are not planned, but it is important to make sure that the right people are available and present during a mock FDA inspection, or your “inspector(s)” may not be able to review the records or interview the most important people. Therefore, I provide an agenda ahead of time, indicating which processes I will be auditing on which days. My agenda for a mock FDA inspection begins with an opening meeting, but the purpose of this opening meeting is primarily training. I take advantage of having all the senior managers in one room as an opportunity to explain how they can benefit most from the audit, and to remind them of what to expect during a real FDA inspection.

CAPA Sources

After the opening meeting, I take a brief tour—unless I already know the facility well. Before I leave for the tour, I ask my client to be prepared for me to begin auditing nonconformities, complaint handling, MDRs, and recalls when I return to the conference room. I select these areas because the FDA always starts with the CAPA process, but they look closely at the sources of CAPAs at the same time. I believe that inspectors rarely take “random samples.” Instead, most inspectors use the sources of CAPAs to help them bias there sampling of CAPAs.

Production and Process Controls

The next major process in my agenda after CAPAs and sources of CAPAs is production and process controls. The sequence of my process for auditing this area is always the same: 1) request the Device Master Record (DMR) for the target product or product family, 2) request two or more recent Device Master Records (DHRs) that were associated with a complaint record or MDR (remember samples are never random), and 3) I then go to the production areas identified in the DHR, and I try to interview the people that produced the lot identified in the DHR—rather than the people the department manager feels are the most experienced. This process of working backward from complaint records and MDRs to the activities on the production floor often allows me to help companies identify a root cause that they missed when the complaint or MDR was initially investigated.

Design Controls

Auditing a Design History File (DHF) is about as exciting as watching paint dry for most auditors. Still, I am always fascinated with how things work, so I am more engaging with the design team members I interview during a mock FDA inspection. I also like to focus on aspects of the design that have proven to be less than perfect—by reviewing nonconformities, complaints, MDRs, recalls, and CAPAs first. For example, if I see several complaints related to primary packaging failures, I am going to spend more time reviewing the shipping validation and shelf-life testing, than I might normally allocate.

Management Processes

The FDA is somewhat limited in this area because, in accordance with 21 CFR 820.180(e), the records of internal audits, supplier evaluations, and management reviews are exempt from FDA inspections. During a mock FDA inspection, I do not have this constraint. Therefore, I will often look more closely at these three areas than an FDA inspector to make sure my client has effective management processes. While procedures and schedules are the focus of an FDA inspector, I will make sure that the problems I observed in nonconformities, complaints, MDRs, and recalls are being addressed by management. As a quality manager, this is not always easy to do. Still, as an independent consultant, I have the luxury of being blunt when a senior manager needs to hear from someone other than the typical “yes men.” I also can use this part of mock FDA inspections to benchmark best practices I have learned from the hundreds of companies against what my client is currently doing to manage their quality system.

When to schedule a mock FDA inspection

Scheduling a mock FDA inspection immediately after an FDA inspection is pointless, but there is an optimal time for scheduling your mock FDA inspection. The FDA target is to conduct inspections once every two years for Class II device manufacturers. However, some district offices do better or worse than this target. Therefore, it’s important to keep track of the typical frequency in your district and the date of your last inspection. If the FDA is on a two-year cycle, you want to conduct your mock FDA inspection approximately 6-9 months before the next FDA inspection to ensure that you have time to implement corrective actions before the FDA inspector arrives.

Additional Resources

If you are interested in learning more about this topic, I highly recommend watching and listening to my free webinar on how to prepare for an FDA inspection:

http://robertpackard.wpengine.com/how-to-prepare-for-an-fda-medical-device-inspection/

In addition to preparing for an actual inspection, every company must know how to respond effectively to an FDA 483 inspection observation:

http://robertpackard.wpengine.com/7-steps-respond-fda-483-inspection-observation/

In addition to my blog, I also have recorded a webinar on this topic:

http://robertpackard.wpengine.com/7-steps-respond-fda-483-inspection-observation-webinar/

Finally, every manager needs to be reminded that FDA 483s are just another opportunity to write a CAPA and improve their quality system. Therefore, do yourself a favor and watch my new webinar on creating a risk-based CAPA process:

http://robertpackard.wpengine.com/create-a-risk-based-capa-process/.

Strategic planning of a mock FDA inspection Read More »

Bioburden Failure Analysis: How auditors can investigate spikes in environmental monitoring

This webinar explains how auditors can investigate unexpected increases in bioburden as part of a bioburden failure analysis that will be used to implement containment, corrections, and corrective actions.

Every medical device company with a controlled environment and sterilized products is required to monitor bioburden and to implement process controls to ensure that bioburden remains within the validated limits. Unfortunately, there are so many possible sources of bioburden it is easy to have a sudden increase (i.e., spike) in the bioburden of raw materials, finished devices, or the controlled environment. Human error is usually blamed, but retraining people is not an effective corrective action. You need to design solutions that eliminate the need for human perfection. When a spike occurs, what do you do?

This webinar will help you pinpoint the actual cause of your bioburden problems. Identifying the actual cause of quality issues is critical to developing effective corrective actions. If you do not narrow the potential causes down to the actual cause or causes, then you will waste time and money implementing solutions you didn’t need. If miss the actual cause of exceeding your validated bioburden limits, then your corrective actions will not be effective and you will need to re-open your CAPA or initiate a new CAPA. You may also be forced to recall non-conforming products.

In this presentation, our speaker explains how to use the process approach to auditing in order to identify the root cause for excursions above established bioburden limits for 1) raw materials, 2) finished devices, and 3) controlled environments. It’s easy to think of ways your process controls could have failed, but you will save time and money if you can identify how your process controls actually failed.

Join us for this webinar as our speaker teaches you how to use your auditing skills to investigate the cause of exceeding validated bioburden limits.

This webinar covers:

  • Important environmental monitoring data to collect and analyze
  • Most common reasons for exceeding validated bioburden limits
  • Containment and Corrections
  • Corrective Actions & Preventive Actions
  • Training & Quality Objectives

Who should watch?

  • Internal Auditors and Supplier Auditors
  • Anyone Responsible for Controlled Environments
  • Anyone Responsible for Investigation of Bioburden Failure Analysis

Please Note: Purchase of the webinar includes the Native PowerPoint slide deck and the recording of the webinar. You will have the ability to share this content with anyone in your company—as many times as they wish.

Bioburden Failure Analysis

This webinar recording is only $129 (AND INCLUDES – SLIDE POWERPOINT PRESENTATION):

Bioburden Failure Analysis Webinar
This webinar explains the process for auditing the environmental monitoring process and controlled environments. The recording will be sent in a separate email and this product includes a copy of the native PowerPoint slide deck.
Price: $129.00

Exam and Training Certificate available for $49.00:

Exam - Bioburden Failure Analysis
This is a 10 question quiz with multiple choice and fill in the blank questions. The completed quiz is to be submitted by email to Rob Packard as an MS Word document. Rob will provide a corrected exam with explanations for incorrect answers and a training effectiveness certificate for grades of 70% or higher.
Price: $49.00
Your cart is empty

VIEW OUR PROCEDURES – CLICK HERE OR IMAGE BELOW:

controled environments Controlled Environments Procedure/Forms

About Your Instructor

Rob Packard is the instructor for the FDA inspection training webinarRob Packard is a regulatory consultant with 30+ years of experience in the medical device, pharmaceutical, and biotechnology industries. He is a graduate of UConn in Chemical Engineering. Rob was a senior manager at several medical device companies—including the President/CEO of a laparoscopic imaging company. His Quality Management System expertise covers all aspects of developing, training, implementing, and maintaining ISO 13485 and ISO 14971 certifications. From 2009 to 2012, he was a lead auditor and instructor for one of the largest Notified Bodies. Rob’s specialty is regulatory submissions for high-risk medical devices, such as implants and drug/device combination products for CE marking applications, Canadian medical device applications, and 510k submissions. The most favorite part of his job is training others. He can be reached via phone at +1.802.258.1881 or by email. You can also follow him on YouTubeLinkedIn, or Instagram.

Bioburden Failure Analysis: How auditors can investigate spikes in environmental monitoring Read More »

Validating Bioburden Limits

This article explains the process for setting and validating bioburden limits, and you will learn when investigations are needed. 

Last week, I was in Europe reviewing product specifications with a potential contract manufacturer for a medical device implant. Due to the raw materials that the contract manufacturer currently is using for a similar product, bioburden levels are higher than we can accept. The company uses an ISO Class 7 cleanroom for assembly and packaging, which is clean enough for these implants, but the molded components used for the assembly are not clean enough.

Validating Bioburden Limits

The average bioburden is 220 CFU/device (i.e., colony-forming units/device), and the maximum observed bioburden exceeded 500 CFU/device. We want to use a lower dose range of gamma radiation to prevent the deterioration of bioabsorbable plastics, but a lower dose range requires that the average bioburden never exceed 100 CFU/device.

Click here to subscribe to our blog feed

There are quite a few Clauses in ISO 13485 that differ from ISO 9001. One example is Clause 6.4–Work Environment. Subsection 6.4(b) states, “If work environment conditions can have an adverse effect on product quality, the organization shall establish documented requirements for the work environment conditions and documented procedures or work instructions to monitor and control these work environment conditions.” This is the applicable clause of ISO 13485 related to setting bioburden limits. Unfortunately, this vague requirement does not explain how to establish or validate bioburden limits.

Rule of Thumb for Setting Limits

One of my microbiologist friends recommends using the following “rule of thumb”: +2 sigma for alert limits and +3 sigma for action limits. This rule of thumb assumes that you are performing data analysis of bioburden and that you have calculated a “sigma” value for the standard deviation. There are a few problems with the “rule of thumb” approach.

First, this method assumes a normal distribution and a controlled process–which bioburden seldom is. Second, the cleanliness you need for your product and the cleanliness your controlled environment is capable of are not always appropriately matched. In my example, we need the finished device to have a bioburden of <100 CFU/device before gamma sterilization. Molded parts are essentially bioburden free due to the hot temperatures of the parts ejected from the mold. Unfortunately, molded components attract dust like a magnet. Therefore, how you handle and store molded parts is important to the bioburden of the molded parts.

Which factors affect bioburden?

For this example, we have three aspects critical to the final bioburden limit of the finished medical devices.

  1. How are the molded parts handled and stored?
  2. Are molded parts cleaned before assembly?
  3. What is the cleanliness of the work environment where the device is assembled?

The cleanliness of the molding environment matters, but parts can fall into a container that keeps the parts clean. It also matters how molding machine operators handle the parts. Gloves should be used, and typically the container the parts are in will be placed in an outer bag for storage. It is possible to clean molded parts with ultrasonic cleaning before assembly, but if the parts are kept clean after molding, this is unnecessary.

For your assembly operation, you need an environment with suitable cleanliness. Sometimes a controlled environment is sufficient. Other times a certified cleanroom is more appropriate. In either case, it is important to control the bioburden in the assembly area to a level that meets the needs of the most critical product assembled in that area. Cleanroom procedures, the design of the cleanroom, and your cleaning/sterilization processes should match the needs of the product. Fortunately, cleanroom procedures and bioburden limits for cleanrooms are well established in ISO 14644-1 (e.g., for an ISO Class 7 cleanroom, particles ≥ 0.5 microns must be fewer than 352,000). If you have devices of different types in the same manufacturing area, you must plan according to the most critical needs.

Validating Bioburden Limits

After establishing your bioburden limits, you need to validate these limits. Once again, cleanroom validation has established ISO Standards to follow. The more challenging validation is a validation of the bioburden of parts and the final assembly. It’s important to validate the component levels first to reduce the variability of inputs to the final assembly process. Typically the first step is to perform data analysis of other molded parts produced in the same molding area by the same operators. If this data meets your needs for cleanliness, then further measures for controlling bioburden may not be needed. However, if you need to reduce bioburden (i.e., bioburden failure), you might consider measuring parts at critical control points. The goal is to identify where the bioburden is being introduced. This analysis is typical of the type of root cause investigation performed when bioburden increases for unexplained reasons.

Once the sources of bioburden are identified and quantified, process controls should be implemented to reduce bioburden. Gloves, double-bagging of product, and keeping containers covered during the molding operation are typical risk controls that may be implemented. To validate the effectiveness of these measures, you should write a bioburden validation protocol that evaluates each of the following aspects:

  1. lot variability of component bioburden
  2. operator variability for assembly
  3. variability in the cleanliness of the assembly area
  4. number of operators in the assembly area
  5. duration of the manufacturing lots

After you have validated the bioburden limits for the components, then the same process should be conducted for the final assembly of the product. A sampling of bioburden after transfer to the assembly area and before assembly begins should be done. This is important because often, improper storage of components and/or failure to remove and clean outer packaging will contaminate the parts and your assembly area.

process validationIf you are interested in learning more about process validation, please download the process validation webinar. We also published a blog on sterilization and shelf-life validation for 510k submissions.

Validating Bioburden Limits Read More »

Auditing the Nonconforming Material Process-21 CFR 820.90-Part III

Auditing the Nonconforming Material Process-21 CFR 820.90 identifies process interactions with the nonconforming material process. 

Auditing the Nonconforming Material Process-21 CFR 820.90

Nonconforming material is not a “bad” thing in and of itself. Having no nonconformities is conspicuous. There are three critical aspects to verify when you are auditing nonconforming materials:

  1. Nonconforming materials are identified and segregated
  2. Disposition of nonconforming materials is appropriate
  3. Feedback from the nonconforming material process interacts with other processes

This article focuses on the third aspect–process interactions. The most efficient method for auditing process interactions is to use turtle diagrams, which provide a systematic framework for identifying process linkages.

Click here to subscribe to our blog feed

Turtle Diagram Step 1

The first step of completing a turtle diagram involves identifying the process owner and obtaining a brief description of the process. This typically will not lead directly to the identification of process interactions–unless the person being interviewed describes the process using a process flow diagram.

Turtle Diagram Step 2

The second step in completing a turtle diagram is for the auditor to identify the inputs of raw materials and information to the process. For nonconforming materials, the key is to review the incoming inspection record and the supplier’s trend of nonconformities. In a thorough investigation of the root cause of nonconforming raw materials, an investigator may recalculate the process capability for each dimension to determine whether it has shifted since the supplier’s original process validation.

Turtle Diagram Step 3

In the third step of completing a turtle diagram, the auditor documents the flow of product and information when the process is done. The transfer from one process to another will often involve an in-process inspection and an update to the product status. The best practice is to identify these in-process inspection steps in a risk control plan as part of the overall process risk controls for product realization. Although risk control plans are not required in most companies, they will become more prevalent as companies update their quality systems to a risk-based process for compliance with the 2015 version of ISO 9001.

Turtle Diagram Step 4

The fourth step of the turtle diagram identifies calibration, maintenance, and validation that apply to the audited process. It is common for nonconformities to occur when measurement devices are out-of-calibration or equipment is not adequately maintained. Therefore, auditors should always ask what device was used to measure a nonconformity and what equipment was used to manufacture the product. Auditors should also review calibration and maintenance records for evidence that corrections are being made frequently.

Whenever frequent corrections are needed, the probability of devices being out-of-calibration and/or equipment malfunctioning increases. Auditors should also verify that the process parameters match the validated ones. Ideally, validation of process parameters is also directly linked to process risk analysis, and in-process inspections are performed whenever process capability is inadequate to ensure conforming parts. If an auditor observes a high frequency of nonconformities, then an in-process inspection should be implemented for containment, and the validation report should be compared to the current process performance.

Turtle Diagram Step 5

The fifth step of completing a turtle diagram involves the identification of personnel and sampling training records. The procedure for control of nonconforming material should require training for anyone responsible for initiating, investigating, or completing a nonconforming product record (i.e., NCR). Critical interactions to verify for effectiveness are related to process changes. If a procedure changes, training may need to be updated. An auditor should verify that there is a mechanism for tracking which revision of the procedure each person is trained to. In addition, training records should verify that training requirements are documented, that training is effective, and that the person can demonstrate competency by correctly completing the sections of an NCR form. The auditor can review completed records to verify competency, but the auditor can also interview personnel and ask hypothetical questions.

Turtle Diagram Step 6

The sixth step of completing a turtle diagram involves the identification of all applicable controlled documents, such as procedures, work instructions, and forms. The auditor should also verify that the process for control of external standards is effective. In the case of controlling nonconforming products, there are seldom any applicable external standards. However, it is critical to verify that the current forms and NCR identification methods are being used for the control of nonconforming products.

Turtle Diagram Step 7

The seventh and final step of the turtle diagram is data analysis of metrics and quality objectives for a process. To control nonconforming products, there should be evidence of statistical analysis of the nonconforming product to identify the need for corrective actions. This is a requirement of 21 CFR 820.250. This data analysis should then be used to quantify process risks that may be used for decision-making and to explain those decisions during regulatory audits.

The above process interactions are just examples, and auditors may identify other essential process interactions during an audit. Each process interaction that touches a record of nonconforming products is a potential audit trail that could lead to value-added findings to prevent future non-conformities.

If you need help improving your process for controlling nonconforming products or with auditing in general, please email Rob Packard.

Auditing the Nonconforming Material Process-21 CFR 820.90-Part III Read More »

Complaint Investigation Case Study (21 CFR 820.198): Part 2

This article is part 2 of a two-part series specific to complaint investigation requirements as specified in 21 CFR 820.198 (http://bit.ly/21CFR820198) of FDA QSR. This second part explains how to perform a complaint investigation and provides a complaint investigation case study.

Click here to subscribe to our blog feed

complaint_part_2


Last week’s blog  reviewed the requirements for a complaint investigation, while this blog includes the following information on how to conduct an investigation:h

  1. How thorough should your investigation be?
  2. Investigation Methods
  3. Verification of the Cause
  4. Documenting Your Investigation
  5. Complaint Investigation Case Study

How thorough should your investigation be?

The depth of investigation should be appropriate to the importance of the complaint. If a previous complaint of similar nature has already been investigated, the investigation may only gather enough information to verify that complaint has the same root cause. However, if a complaint involves an adverse event (i.e., is reportable under 21 CFR 803), then additional information needs to be recorded in the complaint record as per 21 CFR 820.198d:

  1. Does the device fail to meet specifications?
  2. Was the device used for treatment or diagnosis?
  3. What was the relationship, if any, between the device and the reported event?

If the person gathering information from the complainant cannot immediately identify a cause code, or the incident involves a severe injury or death, then it is essential to collect as much information as possible. Typically, the complainant will be asked to return the device to determine if the device malfunctioned.

Investigation Methods

A complaint investigation is not any different from any investigation you perform for a CAPA. The most critical first step is to determine the cause of the complaint. To determine the cause, you need to sample additional records and inspect the device if it is available. If the device is not available, you might also look at other product from the same lot that remains in inventory. The following article I wrote suggests seven ways to investigate a complaint when a device is not returned: http://bit.ly/DeviceNotReturned.

One of the methods described in the article above is an Ishikawa Diagram or “Fishbone Diagram.” This is one of the five root cause analysis tools that I teach in my CAPA webinar (http://bit.ly/enKapCAPAwebinar). Ishikawa Diagrams are an ideal tool for root cause analysis if you have no idea what the cause of the complaint is because this tool provides a systematic process for narrowing down the potential causes, to the narrow few that are most likely. You are not required to use this tool, but you should describe in your complaint record what type of root cause analysis was performed.

Verification of Cause

Once you have identified the root cause, or at least narrowed your list to the most likely causes, you should then verify that the cause will result in the observed malfunction by recreating the scenario if possible. Ideally, you should be able to simulate the event that resulted in the complaint and demonstrate that you can reproduce the problem. This is important because if you cannot verify the cause of a device malfunction, then you will have difficulty verifying the effectiveness of corrective actions for an infrequent complaint.

Documenting Your Investigation

There is no specific format for the way a complaint investigation is documented. Still, most complaint records have a small section on the complaint form that allows them to write a short paragraph summarizing the investigation and the results. Unfortunately, most of the spaces provided on forms are completely inadequate for the amount of information that should be recorded. Therefore, the best approach is often to write, “See attached complaint investigation.” This is especially true if the complaint is reportable (i.e., requires MDR under 21 CFR 803). Good documentation is quantitative and specific. You need to identify which records were sampled as part of the investigation. You should demonstrate that you have expanded your initial search to determine if the problem exists in multiple production lots of the same product code, multiple product codes within the same product family and any other product families that may use similar raw materials, design features, equipment, testing methods or procedures.

Complaint Investigation Case Study

If your company manufactures cast orthopedic implants for the knee and you receive a complaint about an implant that has a small imperfection in the bearing surface of the femoral implant, you may need to perform an investigation–especially if this has not occurred previously. You should request a return of the implant for inspection to verify that the imperfection is nonconforming and not just a cosmetic defect.

Your investigation should include a review of the lot history record for an entire lot of implants–as well as any other parts that they may have been cast at the same time. All the process conditions identified throughout the manufacturing process should be compared to the validated process parameters. Special attention should be given to the inspection results that were recorded for the castings (i.e., radiographic inspection, fluorescent penetrant inspection, and metallurgical inspection). Ideally, these inspection methods should be repeated for 100% of the production lot to ensure that the inspection results meet the acceptance criteria. Documentation of the investigation should include copies of all records that were reviewed and photos if visual inspections were repeated.

If you are interested in learning more about complaint handling, you might be interested in downloading the webinar that Medical Device Academy recorded last year for complaint handling and vigilance reporting (http://bit.ly/Complaint-Webinar-Landing). We can also help you one-on-one with a current complaint investigation you are conducting. 

About Your Instructor

Rob Packard is the instructor for the FDA inspection training webinarRob Packard is a regulatory consultant with 30+ years of experience in the medical device, pharmaceutical, and biotechnology industries. He is a graduate of UConn in Chemical Engineering. Rob was a senior manager at several medical device companies—including the President/CEO of a laparoscopic imaging company. His Quality Management System expertise covers all aspects of developing, training, implementing, and maintaining ISO 13485 and ISO 14971 certifications. From 2009 to 2012, he was a lead auditor and instructor for one of the largest Notified Bodies. Rob’s specialty is regulatory submissions for high-risk medical devices, such as implants and drug/device combination products for CE marking applications, Canadian medical device applications, and 510k submissions. The most favorite part of his job is training others. He can be reached via phone at +1.802.258.1881 or by email. You can also follow him on YouTubeLinkedIn, or Instagram.

Complaint Investigation Case Study (21 CFR 820.198): Part 2 Read More »

FDA Inspections-Complaint Investigation Requirements-Part I

“FDA Inspections-Complaint Investigation Requirements-Part I” is a two-part series that provides an overview of 21 CFR 820.198 requirements.

FDA inspections-complaint investigation requirements-part I

Last week, I received a message from someone asking for advice on how to perform a complaint investigation. She has a complaint-handling procedure that explains how to determine if complaints are reportable (http://bit.ly/Medical-Device-Reporting) and is the complaint coordinator. Her procedure includes a list of pre-determined cause codes for the most common complaints the company has received in previous years. Her system does not require a complaint investigation if an existing cause code is identified. She would like to know how to perform an investigation if she receives a complaint that does not fit one of the existing cause codes.

Click here to subscribe to our blog feed

Is It a Complaint?

Most discussions about complaint handling begin with the definition of a complaint [i.e., 21 CFR 820.3(b); https://www.accessdata.fda.gov/scripts/cdrh/cfdocs/cfcfr/cfrsearch.cfm?fr=820.3]. However, if a complaint is received during an investigation of a device rather than the use of the device, the FDA will still consider this as being “after releasing for distribution.” The reason is that release for distribution occurs at the final inspection. If the device breaks during installation, the device is still distributed.

One last question. Is it correct to consider a complaint only when the device is live and not during the device’s settings and installation process? (The definition states “after it is released for distribution,” what do they mean by this?).

What is Required?

The FDA QSR section specific to complaint handling is 21 CFR 820.198 (https://www.accessdata.fda.gov/scripts/cdrh/cfdocs/cfcfr/cfrsearch.cfm?fr=820.198). There are seven subsections (i.e., “A” through “H”) that comprise the regulation.

  1. Manufacturers shall maintain complaint files and establish procedures for complaint handling.
  2. Manufacturers must review and evaluate if an investigation is needed.
  3. Manufacturers must perform an investigation automatically for any complaint involving a device malfunction–unless an investigation has already been performed for a similar complaint.
  4. Separate files shall be maintained for complaints that involve adverse events that are reportable under 21 CFR 803 (21-CFR-803).
  5. The content of a complaint investigation record is specified in this subsection.
  6. When the complaint handling unit is located at another facility, the records of investigations shall be reasonably accessible to the manufacturing establishment.
  7. When the complaint handling unit is located outside the USA, the records must be reasonably accessible at a U.S. manufacturer or the location of an initial distributor.

What Does the FDA Expect to See?

FDA inspectors are guaranteed to sample complaint records and CAPA records during every routine inspection. The complaint records sampled will typically be limited to a specific product family selected as the focus of the investigation. Most companies have an electronic log of the complaints, and the investigator may request a sorted list that only includes complaints specific to that one product family. The investigator will already be aware of all of your reported adverse events associated with the product family, and there may be one or two records they specifically want to investigate. The investigator will also review the complaint log to see if there are any complaints with a description that sounds like it might be reportable–even though the complaint was not reported.

The investigator will verify that each complaint record includes the content specified in subsection “E”:

  1. name of the device;
  2. the date the complaint was received;
  3. any device identification(s) and control number(s) used;
  4. the name, address, and phone number of the complainant;
  5. the nature and details of the complaint;
  6. the dates and results of the investigation;
  7. any corrective action is taken, and
  8. any reply to the complainant.

In my response to the question I received, I also included advice on conducting an investigation. The investigation is no different than an investigation for any CAPA. The first step is to perform a root cause analysis. The second part of this article will explain the investigation process in more detail.

Register to receive email notifications of new blog postings (https://medicaldeviceacademy.com/blog/) so you can read the second part of this article next week. If you are interested in learning more about complaint handling, you might be interested in downloading the webinar that Medical Device Academy recorded last year for complaint handling and vigilance reporting (https://medicaldeviceacademy.com/complaint-handling-vigilance-reporting-webinar/). We can also help you one-on-one with a current complaint investigation you are conducting. Please don’t hesitate to ask me for help: Mobile: 802.258.1881 or rob@fdaestar.com.

FDA Inspections-Complaint Investigation Requirements-Part I Read More »

11 Steps to Obtaining CMDCAS Certification-Part 2

11-steps-to-obtaining-CMDCAS-certification-part-2

11 Steps to Obtaining CMDCAS Certification-Part 2” focuses on the process of updating the quality system and preparing for your certification audit. The first three steps focus on classification and selecting a registrar. 

Click here to subscribe to our blog feed

Steps 4: Writing a Licensing Procedure

Nowhere in the Canadian Medical Devices Regulations (CMDR), or ISO 13485, does it require that you have a procedure for licensing or writing your technical documentation. However, most of the registrar auditors I have observed expect to see a procedure for this. You can reference Health Canada’s guidance documents (http://bit.ly/CanadianGuidance) and the CMDR (http://bit.ly/CanadianMDR), but that’s not enough. Typical audit questions I see on regulatory checklists include:

  • Is the company required to notify Health Canada of changes to the certificate within 30 days?
  • Is the classification rationale documented?
  • What is the procedure for maintaining technical documentation for Health Canada?
  • Is there a procedure for identifying significant changes that require notification of Health Canada (http://bit.ly/Canada-Significant-Change)?

Step 5: Mandatory Problem Reporting (MPR)

Some companies choose to have one procedure for adverse event reporting that covers all the countries that they distribute the product(s) in. However, I recommend having a separate procedure for each country that is shorter and will require updates less often. It’s a personal preference, but I find people are intimidated by a longer, combined procedure. The following are the key elements for the MPR procedure:

  • decision tree for when to report
  • timescale for reporting deadlines
  • form references
  • address for reporting
  • reminder to report the event to the US FDA if the product is also sold in the USA

Step 6: Recall Procedure

Unlike the MPR procedure, I recommend having only one recall/advisory notice procedure to comply with Health Canada’s requirements and the rest of the worlds’ regulatory requirements. I typically choose this approach, because the recall/advisory notice procedure is less complex than the adverse event reporting procedures. The key element I look for in this procedure is the address for notifying Health Canada of a recall because there is a different address in each region of Canada.

Step 7: Finding a Distributor

A Canadian Medical Device License is a license to distribute medical devices. Only Class I devices require an establishment license. Therefore, your company will be able to sell directly to physicians prescribing your device if you have a Class II, III, or IV Medical Device License. If you choose to use a distributor in Canada, the distributor must meet the requirements for record-keeping, and demonstrate the ability to conduct a recall, if necessary. Often, this is done by having a quality agreement in place, which stipulates the retention of distribution records. Also, your company should conduct a mock recall once distribution has begun. This will ensure that the distributor is compliant with the requirements for maintaining distribution records. The instructions for conducting a mock recall will be included in the revisions to the recall/advisory notice procedure described in Step 6.

Step 8: Training

The most common root cause of audit findings related to the CMDR is a lack of understanding with regard to the regulatory requirements. A better procedure can help, but there is no substitution for training on the CMDR. The CMDR is relatively easy to understand when compared to European Regulations, and the CMDR is shorter in length than US FDA regulations. However, most people have a lot of difficultly understanding the jargon of medical device regulations unless they are a regulatory expert. Therefore, it is essential to develop training that summarizes the CMDR for anyone in your company that will be involved with complaint handling, adverse event reporting, recalls and regulatory submissions–including design changes.

Medical Device Academy has a recorded webinar designed explicitly for company-wide training when companies are preparing for CMDCAS certification: http://bit.ly/CMDCAS-webinar. The cost of the webinar is $129, and there is a 10-question exam to verify the effectiveness of training. The exam costs $49 to grade, correct answers are explained for each question, and a certificate is issued for a passing grade of 70% or more.

Step 9: Internal Auditing

Your registrar will verify that you conducted an internal audit of the quality system for compliance with applicable sections of the CMDR. This can be performed by one of your internal auditors or a consultant. The audit can be completed on-site, but sometimes a remote desktop audit will suffice. Since there will be no records of distribution, licensing, complaints, or recalls before the CMDCAS certification–there is little value in conducting an on-site audit before certification. The duration of the internal audit should not exceed a day. It typically can be completed in four hours by an experienced auditor–plus a couple of hours of audit report writing.

Step 10: Conducting the CMDCAS Certification Audit

Your registrar conducts this step. Any audit findings will require a corrective action plan that is accepted by the auditor before the new certificate can be issued. The new CMDCAS certificate will look very similar to the existing certificate, but there is typically an additional logo indicating compliance with CMDCAS. This is not the same as the SCC logo indicating accreditation by the Standards Council of Canada. Once the initial extension to the scope is completed, the continued certification is evaluated as part of the normal surveillance audits and re-certification audits.

Step 11: License Application Submission

For a Class 2 device license application, you need to complete a form, send a check, and include a copy of your new ISO 13485 Certificate with CMDCAS. The response from Health Canada is typically within 15 days or less–depending upon the current workload. Class III and IV device license applications are more complex and require technical documentation–including a clinical evaluation.

The timelines for approval of a Class III or IV device license is closer to the timeline for a 510(k) clearance letter from the US FDA. Health Canada’s Device Licensing Division is quite responsive to email inquiries, and they will respond to voicemail messages. Once a license is issued, it is typically faxed to the company, and a hardcopy is mailed. I recommend a dedicated fax number for your regulatory affairs department.

Medical Device Academy, Inc. has a complete set of generic quality system procedures–including Canadian Medical Device Licensing and Mandatory Problem Reporting. Since the requirements for reporting adverse events is quite different in each country, it is not recommended to combine these procedures with other procedures. The cost of purchasing generic procedures from Medical Device Academy in a native MS Word Format is $300/procedure. Purchase grants your company a non-exclusive license to the content of the procedure for internal use. Please email Rob Packard if you are interested.

11 Steps to Obtaining CMDCAS Certification-Part 2 Read More »

Nonconforming Materials Disposition

Nonconforming materials disposition can be simplified into four categories: scrap, return to supplier, rework, and use as is.

Disposition of Nonconforming Materials-21 CFR 820.90 Compliance

Nonconforming materials disposition

In our previous blog, we focused on requirements to identify and segregate non-conforming materials. Once nonconformities are labeled and locked in your quarantine cage, what do you do next? The next step in the process of determining nonconforming materials disposition. The most common dispositions are:

  • Scrap
  • Return to Supplier (RTS)
  • Rework
  • Use As Is (UAI)

Some companies also have dispositions of sort and repair. The sort is not a disposition and often creates confusion for anyone auditing records of nonconforming materials. Sorting is the process that you must perform when a lot of material fails to meet acceptance criteria. Still, some of the individual units within the lot meet the acceptance criteria. In this scenario, the following sequence of events is recommended.

Click here to subscribe to our blog feed

Sorting nonconforming materials

First, the lot is segregated from a conforming product, and an NCR number is assigned. Next, the lot is 100% inspected for the defect, and the results of the inspection are recorded on the inspection record. It is important to record the specific number of non-conforming units on the NCR record–not the total amount inspected. The final step is to release a conforming product back into the production process or warehouse, and the Material Review Board (MRB) will disposition the units identified as non-conforming.

If identifying a non-conforming product requires an inspection method that is not typically performed, then the inspection plan needs to be corrected, or a corrective action plan is needed. New and unforeseen defects may indicate a process change, a change in the raw materials, or inadequate training of personnel at your company or your supplier. An investigation of the root cause is needed, and it is recommended to consider documenting this investigation as an internal CAPA or a Supplier Corrective Action Request (SCAR).

Material Review Board (MRB) determines the nonconforming materials disposition

Most companies have a “Material Review Board” (MRB) that is responsible for making the decision related to the disposition of non-conforming material. Typically, the MRB will be scheduled once per week to review the most recent nonconformities. The board usually consists of a cross-functional team, such as:

  • Quality Assurance
  • Research & Development
  • Manufacturing
  • Supply Chain
  • Regulatory

The reason for a cross-functional team is to review the potential adverse effects of rework and potential risks associated with a UAI disposition. If rework is required, the cross-functional team will typically have the necessary expertise to create a rework instruction and to review and approve that rework instruction–including any additional inspections that may be required beyond the standard inspection work instructions.

Scrap

If the material is going to be scrapped, there is no risk to patients or users. Therefore, the entire MRB team should not be required to scrap products. Because there may be a cost associated with a scrap of non-conforming products, it is recommended that someone from accounting and a quality assurance representative approve scrap dispositions. Other departments should be notified of scrap, but a trend analysis of all non-conforming products should be reviewed by each department and by top management during management reviews. Auditors and FDA inspectors, specifically, will be looking for evidence of statistical analysis of non-conforming material trends and the implementation of appropriate corrective actions.

Return to Supplier (RTS)

Returning non-conforming material to the supplier that produced it is the most common disposition, but the trend of RTS should continuously be improving. If the trend of RTS is not improving, your supplier qualification process or your supplier control may be inadequate. The best way to ensure that the trend is improving is to initiate a SCAR. Some companies automatically wait until they have a trend of non-conforming material before initiating a SCAR. However, if you wait until a defect occurs twice, you are doubling the number of nonconformities for that root cause. If you wait until a defect occurs three times, you are tripling the non-conformities. For this disposition, there also does not need to be approval from the entire MRB. Typically, only someone from the supply chain management and quality assurance are needed to return non-conforming products to a supplier.

Note: You should not always wait until there is a “trend” to request supplier corrective action.

Rework

Almost every auditor looks for a specific phrase in the procedure for Control of Nonconforming Material: “The MRB will review and document the potential adverse effects of rework.” Most companies are doing this, but the procedures often do not specifically state this requirement, and rework instructions are often missing any specific inspection instructions that have been added to reduce risks associated with the rework process. Repeating the normal inspection criteria is seldom adequate for reworked product because the rework process typically results in different defects.

Another phrase that auditors and inspectors are looking for is the requirement to document the rework instructions and to have the instructions reviewed and approved by the same functions that reviewed and approved the normal production process. This requirement is often not specifically stated in the procedure, and FDA 483 inspection observations are commonly issued for this oversight.

Use As Is (UAI)

The UAI disposition should be rare. When I see a large number of NCRs with a disposition of UAI, I expect one of two reasons for this situation. First, the NCRs are for cosmetic defects where the acceptance criteria are too subjective and inspectors need clear guidelines regarding acceptable blemishes and unacceptable nonconformities. The visual inspection guides used during solder joint inspection for printed circuit boards are an excellent example of best practices for clearly defining visual inspection criteria. Personally, I prefer to use a digital camera to take pictures of representative “good” and “bad” parts. Then I create a visual inspection chart with a green, smiley face for “good” and a red, frowny face for “bad.” The best inspection charts identify the proper inspection equipment and quantitative acceptance criteria with pictures and symbols instead of words.

The second reason for a larger percentage of UAI dispositions is that the product specifications exceed the design inputs. For example, if a threaded rod needs to be at least 1” long, but 1.25” long is acceptable, then you should not approve a drawing with a specification of 1.00” +/- 0.05”. Often, the legend of drawings will define a default tolerance that is unnecessary. A more appropriate specification would be 1.13” +/- 0.12”. No matter how much work it is to specifically define tolerances for each dimension on a drawing, the work required to do this at the time of initial drawing approval is much less than the work required to justify a UAI disposition. FDA inspectors will consider a UAI disposition as a potentially adulterated or misbranded product, and a formal Health Hazard Evaluation (HHE) may be required to justify the reason why the product is not recalled.

Regardless of the disposition of the product, the decision for disposition should be a streamlined process that is not delayed unnecessarily. In order to ensure that your non-conforming material dispositions are effective and processed in a timely manner, our next blog in the series about control of non-conforming materials will focus on process interactions, monitoring and measuring of non-conforming product and when to initiate a CAPA or SCAR to prevent more NCRs.

Nonconforming Materials Disposition Read More »

Scroll to Top